How to compress files and folders in Windows XP/Windows Vista?
- Locate the file you want to zip.
- Right click on the file and select “Send To” and “Compressed (zipped) Folder.” This will create a new compressed folder with the same name as the file but with the extension .zip.
- To add another file to this zip,right click on the other file and select “Copy.”
- Next right click on the compressed folder created in step 2 above and select “Paste.” The copied file is pasted into the compressed folder. Repeat steps one to four until all the files are copied to your compressed folder.
How to password protect zip file or compressed folder in XP?
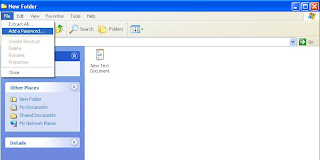
- Right click on the compressed folder and select “Explore.”
- In “File,” select “Add a Password.” Enter the password and confirm the password.
How to remove or disable password for zip file or compressed folder?
- Right click on the compressed folder and select “Explore.”
- In “File,” select “Remove Password.”
However file names in password-protected zipped or compressed folder are visible though the files themselves are inaccessible without the password. If you like to hide the file names, zip or compress the file(s) and add it to the password protected zipped or compressed folder.


