Security dominates discussions about wireless communication. Sure, the whole wireless phenomenon still makes all the news stories, especially when it comes to high-tech news.
With Wi-Fi becoming the catch-all term of this decade the way Web dominated the ‘90s, but no matter how innovative, how exciting, how flat-out cool journalists and marketers paint the wireless landscape, questions about security follow close behind and, in many cases, even lead the way.
The reason is simple: remove the wires and you simultaneously remove the access restrictions. Wireless networks provide less built-in security than any type of network in computing history.
In fact, many wireless networks begin life completely unsecured because vendors design APs and WLAN cards with ease of use in mind, and configuring security settings almost never equates to ease of use, at least not in the minds of home or small office purchasers.
For this reason, the vast majority of Wi-Fi equipment ships with security disabled. If you want a secure network, you have to set it up intentionally and consciously because the equipment won’t do it for you. Why not?
First, wireless security has proven difficult to implement. For that matter, electronic security of any kind has proven exceedingly difficult to guarantee to any degree whatsoever.
If you don’t believe that, look at all the critical updates Microsoft makes available, for all flavors of Windows, as downloads from their Web site or via Windows Update. The vast majority of these updates deal with issues surrounding intruders from the Internet, and the Internet remains primarily wired, not wireless.
If a company with Microsoft’s resources, and with Microsoft’s control of its product, can’t protect your PC from intruders that enter through wired communication, what chance does anyone have of securing communication through much more accessible radio waves between much less controllable technologies?
Secondly, wireless and convenience go hand in hand. Cellular phones and Wi-Fi networks sell themselves because they do away with tethering, with the need to do your computer work, or your phone calling, with a wire restricting your motion and creating unsightly or even dangerous obstacles across your floor.
For a product to sell its convenience, it has to follow the sale with a performance emphasizing convenience, something a requirement for encryption and authentication configuration would do little but dispel.
To be sure, the recent expansion of media coverage about identity theft and other high-tech dangers promises to force vendors to merge convenience with security in their products, and high-tech consumerdom might very well have reached the point where security has actually become a part of convenience.
But to date most products let you set up your wireless network most easily, and with the greatest speed, without security of any kind in place. Even so, you can easily detect a trend toward security.
Install a new router/AP device today, and you’ll likely encounter a wizard that steps you through the process of configuring your WLAN with encryption and authentication security in place.
Windows XP Service Pack 2, set for release roughly, offers a WLAN creation wizard that forces you through the security setup without an option to avoid it. This tutorial outlines Wired Equivalent Privacy (WEP), the most common and basic method of WLAN security and authentication.
Access Point and Adapter Settings
You should always consider enabling WEP only after you know that your WLAN works properly. If you don’t, you can easily run into the classic computer problem of not knowing which component isn’t working properly.
True, you’ll have a few minutes of an unsecured WLAN on your hands, but unless someone’s sitting outside your door waiting to receive a signal, you won’t likely be in much danger of intrusion until you can get WEP up and running.
As with everything else to do with wireless networking, you should configure the access point before bothering with the WLAN adapters on the networked PCs.
You don’t actually need to do it in this order, especially if you have only one or two clients to connect, but you’ll have to adjust the AP at some point, so it makes sense to do so right away. This demonstration will operate in that order: AP first, network clients afterwards.
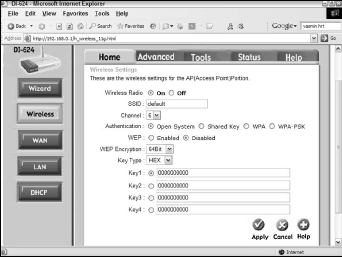
To begin, take a look at Figure 1.
This figure shows the D-Link DI-624 router’s configuration screen in its factory state, with an SSID of “default,” the channel set to 6, and the authentication configured as open system.
In the process of configuring security for your WLAN, you’ll alter only the WEP-related settings, even though you could change several others, including the SSID and the channel, to make the WLAN even more secure.
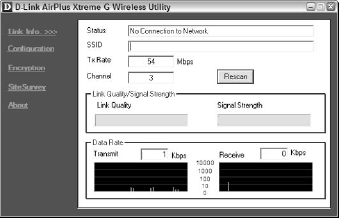
In addition, look at Figure 2.
This figure shows the D-Link utility for the company’s DWL-G650 CardBus WLAN adapter.
Like all utilities included with wireless adapters, you can access this one from any Window 9x or Windows 2000 PC, but in Windows XP it’s available only when you deselect the option “Use Windows to configure my wireless network settings” on the Wireless Network Properties dialog box.
Microsoft has built 802.11x support directly into Windows XP, in part to eliminate the need for proprietary utilities, but in many cases, especially when configuring WEP or WPA security, you’ll quickly discover that the proprietary utilities work more easily and often better than those built into Windows XP.
Enabling WEP Encryption
The first step in providing WEP security, for this AP at least, is to turn WEP encryption on. To do so, click the Enabled radio button in the middle of the screen, beside the WEP heading.
To keep the WEP key relatively simple, but still somewhat effective, choose 64-bit WEP encryption and a hexadecimal key type (note that the DI-624 does not support 40-bit encryption, only 64-bit and 128-bit).
For the sake of demonstration, although certainly not something you’d do if you hope to have any true degree of security, use the key 0123456789. The ten digits are required for a 64-bit hexadecimal, but you don’t have to remember that fact.
If you type too many or two few digits, the D-Link utility displays an error message telling you the legal length of the key. Once you have the key you want, click Apply. With the access point now the way you want it, the next step is to configure the client PCs so they can connect to the AP.
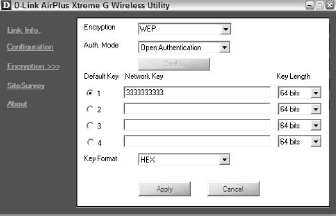
Figure 3 shows the D-Link utility on the laptop, set to match the configuration on the AP.
Note that WEP encryption and open authentication are both selected, with the network key typed into the first key field, and the key set to 64 bits and hexadecimal format. Every single detail between the two devices must match, or they will not be able to communicate.
If you discover later that you cannot connect an adapter to your AP, open the configuration menu in each and study them carefully to ensure that they match precisely. Otherwise, you won’t have the network you want.
Of course, not all networks contain PCs with identically matching equipment. You might very well have two notebooks with D-Link adapters, two with Linksys adapters, and another two with Microsoft adapters.
Fortunately, 802.11b and 802.11g are standards, so theoretically any adapter you buy should work with any access point you buy, as long as both share at least one of the 802.11 protocols.
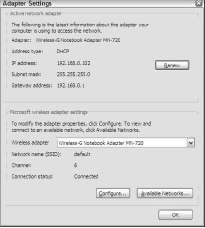
Figure 4 shows the utility supplied with the Microsoft MN-720 Wireless Notebook Adapter.
After installing the software and inserting the card in the PC Card slot of the laptop, a connection wizard automatically runs.
On Windows XP, the operating system takes over from the wizard, allowing you to connect through it instead.
But in any case the utility remains available, even if, unlike other vendors’ utilities, you check the Wireless Network Connection Properties box instructing the connection to use Windows to configure the networks.
With this option selected, clicking the Configure button yields the standard Wireless Network Connection Properties dialog box, which once again differs among Windows XP, XP SP1, and XP SP2. For this demonstration, therefore, only the proprietary configuration utility will be used, which appears in Figure 5.
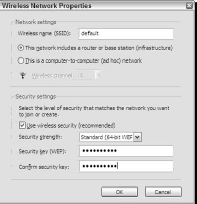
This figure shows the SSID of the AP to which the network card has already connected, and also the checkbox for configuring wireless security.
Note that, out of the box, this product supports WEP only, not WPA. That’s because the pictured PC is running on Service Pack 1, which, like all earlier Windows XP versions, requires you to download a patch to use WPA security.
This limitation obviously does not affect this tutorial, which deals with WEP anyway, so we will proceed with the adapter as installed.
Configuring the Microsoft adapter for WEP encryption is very similar to configuring the D-Link adapter. Click the Use Wireless Security checkbox, select Standard (64-bit WEP) from the Security Strength drop-down menu, and type the security key in the two remaining fields.
The confirmation is necessary because Microsoft’s utility treats the keys like passwords, displaying bullets instead of alphanumeric symbols when you type, so confirming gives you reassurance that you’ve typed the right characters.
The primary difference between the two utilities lies in the number of keys you can include. The D-Link utility accepts four WEP keys, matching the D-Link access point, while the Microsoft utility lets you type only one.
As a result, if you change the WEP key regularly, as you should in order to gain the best possible security, on the Microsoft utility you must type the new key from scratch, while on the D-Link you need only select the next one on the list.
You could argue—as Microsoft probably does—that storing four possible keys in the utility allows would-be intruders to steal the information more readily, but this argument applies primarily to people who have access to the notebook itself.
Still, there’s certainly nothing wrong with retyping the security key each time you change it—it merely becomes tedious if you have a network of more than a few PCs.
Once you have applied your settings through the adapter’s utility, all that remains is to test to see that your secure network functions. Check the status screens for the AP and all your adapters to make sure they state that WEP encryption is in place.
Next, use My Network Places to ensure that you can still connect to the same network resources, including printers and shared folders. Finally, open a Web browser and navigate around the Internet to make sure that the shared Internet connection remains in place.
Configuring Authentication
Now that you have WEP encryption in place, a few more clicks will give you additional security in the form of Shared Key authentication. On the utility for the access point, select the Shared Key option and click Apply (depending on the interface of your particular AP).
Next, on your WLAN adapter’s configuration screen, enable Shared Key authentication as well. On some utilities, this option is easy to locate. Oddly enough, however, on Microsoft’s it is not.
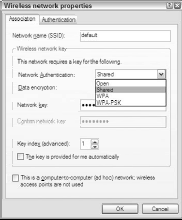
In fact, to configure the adapter to use Shared Key authentication, you must open the Wireless Network Connection Properties dialog box, click the Configure tab, and choose Shared from the Network Authentication drop-down menu.
Figure 6 shows this menu in the process of being configured.
Once again, don’t consider the network setup complete until you’ve tested the connections.
Ensure that you can print across the network and that you can upload and download files to the appropriate shared locations. And again, test the Internet sharing.
If you can’t get onto the Internet, undo the authentication and try again until you can do so. Otherwise, the entire purpose of the infrastructure network might well be lost.
Upping the Ante to 128-bit Encryption
Once you have 64-bit WEP encryption in place and functioning, you have a much more secure LAN than you did before configuring your access point and wireless adapters to use WEP.
But as noted earlier, 64-bit WEP, while certainly stronger than the older standard 40-bit WEP, is still much more prone to intrusion than even higher degrees of security. To provide an even better guard against unwanted access, configure your WLAN for 128-bit security.
Once again, you perform this configuration in two locations: on the AP, and on each WLAN adapter. This time, however, the length of the security key changes, the primary reason for the security enhancement.
A longer key means less chance of breaking the code of that key, and thus less chance of intruders finding a way to include the key in their own adapter configurations to use your network. The key lengths are as follows:
- 64-bit ASCII—5 characters
- 64-bit hexadecimal—10 characters
- 128-bit ASCII—13 characters
- 128-bit hexadecimal—26 characters
As you can see, the hexadecimal key type doubles the key length over the ASCII key type for both security strengths.
But moving from 64-bit to 128-bit with either type more than doubles the length in each case, and changing your configuration from 64-bit ASCII to 128-bit hexadecimal more than quintuples the length of the key.
The result: an exponential decrease in the probability of cracking your key, and almost no chance of simply guessing it. As you probably expect, intruders have come up with numerous tools to do the cracking for them, so saying a 128-bit hexadecimal key network gives you true security is inaccurate.
Keep in mind, however, that one of the primary goals is to prevent casual access to your network, or even casual and beyond, so by all means choose the strongest possible security you have available. As with passwords, you should make the key as difficult as possible to guess.
Practically, this means you need to write it down so that you can type it into appropriate configuration fields on each WLAN adapter, unless you develop a mnemonic system that will let you recall it.
Even here, though, remember to store it somewhere you can find it because even the best mnemonic system breaks down unexpectedly at precisely the wrong time. Murphy’s Law and all that.
As with 64-bit WEP (or 40-bit, if you have that available), once the new encryption strength is in place on the AP, you need to configure all WLAN adapters to use it as well. Load your adapter’s utility, make the changes by selecting 128-bit security and typing the new key in the appropriate field(s).
If you use Windows XP, you might be better off at this stage using the built-in networking utilities, primarily because Windows XP simply connects more effectively when you do. Starting with Service Pack 1, you don’t even need to specify if you’re using 64-bit, 128-bit, ASCII, or hexadecimal.
The Windows XP dialog boxes are designed to accept only keys of the required length—5, 10, 13, and 26 characters—and when you click OK, the operating system adjusts itself to use the appropriate encryption.
