Most two-or three-node networks have simple needs. They share an Internet connection and possibly a printer, and they have access to a set of shared folders for easy transfer of files among them.
Windows XP sets up such a network straight out of the box. As soon as you install the networking components during Windows setup, you create a Shared Documents folder specifically designed for availability to all network users. When you install Windows XP, you also create one or, typically, two or three user accounts.
Every Windows XP installation includes an Administrator account, established early in Setup, and towards the end of the Setup process you can set up five additional accounts, before you fully launch Windows itself (at which point you can create many more).
Each account contains a set of folders unique to that account, all of which are shareable across the network. Later in this tutorial we outline the uses of user accounts; for now the point is that they exist, and they can share specific resources according to the specific needs of each user.
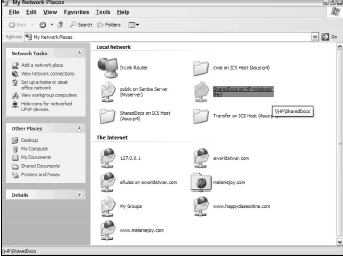
Figure 1 shows the My Network Places folder for a computer with several available shared resources.
This folder has two parts: Local Network and The Internet.
Folders in The Internet area refer to Web sites and FTP sites to which this PC has connected for the sake of downloading or editing Web sites.
In this case the addresses appear courtesy of Microsoft FrontPage, which counts each edited Web site as a Network Place.
Although these folders are most certainly valid for listing here, the folders in the Local Network area are commonly considered shared network folders in the more standard sense of the term.
In this area you see all available shared folders. In this case, two of those folders are actually on different PCs.
Those listed as belonging to ICS Host are in fact located on the PC where we took the screenshot; Windows considers those folders as network folders, even though they reside on this PC, because they are simultaneously local resources and local network resources.
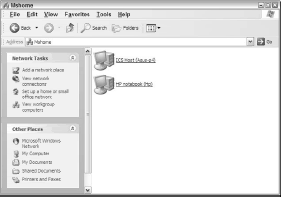
Understanding this feature becomes crucial when understanding how Windows creates and configures networks. To Windows, unless otherwise stated, everything belongs to the network. A much less populated network folder appears in Figure 2.
Here, the only two network locations available to the PC are itself and a desktop PC called ICS Host.
In this particular case, the PC belongs to a network of only two nodes.
Only the local folders are available at all; the second PC is visible on the network but has no shared folders.
The two situations shown in Figures 1 and 2 demonstrate Windows XP’s ability to restrict network access to specific PCs. This feature becomes increasingly important as your network grows.
If you don’t configure the restrictions, you can end up with lost files and other problems, often innocently caused by users trying to manipulate files without realizing their shared status.
This tutorial is concerned in part with creating these restrictions to make the network behave precisely as you need it to, but also with ensuring that each user has access to precisely the necessary resources.
Sharing Files
Shared files appear in the My Network Places folder. You can access this folder directly from the Start menu, or by opening My Computer and clicking My Network Places on the left. For the most efficient file operations, however, open Windows Explorer.
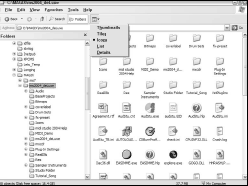
Figure 3 shows the two panes of Windows Explorer, the Folders pane on the left and the Files pane on the right.
You can also see the Views drop-down menu, which enables you to adjust the Files pane to display the contents in one of several different ways.
This example shows the Icons view, but you can choose Thumbnails (icon-sized reductions of picture files), Tiles (large icons), List (small icons), or Details.
The Details view displays the filenames down the left column, along with a small icon for each, and information columns showing the size of the file, the file type, and the date last modified.
By right-clicking the headings row, you can add or delete information columns until you have the Details view customized to your tastes. Of course, any folder view in Windows offers the same multiple Views options, so this by itself offers no reason to open Windows Explorer in particular.
Having the two side-by-side panes, however, does. Unless you establish a practice in which you want users to work directly from shared folders, opening and saving their documents to these folders, users will want to transfer the files they need to their own PCs, work with them, and transfer them back to the shared folder.
They could open two separate folders and drag files from one to the other, but using the two panes of Windows Explorer speeds up the process and offers better control overall.
Furthermore, and despite Microsoft’s seeming insistence to the contrary, using the two panes for transfer among folders is far more intuitive than using standard single-pane folders. All of which raises the question of how to share a folder in the first place.
It’s simple, actually. Just open either Windows Explorer or My Computer, navigate to the folder you wish to share, right-click the folder name, and choose Sharing and Security from the pop-up menu.
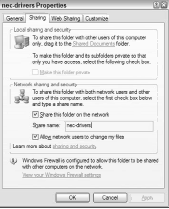
Alternatively, choose Properties from the menu and then click the Sharing tab on the dialog box that appears. Next, click the “Share this folder” checkbox. Figure 4 shows the dialog box after clicking the checkbox for sharing the folder on the network.
Windows fills in the Share Name field with the existing name of the folder, but you can rename it to make its function more apparent to anyone who locates the folder for use.
Several other points of interest appear on this dialog box.
First, users accessing the folder from the network cannot alter any of the files, unless you click the checkbox allowing them to do so (“Allow users to change my files”). Don’t confuse this feature with actual security, though.
Although users can’t change the files, they can copy them without restriction. Think of this feature as a safeguard against important files being edited, and you have the right perspective.
At the top of the dialog box you can see the settings for local sharing and security. The dialog box instructs you to share the folder by dragging it into the Shared Documents folder, which of course is already available to all users, so the instruction seems rather redundant.
What makes Local Sharing and Security interesting is the box labeled, “Make this folder private,” a powerful feature that you’ll frequently find grayed out, as it is in this figure. Each user can make a folder private only if it’s located inside that user’s specific file structure, within Windows XP’s Documents and Settings folder.
In the Documents and Settings folder (located on the same drive as Windows XP) exists a set of subfolders under each user’s parent folder (which bears each user’s username), and only those folders are available for privatizing.
Functionally, this feature means that anyone can block access to his specific Documents and Settings folder, and its subfolders, by making his files private and password protecting his account. Furthermore, even though the dialog box does not say so, nobody on the network can access that folder either.
The difference between the two sections of the dialog box is this: Except for folders made private (and only those within your account name in the Documents and Settings folder can be private), anyone logging on to a specific PC can access all folders on that PC.
By contrast, to allow people on the network to access a folder, no matter where it resides, you have to share it using the Network Sharing and Security section of the dialog box.
The upshot of this is that a folder made private is available to no one at all, whether on the network or on that PC, and is thus the most effective privacy setting of all. Denying access, of course, is the other side of sharing. Windows XP actually offers two file sharing interfaces, Standard and Simplified.
By default, the operating system uses Simple File Sharing, but you can switch to the more powerful Standard system by opening the Folder Properties dialog box (from Control Panel or via the Tools menu in My Computer), choosing the View tab, and unchecking the option labeled “Use simple file sharing.”
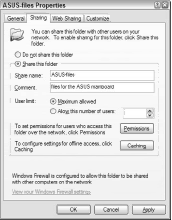
Figure 5 shows the Sharing tab on Windows XP’s alternative Properties dialog box, which appears when Simple File Sharing is toggled off.
The Standard file sharing options aren’t quite as easy to use, but they do offer a significantly greater range of options.
Here a folder named ASUS-files is being shared with the network, and a description of the folder has been typed into the Comment field.
Oddly enough, this comment doesn’t do anything for anyone else on the network; you would think it would appear in the My Network Places folder on all other machines, to help people know what the folder contains, but no such luck.
Apparently, it exists solely for the benefit of the sharer of the file, surely the person who needs the comment least. The primary difference between this Properties dialog box and that for simple file sharing is the ability to control access by user.
Other options, also visible in Figure 5, enable you to restrict the number of users who can get access to that folder at any given time, and also let you configure the way the folder works for users using Windows’ offline access feature.
To restrict the number of users, click the “Allow this number of users” radio button and use the arrow keys to choose the number you want (or type it in).
Configuring caching settings is well beyond the scope of this tutorial, but in effect enables you to determine whether or not you will allow the users on your network to store local copies of files they retrieve from shared folders.
The benefit of caching is speed of access each time the user loads the file; the disadvantages, as you’ve no doubt guessed, are lessened security and possible confusion.
Not only do you suddenly have a shared file on another PC, an obvious security risk, you also have users potentially working with outdated versions of important files. As soon as you click OK to enable the sharing of a folder, its icon appears in the My Network Places folder of all PCs connected to the workgroup.
Sharing a Printer
Most small networks consider printer sharing even more important than file sharing. Indeed, for a home network or a small office network, sharing a printer can save a considerable amount of money, especially when more than one user requires more than one kind of printer.
Even on a home network of three PCs, with each person needing color inkjet printouts for some purposes and black and white laser printouts for others, being able to let all users print on both printers without the need for moving the printers or transferring the files becomes, at the very least, a major convenience.
To share a printer, open the Printers and Faxes folder from the Start Menu or Control Panel. Highlight the printer you wish to share, and click the Share this Printer link on the Printer Tasks menu.
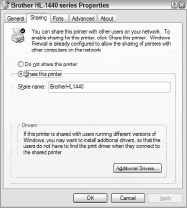
You can also right-click the printer’s icon and choose Sharing. On the resulting Properties dialog box (shown in Figure 6), select the radio button labeled “Share this printer” and, if Windows does not supply an easily recognizable name, edit the Share Name field.
 After clicking OK, the printer becomes available to anyone on the workgroup.
Before you click, however, determine if any workgroup PCs are running an earlier version of Windows, such as Windows 98, Me, or 2000.
If so, you can install drivers for that operating system on the printer host PC (the one to which the shared printer is physically connected), so that users attempting to print from their PCs do not encounter a “driver not found” error, and instead download the drivers from the host automatically.
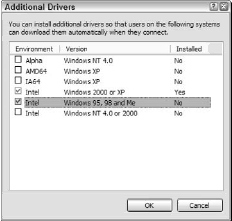
This option, as seen in Figure 7, can prove extremely useful on small office networks with mixed operating systems, a fairly typical scenario.
You get to this dialog box by clicking the Additional Drivers button on the Sharing tab; you can see this button in Figure 6.
Choose the operating systems that has the printer driver you wish to make available and click OK.
Windows prompts you for the location of the driver and, once you have located it, installs it on your PC.
Sharing the printer does not automatically make it available to the workgroup users; they still have to install the printer on their systems on their PCs via the Add Printer Wizard.
To do so, access a network PC and open the Printers and Faxes folder. Click Add a Printer and click the radio button labeled “A network printer, or a printer attached to another computer.”
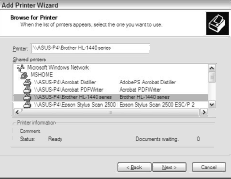
Clicking Next takes you to the Specify a Printer screen, on which you have three choices: browse for a printer, type the name of a printer on the network, or type the URL of a printer connected to the Internet or your local intranet.
For small networks, browsing works perfectly fine, so select it and click Next. On the resulting Browse for Printer screen (see Figure 8), choose the appropriate printer and click Next.
Windows warns you about the security dangers of downloading drivers, and when you click Yes, locates the driver for that printer, either on its own hard drives or the network (assuming you’ve made the driver available through the printer sharing process outlined above).
After installing the driver, the printer is ready for use from the network PC.
Standard File Sharing
Figure 5 shows the standard sharing dialog box, available when the Simple File Sharing option is unchecked in Folder Options. Two primary elements come to the fore for the purposes of creating a more secure and user-specific infrastructure network: User Limit and Permissions.
The User Limit feature lets you restrict access to the shared resource to a specific number of users at one time. For example, if you want to ensure that only one person can edit a document file or a graphics file at any one time, click the radio button labeled “Allow this number of users” and use the arrow buttons to set the number to 1.
If you have a group of employees working on a document and you want no more than four to be able to access it during a meeting, set the User Limit to 4 before the meeting begins and reset it to Maximum (or the previous limit) after the meeting.
The problem with this approach is that it restricts the number of people accessing the shared resource, but it does not specify who. To restrict access to specific users or groups, follow these steps:
- Open the Properties dialog box for the folder you wish to share.
- Click the Sharing tab, and then click the Permissions button.
- On the resulting Permissions dialog box, check to see if the Everyone account is listed. If so, select it and click the Remove button to prevent access from all users.
- Click the Add button.
- On the resulting Select Users or Groups dialog box, click the Advanced button.
- Click the Find Now button.
- Highlight the users and/or groups to whom you wish to grant access and click OK. Note that you can select multiple entries by holding the Ctrl key as you click on each one.
- Click OK to add those Users/Groups to the list.
- Click OK again to return to the Permissions dialog box.
- Select a user from the Group or User Name list and check the appropriate boxes in the Permissions list at the bottom of the dialog box.
You can enable each user to read the item only, change it, or have full control over it (which allows deletions as well). Be careful here, because this is your primary form of control over who gets to do what to each resource.
