Showing posts with label SSH. Show all posts

Configuring SSH to use Protocol 2 or SSHv2 in CentOS

To disable SSHv1 or SSH Protocol 1, do the following:

Check for Protocol configuration
# cat /etc/ssh/sshd_config |grep Protocol

Ensure that you should get only Protocol 2
Protocol 2

If not, Edit the /etc/ssh/sshd_config to reflect only Protocol 2
# vim /etc/ssh/sshd_config
Search for the word Protocol and make the necessary changes.

Restart OpeenSSH Server
# service sshd restart

Automatically load sessions with SSH

To run a program after the ssh, simply pass the program at the end of the ssh command
# ssh root@remote.server.com nano

To connect into a remote screen session, it is necessary to add the "-t" flag
# ssh -t root@remote.server.com screen -dr
According to the ssh man page, the "-t" flag force pseudo-tty allocation. This can be used to execute arbi-
trary screen-based programs on a remote machine.

For the screen command "screen -dr", it refers to reattaching a session and if necessary detach it first.

Very useful indeed

Resolving Warning Remote Identification has changed!

If you encounter the following error, this can be easily resolve....

@@@@@@@@@@@@@@@@@@@@@@@@@@@@@@@@@@@@@@@@@@@@@@@@@@@@@@@@@@@
@ WARNING: REMOTE HOST IDENTIFICATION HAS CHANGED! @
@@@@@@@@@@@@@@@@@@@@@@@@@@@@@@@@@@@@@@@@@@@@@@@@@@@@@@@@@@@

IT IS POSSIBLE THAT SOMEONE IS DOING SOMETHING NASTY!
Someone could be eavesdropping on you right now (man-in-the-middle attack)!
It is also possible that the RSA host key has just been changed.
The fingerprint for the RSA key sent by the remote host is
xx:xx:xx:xx:xx:xx:xx:xx:xx:xx:xx:xx:xx:xx:xx:xx.
Please contact your system administrator.
Add correct host key in /root/.ssh/known_hosts to get rid of this message.
Offending key in /root/.ssh/known_hosts:6
Password authentication is disabled to avoid man-in-the-middle attacks.
Keyboard-interactive authentication is disabled to avoid man-in-the-middle attacks.
Permission denied (publickey,gssapi-with-mic,password).

You can do a quick fix. In my case, I just simply edit the known_hosts file
# vim /root/.ssh/known_hosts
Search for the remote host that is having the issue. In this case (myserver.com)
:/myserver.com
Delete the "offending" line
:dd
Save the file known_hosts
:wq

Done!

Auto SSH Login without Password

The SSH daemon validates SSH client access by Linux system verification via /etc/passwd, or by public/private key cryptography approach.

By using the public/private cryptography approach, we can do a SSH without password.

In my write-up it is for root-to-root connection. You can use it for user connections


Steps 1: At the Host Machine

  1. Logon to the root home directory.
  2. Make sure the hidden .ssh directory has the permission 700. If not execute the command
    chmod 700 .ssh
  3. Change Directory to .ssh directory by executing the command
    cd .ssh
  4. Generate the public-private keys using the ssh-keygen command.
    # ssh-keygen -t rsa 
  5. The resulting file id_rsa and id_rsa.pub rsa type public key
  6. # ssh-copy-id -i ~/.ssh/id_rsa.pub remote-host
    (ssh-copy-id appends the keys to the remote-host’s .ssh/authorized_key)


Step 2: At the Remote Machine, test it out

  1. # ssh remote-host 
    (It should automatically login)
Reading Articles:

Using Putty, Xming to forward X11


If you are using Windows and you wish to forward X11 traffic to your windows. This is not a hard things. You need a couple of freeware


Step 1: At the Linux SSH Server
vim /etc/ssh/sshd_config
Ensure X11Forwarding yes


Step 2: Download Freeware

At your Putty session,

  • click on the host you wish to X11 forwarding
  • Go to Connection > SSH > X11 > "Enable X11 forwarding" > X display location "localhost:0"


Step 3: Install XmingNote: Xming uses Microsoft's OpenGL renderer interface as standard. If your display is quirky, download and use Xming-mesa usually render most clients that uses OpenGL

After installation of Xming or Xming-mesa
  • Launch Xming before you use SSH to forward X11
For more information, see Xming - PC X Server

Using Putty to have passwordless login

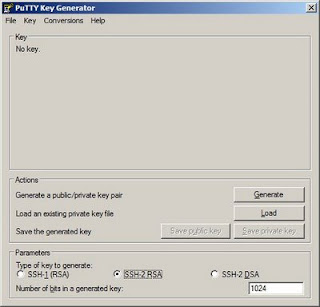
Step 1: Go to http://www.chiark.greenend.org.uk/~sgtatham/putty/download.html and download puttygen.exe


Step 2: Open PuttyGen.exe,
  • Click Generate
  • To provide randomness, move the mouse randomly on the blank are


Step 3:

  • Copy public-key by copying all the text in the public text-box

Step 4: Open Putty

  • Connection > Data.
  • Under ‘’ for the auto-login username
  • Connection > SSH > Auth (left column) > Browse to the private key
  • Save the setting

Step 5: Login to the linux server

  • vim ~/.ssh/authorized_keys2
  • Paste and save the public Key content saved in Step 3
  • chmod 700 ~/.ssh
  • chmod 644 ~/.ssh/authorized_keys2

Articles:

SSH Error : Permission denied (publickey,gssapi-with-mic,password)

One of our Linux accounts was having this issue with SSH
"Permission denied (publickey,gssapi-with-mic,password)"
One obvious symptoms of this problem is that it was possible to SSH in from external machine, but was unable SSH out of the problematic machine

To resolve this issue, you have to go to
$ cd /home/youruserid/.ssh/
$ vim config

Change the configuration to
BatchMode no
The option BatchMode specifies whether a username and password querying on connect will be disabled. This option is useful when you create scripts and dont want to supply the password. e.g. Scripts that use the scp command to make backups over the network.

For more information on SSH configuration, see

Reverse SSH

Thinking of using your LINUX box hehind a NAT? Here's how to do it....

First thing first:


  1. Make sure you have installed OpenSSH on the destination machine.

  2. ssh -R 1234:localhost:22 home_machine (where home_machine is the IP Address of your home computer)

  3. Once you have established the connection, from your home type: ssh your_name@localhost -p 1234

Similar Article from HowToForge: http://www.howtoforge.com/reverse-ssh-tunneling