In this example, we build a wireless LAN that consists of a wireless LAN user and an Access Points and that communicates with a wired LAN using a software−based VPN solution. The following are the network components that are necessary to build this LAN:
- A laptop computer equipped with ORiNOCO 802.11 Silver PC Card and Windows XP.
- A wireless LAN Access Points that supports the 802.1X protocol.
- A small Ethernet−wired LAN with a Windows 2000 Server and a desktop computer.
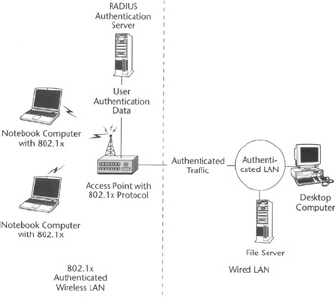
We further assume that the wired LAN is directly connected with the Access Points using one of the Ethernet jacks present in the rear of the Access Points, and that Alice and Bob are the users of the laptop and the desktop computers, respectively. Figure 1 shows us the desired configuration for the LAN equipment.
Let's walk through the steps to build our secure wireless LAN that uses the robust 802.1X and VPN connectivity. We will first set up the LAN to use the 802.1X, and then we will add the VPN support to the LAN.
Setup the 802.1X for Wireless LAN
The 802.1X solution we are presenting here consists of a wireless LAN adapter with 802.1X software driver, an 802.11 Access Points with 802.1X support, and a wired LAN that is directly connected to the Access Points and consists of a RADIUS server and a desktop computer.
In this example, we use Microsoft Windows 2000's Internet Authentication Service as our RADIUS server, Cisco 350 Series Access Points as the Access Points, and a client laptop computer equipped with ORiNOCO 802.11 Silver PC Card.
Configuring the RADIUS Server for the Wireless Users
Configuring the Windows 2000 Server's RADIUS service for use with our example server requires the following steps to be performed:
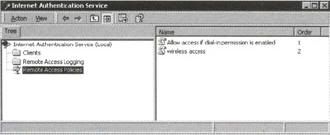
- Click Start, point to Administrative Tools, and then point to Internet Authentication Service. Figure 2 shows the Internet Authentication Service screen.
- Right−click on Clients, and Select New Client.
- Enter a name for your access point and click on Next.
- Enter the IP address of your access point, and set a shared secret. Select Finish.
- Right−click on Remote Access Policies, and Select New Remote Access Policy.
- Name the policy EAP−MD5, and click on Next. Click Add. In this screen you're basically setting conditions for using EAP−MD5 to access the network (consult Windows 2000 documentation for more information on the exact restrictions that you can impose).
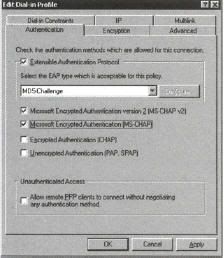
- Click on Edit Profile and select the Authentication tab. Figure 3 shows the authentication tab. Make sure Extensible Authentication Protocol (EAP) is selected. Deselect other authentication methods listed. Click OK.
- Windows asks you if you wish to view the Help topic for EAP; select No if you just want to get on with the installation. Click Finish.
Enabling Remote Access Login for Wireless LAN Users
- Click Start, point to Administrative Tools, and select Active Directory Users and Computers.
- Double−click on the user for which you want to enable authentication to bring up its account properties.
Select the Dial−in tab, and select Allow Access. Click OK.
Configuring the Wireless LAN Access Points for 802.1X Authentication Protocol
You must configure the Access Points to use the RADIUS server. We assume that you have already performed the Access Points configuration using the Bob's desktop computer, which is connected to the Access Points via the wired Ethernet LAN.
We assume that you have set the proper SSID and channel on which the access point will operate and that you have taken the proper steps to secure the access point itself. These instructions use the Web management interface, although the identical configuration options are available from the terminal connection.
It's important that you're running at least 11.08T firmware; as of this writing, the latest 11.10T is best. The following are the steps necessary to ensure proper setup of 802.1X:
- Log in to the Access Points Configuration setup using a Web browser.
- From the home start screen, select Setup.
- Select Security from under Services.
- Select Authentication Server.
- Under Server Name/IP, enter the IP address of the authentication server you've already set up with the Internet Authentication Service.
- Server Type should be RADIUS, port 1812, and enter the shared secret that you set in step 5 of the server setup. Timeout can probably remain at the default 20 seconds, and ensure EAP Authentication is selected.
- Select OK.
Enabling the 802.1X EAP Authentication
- Go back to the Security screen. Select Radio Data Encryption (WEP).
- Deselect all authentication types except for the Open options of Accept Authentication Type and Require EAP.
- Select OK.
The only way to ensure strong mutual authentication between Windows XP and the access point is to enable dynamic WEP. Without it, your machines are vulnerable to a man−in−the−middle attack. 802.1X port access authentication isn't enough by itself.
- Go back to the Radio Data Encryption (WEP) page.
- Enter the encryption key, and select the appropriate key size.
- Click OK.
- Go to the Radio Data Encryption page once again.
- Select Full Encryption from the Use of Data Encryption by Stations drop box.
- Click OK.
Configuring the Wireless LAN Adapter Software for 802.1X Protocol
For this task you should already be familiar with the steps required to install a wireless LAN adapter and the necessary software drivers; thus, we will examine only the configuration steps that are required for the 802.1X authentication support.
Enabling 802.1X Authentication for Wireless Card:
- Open up the properties for your wireless connection, either by right−clicking on My Network Places on the desktop and selecting Properties, or open up the Control Panel and select Network Connections (located under Network and Internet Connections if in Category View).
- Right−click on the Wireless Network Connection, and select Properties.
- Select the Authentication Tab, and ensure that Enable Network Access Control Using IEEE 802.1X is selected, and username/password−based EAP−MD5 is selected from the EAP type.
Enabling Encryption
- To enable encryption for a wireless network, click on the Wireless Networks tab.
- Select the wireless network on which you want to enable dynamic WEP from under Available Networks, and select Configure.
- Select Data encryption (WEP−enabled), and ensure The Key is Provided for Me Automatically is also selected.
Adding VPN Connectivity to Provide Higher Security
The preceding steps described how to improve WEP support, as defined in the basic 802.11 wireless LAN, by using the 802.1X authentication protocol. Adding VPN connectivity provides an additional layer of security that complements the security provided by the 802.1X protocol.
In this section, we present an example of setting up VPN connectivity between a wireless LAN client computer installed with Microsoft Windows 2000 OS and a computer on the wired LAN installed with Microsoft Windows 2000 Server.
Setting Up Windows 2000 VPN Gateway/Server.
Configuring Windows 2000 server for using as a VPN server includes the following steps:
- Install and enable VPN. Most of the VPN server components are preinstalled on the Windows 2000 server; still, you need to install some components and enable the VPN server.
- Configure the VPN Server. You also have to configure the security parameters for Point−to−Point Tunneling Protocol (PPTP), which provides data encryption using Microsoft Point−to−Point Encryption and the Layer Two Tunneling Protocol (L2TP) that provides the data encryption, authentication, and integrity using IPSec protocol.
- Set up users to access the VPN. You will have to set up the VPN server to allow the users you want to grant VPN access.
- Let's get started with setting up a Windows 2000 server as a VPN server.
Installing and Enabling VPN
To install and enable a VPN server, follow these steps:
- On the Microsoft Windows 2000 VPN Server, confirm that the connection to your local area network (LAN) is correctly configured.
- Click Start, point to Administrative Tools, and then click Routing and Remote Access.
- Click the server name in the tree, and then click Configure and Enable Routing and Remote Access on the Action menu.
- In the Common Configurations dialog box, click Virtual private network (VPN server), and then click Next.
- In the Remote Client Protocols dialog box, confirm that TCP/IP is included in the list, click Yes, All of the Available Protocols Are on This List, and then click Next.
- In the IP Address Assignment dialog box, select Automatically in order to use the DHCP server on your subnet to assign IP addresses to dial−up clients and to the server.
- In the Managing Multiple Remote Access Servers dialog box, confirm that the No, I don't want to set up this server to use RADIUS now check box is selected. Click Next, and then click Finish.
- Right−click the Ports node, and then click Properties.
- In the Ports Properties dialog box, click the WAN Miniport (PPTP) device, and then click Configure.
- Type the maximum number of simultaneous PPTP connections that you want to allow in the Maximum Ports text box. The maximum number may depend on the number of available IP addresses. For example, if you want to use only 25 IP addresses, enter 25 for the maximum number of simultaneous PPTP connections.
- In the Ports Properties dialog box, click the WAN Miniport (L2TP) device, and then click Configure.
- Type the maximum number of simultaneous L2TP connections that you want to allow in the Maximum Ports text box. The maximum number may depend on the number of available IP addresses. For example, if you want to use only 25 IP addresses, enter 25 for the maximum number of simultaneous PPTP connections.
Configuring the VPN Server
To configure the VPN server, follow the steps in the following paragraphs.
Configuring the Remote Access Server as a Router
For the remote access server to forward traffic properly inside your network, you must configure it as a router with either static routes or routing protocols so that all the locations in the virtual LAN are reachable from the remote access server. Follow the steps that follow to configure the server as a router.
Click Start, point to Administrative Tools, and then click Routing and Remote Access
- Right−click the server name, and then click Properties.
- On the General tab, click to select Enable This Computer As A Router.
- Select Local Area Network (LAN) Routing Only. Click OK to close the Properties dialog box.
Setting Up Addresses and Name Servers
The VPN server must have IP addresses available in order to assign them to the VPN server's virtual interface and to VPN clients during the IP Control Protocol (IPCP) negotiation phase of the connection process.
The IP address assigned to the VPN client is assigned to the virtual interface of the VPN client. For Windows 2000−based VPN servers, the IP addresses assigned to VPN clients are obtained through DHCP by default.
You can also configure a static IP address pool. The VPN server must also be configured with name resolution servers, typically DNS and WINS server addresses, to assign to the VPN client during IPCP negotiation.
Setting Up Users for VPN Access
By default, users are denied access to dial−up. Configure the dial−in properties on user accounts and remote access policies to manage access for dial−up networking and VPN connections.
VPN Access by User Account
If you are managing remote access on a user basis, click Allow Access on the Dial−In tab of the user's Properties dialog box for those user accounts that are allowed to create VPN connections.
Delete the default remote access policy called "Allow Access If Dial−In Permission Is Enabled." Then create a new remote access policy with a descriptive name, such as "VPN Access If Allowed By User Account."
For more information, see Windows 2000 Help. If the VPN server is also allowing dial−up remote access services, do not delete the default policy, but move it so that it is the last policy to be evaluated.
VPN Access by Group Membership
If you are managing remote access on a group basis, click Control Access through Remote Access Policy Radio on All User Accounts. Create a Windows 2000 group with members who are allowed to create VPN connections.
Delete the default remote access policy called Allow Access If Dial−In Permission Is Enabled. Next, create a new remote access policy with a descriptive name such as "VPN Access If Member of VPN−Allowed" group, and then assign the Windows 2000 group to the policy.
If the VPN server also allows dial−up networking remote access services, do not delete the default policy; instead move it so that it is the last policy to be evaluated.
Configuring the VPN Client
Follow these steps to set up a connection to a VPN:
- Log in as the administrator on the client computer. This option is available only if you are logged on as a member of the Administrators group.
- On the client computer, confirm that the connection to the wireless LAN is correctly configured.
- Click Start, point to Settings, and then click Network And Dial−Up Connections.
- Double−click Make New Connection. This will start the Network Connection Wizard. Click Next. The Network Connection Type screen will appear.
- Click on Connect To A Private Network through The Internet, and then click Next.
- Click Do Not Dial The Initial Connection. Click Next.
- Type the host name (for example, vpn.adme.com) or the IP address (for example, 111.111.111.111) of the computer to which you want to connect, and then click Next.
- Click to select For All Users if you want the connection to be available to anyone who logs on to the computer, or click to select Only for Myself to make it available only when you log onto the computer. Click Next.
- In Completing the Network Connection Wizard screen, type a descriptive name for the connection, and then click Finish.
Testing the VPN Connectivity
To test the VPN connectivity, follow these steps:
- Click Start, point to Settings, and then click Network And Dial−Up Connections.
- Double−click the new connection you just created.
- The VPN server should prompt you for your username and password. Enter your username and password, click Connect, and your network resources should be available to you in the same way they are when you connect directly to the network.


