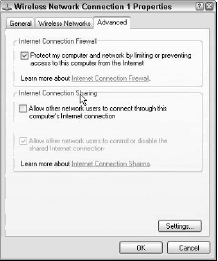
When you are connected to a hotspot, any protection that your home network afforded to you is missing for your new connection. It’s essential that you use a personal firewall when you connect in a public location.
Using your notebook without a firewall will make your notebook literally an open book, all of your files will be viewable over the Internet. You can turn on a firewall that is built into Windows by going to the Advanced tab of the Network Connection dialog box and checking the box entitled “Protect my computer and network by limiting or preventing access to this computer from the Internet.”
The feature is called the Internet Connection Firewall. In Windows XP Service Pack 2 this feature is substantially improved. If you aren’t going to use Windows’ built-in firewall, then by all means use a third-party firewall.
The top three choices are Norton Personal Firewall, ZoneAlarm, and BlackIce, but others worth looking at include eTrust, McAfee, Panda, PC-cillin, and Sygate.
When you open your browser, you may not be taken directly to the hotspot provider’s Web site and sign-up page. Depending on how you connect you may see your browser’s normal home page in the browser window.
That happens because your network settings direct you to that page, and the page is still in your cache. In that case you should click the Refresh button on your browser in order to force the page to reload.
If you can’t connect at all to the hotspot, you should check your proxy server settings. If you have set a proxy server, you will need to turn that feature off. Here, the tutorial about how you can turn off the proxy server for Internet Explorer.
If your computer has a proxy server client, you may find that the client shows up in the Status area of your Start menu with an icon. For Microsoft ISA server, when you double-click the icon you will see the Firewall Client Options dialog box, where you can disable your firewall.
Other firewalls have different methods for disabling them. However, it is still a good idea to go through the procedure shown earlier so that you’ve specifically turned off the proxy server.
Sometimes it is necessary to set a property called the preamble setting when a wireless NIC is unable to auto-detect the connection. To configure a preamble, follow these steps:
- Open the Properties dialog box for the wireless connection.
- Click the Configure button and then the Advanced tab.
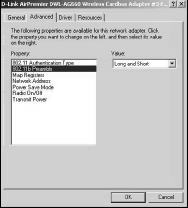
- Select Preamble Mode under Properties, and then for the Value settings, select “Auto Tx Preamble” (if that choice is available). The adapter shown in Figure below allows only a Long and Short and a Long only mode.
- Click OK twice to accept the setting.
- If the auto-detect doesn’t work, try the value “long” and then try the value “short” to see if that lets you establish your connection.
In situations in which you are sure that a wireless signal is strong in your area, but you can’t seem to detect it, always make sure that your wireless network card is enabled.
The lights on the card only indicate that the card is detected and configured by your computer (in most cases), but they don’t tell you if the card has been enabled or disabled. So right-click the icon on the Status bar and select Enable if it isn’t already selected.
Once you are sure that the connection is enabled, you may need to rescan to find the missing network. To rescan, do the following: open the Wireless Network Connection dialog box and click the Advanced button.
On the Wireless Network Connection Properties dialog box, click the Wireless Networks tab, and then click the Refresh button. The network should appear and allow you to connect.

