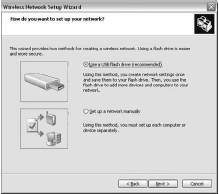
Windows XP Service Pack 2 ships with a Wireless Network Setup Wizard (WNSW), which is meant to provide an easy way to get your wireless connection up and running.
This wizard assumes that the small business office doesn’t have a central domain server or a dedicated professional or outside consultant who can help you set up a wireless connection. Many users have trouble turning on encryption and authentication.
Therefore the wizard lets you pick options such as WPA with a Preshared Key (PSK) and Temporal Key Integrity Protocol (TKIP) encryption without having to know much about them. The use of WPA/PSK-TKIP is highly recommended whenever practical.
The wizard will let you set up an open network with WEP, although that isn’t recommended. The best you can do with WEP is to select a strong WEP key; and the wizard walks you through this. A strong key is one that can’t be guessed from a dictionary of words or with numbers that identify you and the people or things around you.
The strongest keys are the ones that are random hexadecimal numbers and letters, and have the largest number of characters that the particular protocol allows. So the wizard does a conversion for you to a strong key.
It also makes sure that the same key is used on all other connected computers in your WLAN. One of the most common issues users have is that the setup of the different wireless devices on a WLAN varies.
Your access point might have a browser-based administration utility, while your NIC’s settings are selected in the Network Connections dialog box. Windows XP SP2 unifies settings to a degree by allowing you to configure settings for both WEP and WPA-PSK using a new feature called the Windows Smart Network Key, or WSNK.
Devices that have added WSNK will now register in the Wireless Network Setup Wizard. Some wireless devices that don’t have WSNK support can add this support through software or firmware updates.
Here are the steps in the WNSW:
- Launch the wizard from the Wireless Network Setup task or icon in the Network and Internet Connections folder.
- Enter the wireless network name, also known as the SSID.
- Set the authentication and encryption methods.
- Create a strong WEP or WPA-PSK key.
- Store the settings you just created into an XML file on a Universal Serial Bus flash drive.
Once you have a wireless configuration key on your USB storage device, plug that device as a key into any wireless device that supports WSNK, where it is read, copied, and installed.
Microsoft recommends that you start by configuring your access point first, and then proceed on to configuring your network computers. You’ll know that this system has worked because the USB drive will flash its status light three times.
- Put the USB device into your WSNK-compliant access point or router. Configure that device, automatically if you can, manually if you must.
- Put the USB device in your other network computers and install your settings on them. For computers, USB storage devices are supported in the Windows XP operating system automatically, and so when you put this device into any computer with Windows XP it is recognized automatically as a disk drive.
Open My Computer and you will see it there. If you’ve set this up properly, the wizard will autorun on the computer you’ve just inserted the device into, ask if you wish to join the network you have set up, and copy the wireless configuration profile.
- When you have completed all of the other device configurations, put the USB key into your starting computer and click Next to transfer all of those network settings to your computer. You will see a message that says that the wizard has successfully completed its task.
- If you intend to configure more devices, leave the checkbox checked, otherwise click Finished.
Microsoft recommends that you reformat the USB device so that your settings are protected. To do so, right-click the icon of the USB drive in My Computer and then select the Format command from the context menu.
The only glitch is that your access point, router, or repeater has to have a USB port, and most don’t, at this point. So to get these “legacy” devices to update and configure you will need to upgrade the firmware using their management software consoles, which unfortunately this wizard doesn’t help you with.
For those devices that can’t be updated in firmware you are reduced to taking the printed settings and manually configuring the devices yourself, which in a way puts you back where you started if you are not knowledgeable about computer networks.
You can also use the wizard to configure any new WSNK-compatible device that you add at a later date. To do so, run the wizard again and it will re-create your settings on your flash disk so that you can then plug that disk into the USB port of your new WLAN device.
If you want to, you can manually set up your WEP or WPA-PSK key, or change your existing WLAN network settings within the wizard. You might want to change the encryption keys on a regular basis as a security measure.
