Showing posts with label H55. Show all posts

iBoot 2.0 - Updated with Enhanced USB Support

NOTE: iBoot is now a permanent replacement for iBoot NVIDIA, iBoot ATI, and iBoot Supported.
Since Apple released Mac OS X Snow Leopard version 10.6.3, USB issues have plagued the Hackintosh community. Non-functional peripherals have made installation a major issue for many systems. There are two popular work arounds. The first is to use a system-specific pre-edited DSDT.aml to enable the USB ports. This is great if you have one, otherwise no. The other method is to use my USBFamilyMOD installer, which only enables 1.1 support.

Either of these solutions are lacking for use in iBoot. It's impossible to create a universal DSDT for every motherboard, and my USBFamilyMOD only supports USB 1.1.  This makes things difficult when transferring files using USB sticks or USB drives.

Until now.

Introducing the next generation: iBoot 2.0, with full USB support.  A milestone for 10.6.3.

       
For discussions on this and other topics, register today at tonymacx86.com!

Intel Core i3/i5 Dual-Core Processors and Mac OS X

EDIT: As of the release of Apple's new MacBook Pros, i3/i5/i7 notebook processors are supported!  Just use the new 10.3.1 Darwin Vanilla kernel.  It's available through the MacBook Pro Software Update.  Check out this thread for details on installation.

Intel's new Dual-Core Core i3 and Core i5 processors are currently (as of 10.6.2) not supported natively by Mac OS X. Furthermore, recent looks into the 10.6.3 developer build don't reveal any future support. This includes the following dual-core desktop and mobile processors:

Core i3-530
Core i3-540
Core i5-650
Core i5-660
Core i5-661
Core i5-670
Core i3-330M
Core i3-350M
Core i5-520UM
Core i5-430M
Core i5-520M
Core i5-520E
Core i5-540M

If you own one of these processors, and would like to try to install Mac OS X, you can try my Boot CD Method with the default tonymacx86-P55BootCD. It has the Qoopz 10.0.0 kernel which is patched to run on unsupported processors. Issue this command at the Chameleon prompt:

busratio=20

If you don't type this command, your computer may instantly reboot. Also, when you update to 10.6.2, you'll have to use a patched kernel.

METHOD FOR UPDATING TO 10.6.2
  1. Download the Mac OS X 10.6.2 Combo Update here:
  2. http://www.apple.com/downloads/macosx/apple/macosx_updates/macosxv1062updatecombo.html
  3. Download MultiBeast
  4. Mount MacOSXUpdCombo10.6.2.dmg
  5. Install MacOSXUpdCombo10.6.2.pkg
  6. DO NOT REBOOT
  7. Run EasyBeast 10.6.2 Unsupported to install the patched mach_kernel.
  8. Reboot.
As of now the only Core i-series Intel processors that Apple has used in a Mac are the quad-core Core i5 750 and Core i7 860. Therefore these are the only ones that are supported natively by Mac OS X, and can therefore run the 10.6.2 Vanilla (default) kernel. Of course, Apple may release new Macs that run these processors, and at that point, they'll be supported.

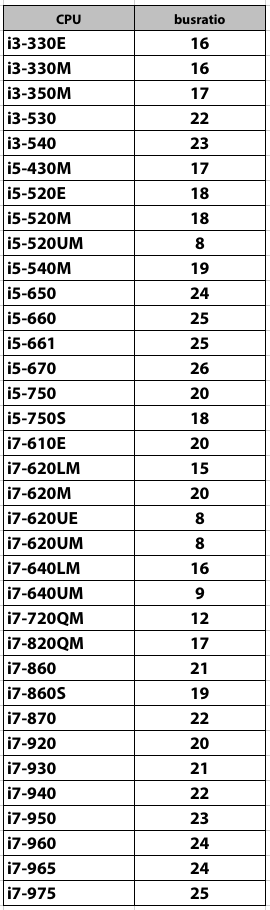
EDIT: Here's a table of all of the actual bus/core ratios for every Intel Core i processor:


If you have had any success or failures using these new processors, be sure to let me know. Good luck!
For discussions on this and other topics, register today at tonymacx86.com!

iBoot 2.5 - Unified Graphics Support


Today, iBoot has received a major update.  No longer will there be multiple versions of iBoot, but one unified version for any supported Intel CPU with either ATI or NVIDIA graphics.  The new version is a permanent replacement for all previous versions of iBoot, including iBoot-NVIDIA, iBoot-ATI, iBoot-ATI-5xxx, and iBoot-Supported. 


We've rolled in the latest pre-release version of Chameleon 2.0 RC5, and for ethernet, the latest beta version of Lnx2Mac's RealtekRTL81xx.kext.  For desktops and laptops using unsupported Intel CPUs and graphics, a legacy version of iBoot can be downloaded here.

As always, follow the iBoot + MultiBeast method for installation.  Please note that iBoot is an installation tool, and is not intended as a substitute for installing Chameleon to your hard drive or EFI partition. 

If iBoot has helped you, please consider a contribution to support further development.  Thanks in advance, and enjoy!

-tonymacx86 & MacMan

UPDATE: iBoot 2.5.1 now includes 10.5.0 kernel and updated USB support for 10.6.5.

For discussions on this and other topics, register today at tonymacx86.com!

JMicron ATA Support

Are you trying to build a Hackintosh on the cheap? Do you have an old IDE CD/DVD drive or hard drive from your Pentium II rig collecting dust in the closet? Does your motherboard use the JMicron or GSATA IDE controller? MacMan and I have got the answer for you.

Introducing JMicron36xATA.kext, a 32/64-bit driver for the JMicron 361, 363, 365, 366, 368 and Gigabyte GSATA IDE controllers so you can support that old drive in your shiny new Hackintosh.

We have implemented it in iBoot so you can now install from an IDE DVD Drive or to an IDE Hard Drive.

These kexts are now available in MultiBeast. Enjoy your old hardware!


-MacMan & tonymacx86
For discussions on this and other topics, register today at tonymacx86.com!

JMicron SATA Support

Are you tired of seeing this in System Profiler?


MacMan was, so that’s why he created JMicron36xeSATA.kext and JMicron36xSATA.kext.

Now in System Profiler you will see this if you use JMicron36xeSATA.kext:


Or this if you use JMicron36xSATA.kext:


So what’s the difference other than the name display? When using JMicron36xSATA.kext all drives connected to the JMicron controllers will be displayed on the desktop as internal disks, just like the Intel connected drives. But if you use the JMicron36xeSATA.kext, then they show up on the desktop as external (orange) disks and can be hot swapped.

These kexts are now available in MultiBeast.

They install like any other Hackintosh kext. Just drag to /Extra/Extensions and rebuild the kext cache.

-MacMan & tonymacx86
For discussions on this and other topics, register today at tonymacx86.com!

iBoot Supported - with Vanilla Kernel for all i3/i5/i7s

NOTE: iBoot is now a permanent replacement for iBoot NVIDIA, iBoot ATI, and iBoot Supported.

The iBoot + MultiBeast installation method has been out for a bit over a month and it's been really great to hear your success stories.  I've created an updated iBoot with few new features called iBoot Supported.

As of MacBook Pro Software Update 1.3, and Apple's release of the Core i5 and i7 MacBook Pros, many more Core i processors, possibly all, are natively supported by Mac OS X.  Part of this software release is a new kernel, known as 10.3.1 Darwin Kernel.  One of it's key new features is to enable support for the new MacBook Pro CPUs, namely the Core i5-520M, Core i5-540M, and Core i7-620M.  So now we can use this kernel to support these and many other Core i3/i5/i7 processors for our Hackintoshes.

 What does iBoot Supported offer that iBoot doesn't?
  1. No need for busratio=xx for Intel Core i3/i5/i7 processors to boot the Retail DVD.  
  2. Updated kernel for use with 10.6.3.  You can use iBoot Supported without ever installing Chameleon if you want to. This makes it a great rescue disk option as well.
  3. ATY_Init.kext alternative graphics card support.
  4. Install Succeeded!   You'll no longer get the Install Failed message at end of install. You'll now see this nice message:
 
    Another great thing about iBoot Supported is that by testing it, you can determine whether your processor is supported or not.  If you can boot iBoot Supported, you can use the 10.3.1 Vanilla Kernel.

    To replace your kernel with the 10.3.1 Vanilla Kernel, use MultiBeast 2.0.0 or later.

    Below is a list of all Intel Core i CPUs.  If iBoot Supported works for you, post your processor in the comments below, or in the forum here.  Then I'll add it to this table.  My hypothesis is that all of them will work, but we'll have to see.  As always, any Core Solo and Core2 machines will work.  Pre-Core Intel CPUs and AMD CPUs will not work,

    Please help me test this!  I'm really curious to see if it actually supports all of these!  Good luck!

    iBoot Supported - Confirmed Intel Core i CPUs

    Intel CPU Supported
    Core i3-330E?
    Core i3-330MYES
    Core i3-350M?
    Core i3-530YES
    Core i3-540YES
    Core i5-430MYES
    Core i5-520EYES
    Core i5-520MYES
    Core i5-520UMYES
    Core i5-540MYES
    Core i5-650YES
    Core i5-660YES
    Core i5-661YES
    Core i5-670YES
    Core i5-750YES
    Core i5-750SYES
    Core i7-610E?
    Core i7-620LM?
    Core i7-620MYES
    Core i7-620UE?
    Core i7-620UM?
    Core i7-640LM?
    Core i7-640UM?
    Core i7-720QMYES
    Core i7-820QMYES
    Core i7-860YES
    Core i7-860SYES
    Core i7-870YES
    Core i7-920YES
    Core i7-930YES
    Core i7-940YES
    Core i7-950YES
    Core i7-960YES
    Core i7-965YES
    Core i7-975YES
    Core i7-980XYES
    For discussions on this and other topics, register today at tonymacx86.com!

    DSDT Database Update: ASUS Socket 1156 H55/P55 Verified Edits

    We've done a major update to the DSDT Database, adding hand edited, verified DSDTs for all ASUS Socket 1156 motherboards. We've supplied only the bare minimal edits, as most of these motherboards will function well without DSDTs. Special thanks to Beelzebozo for spearheading this effort! 

    Here's a list of the 28 new DSDTs we've just added:
    • ASUS Maximus III Extreme - BIOS 1204
    • ASUS Maximus III Formula - BIOS 2104
    • ASUS Maximus III GENE - BIOS 2103
    • ASUS P7H55 - BIOS 0901
    • ASUS P7H55 USB3 - BIOS 1606
    • ASUS P7H55-M - BIOS 1101
    • ASUS P7H55-M LE - BIOS 0706
    • ASUS P7H55-M PRO - BIOS 1604
    • ASUS P7H55 -M USB3 - BIOS 0901
    • ASUS P7H55D-M EVO - BIOS 1604
    • ASUS P7H55D-M PRO - BIOS 1604
    • ASUS P7H57D-V EVO - BIOS 1606
    • ASUS P7P55 LX - BIOS 1102
    • ASUS P7P55 M - BIOS 0904
    • ASUS P7P55 WS SUPERCOMPUTER - BIOS 1201
    • ASUS P7P55D - BIOS 2003
    • ASUS P7P55D DELUXE - BIOS 2003
    • ASUS P7P55D EVO - BIOS 2004
    • ASUS P7P55D LE - BIOS 2003
    • ASUS P7P55D PREMIUM - BIOS 2003
    • ASUS P7P55D PRO - BIOS 2003
    • ASUS P7P55D-E - BIOS 1504
    • ASUS P7P55D-E DELUXE - BIOS 1504
    • ASUS P7P55D-E EVO - BIOS 1504
    • ASUS P7P55D-E LX - BIOS 1602
    • ASUS P7P55D-E PREMIUM - BIOS 1504
    • ASUS P7P55D-E PRO - BIOS 1602
    • ASUS Sabertooth 55I - BIOS 2003
    Instructions on how to use with MultiBeast's UserDSDT are available here.  Good luck, and let us know how it goes with these new additions to the DSDT Database!

    -tonymacx86 & MacMan

    DSDT-Free and UserDSDT Solutions for ASUS Socket 1156 H55/P55 Motherboards

    I've always been a Gigabyte fan. When looking at last year's ASUS specs for 1156, standard Realtek ALC HDEF audio made Gigabyte the best choice. However, we recently picked up the ASUS P7H55-M LE. We figured it would be an important board to test, as many people buy ASUS, and would like them better supported

    I was astounded that when booting without a DSDT, most of everything just worked! No kernel panic on power management, built in USB hubs, SATA recognized- and best of all sleep worked! 

    As far as buying advice goes, because of the Sandy Bridge onslaught, there are some amazing deals on both Gigabyte and Asus 1156 stuff right now, and they're 100% supported. Here are 2 methods you can use for Post-Installation on most ASUS 1156 motherboards.

    ASUS 1156: DSDT-FREE METHOD
    Using a DSDT is not necessary for most ASUS Socket 1156 boards using a recent BIOS. Most implement RMH (Rate Matching Hubs) for USB, use VIA audio, and initiate Power Management on their own with no further tweaks. This means sleep works, even without DSDT edits! Please note that you'll still have to install audio, graphics, and network support separately.
    1. Backup and delete your /Extra folder
    2. Run MultiBeast
    3. Install choices below and reboot.
    ASUS 1156: UserDSDT METHOD
    In general, a DSDT is a helpful thing to have if you are planning on tweaking and optimizing. If you want to configure 2 graphics cards via DSDT graphics edit, or if you want to add support for HDMI (HDAU edit) you need a DSDT. To utilize AppleHDA instead of VoodooHDA for Realtek ALC8xx audio, you need a DSDT. Please note that you'll still have to install audio, graphics, and network support separately.
    1. Backup and delete your /Extra folder
    2. Download your motherboard's DSDT from the DSDT Database
    3. Place the .aml file on Desktop
    4. Run MultiBeast
    5. Select UserDSDT + System Utilities
    6. Reboot
    OUR BUDGET PICK
    ASUS P7H55-M PRO - AMAZON / NEWEGG  $99.00

    Please report back in comments if the DSDT-Free method works for you!  Thanks!

    -tonymacx86 & MacMan

    For discussions on this and other topics, register today at tonymacx86.com!

    Introducing the tonymacx86 Wiki!

    Introducing the tonymacx86 Wiki!  A fully user-editable site where people can find and document what hardware works specifically with iBoot + MultiBeast.

    We're looking for contributors to make this site a valuable resource- it's only going to grow with your help!  Go ahead and add your confirmed desktops, laptops, graphics cards to the pages linked to the front, or create a new page!  Let me know if you have any great ideas for sections- post at this thread in the forum.  Have fun with it!

    -tonymacx86
    For discussions on this and other topics, register today at tonymacx86.com!

    iBoot + MultiBeast: Install Mac OS X on any Intel-based PC

    Any OSx86 installation guide can seem daunting at first glance, especially when trying to remember cryptic terminal commands and sorting through volumes of misinformation on the web.  This guide requires no coding, terminal work, or Mac experience of any kind.  You will not need access to a Mac.  In fact, it's easier and faster for me to install Snow Leopard with fully working components on my system than it is to install Windows 7.  And more fun.

    The iBoot + MultiBeast method is designed and tested for any desktop or laptop running the latest line of Intel processors, the Core i3/i5/i7s.  I have had reports of success with older machines as well including CoreDuo, Core2Duo, and even Pentium 4.  However, AMD processors are not supported.

    YOU WILL NEED

    • A computer running an Intel Processor
    • A blank CD
    • A Mac OS X Snow Leopard Retail DVD
    • To leave any fear of your computer at the door.
    • Patience and humility- it may not work out perfectly the first time- but with enough tenacity and grit, you'll reach the promised land.  It's easy to get frustrated, but don't give up!  There are a community of users with similar hardware in the tonymacx86 Forum to provide support if you get stuck.
    BEFORE YOU BEGIN
    • If you have greater than 4gb of RAM, remove the extra RAM for a maximum of 4gb.  You can put back any extra RAM in after the installation process.
    • Use only 1 graphics card in the 1st PCIe slot with 1 monitor plugged in.
    • Remove any hard drives besides the blank drive being used for OS X.
    • Remove any USB peripherals besides keyboard and mouse.
    • Remove any PCI cards besides graphics- they may not be Mac compatible.
    • If using a Gigabyte 1156 board, use the blue Intel SATA ports- not the white Gigabyte SATA ports.
    • It's best to use an empty hard drive- you will have to partition and format the drive. 
    • Always back up any of your important data.
    STEP 1: BIOS SETTINGS
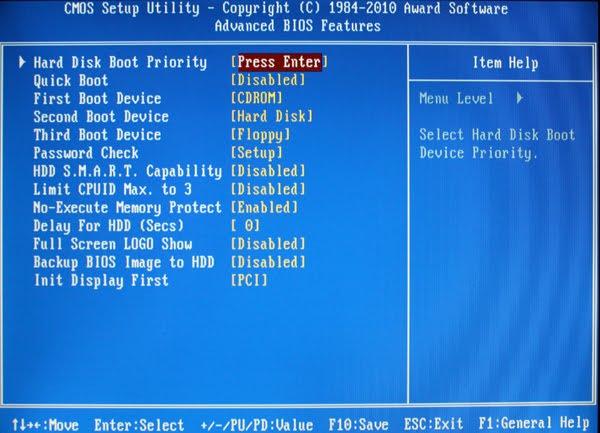
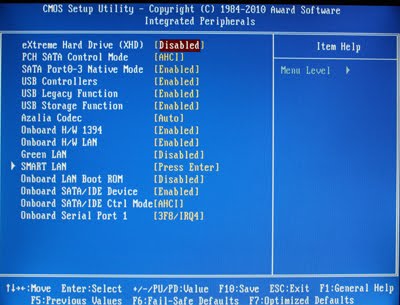
    You will need to set your BIOS to ACHI mode and your Boot Priority to boot from CD-ROM first.  This is the most important step, and one many people overlook.  Make sure your bios settings match these.  It's not difficult- the only thing I did on my Gigabyte board besides setting Boot Priority to CD/DVD first was set Optimized Defaults, change SATA to AHCI mode, and set HPET to 64-bit mode.

    STEP 2: INSTALL MAC OS X 

    In order to boot the Mac OS X Retail DVD, you'll need to download and burn iBoot.  For desktops and laptops using unsupported Intel CPUs and graphics, a legacy version of iBoot can be downloaded here.
    1. Download iBoot
    2. Burn the image to CD
    3. Place iBoot in CD/DVD drive
    4. Restart computer
    5. At Chameleon prompt, eject iBoot


    6. Insert your Mac OS X Snow Leopard Retail DVD and press F5
    7. When you see the screen below, press enter to begin the boot process
    8. When you get to the installation screen, open Utilities/Disk Utility.  NOTE: If you cannot get to the installation screen, retry from Step 4, type PCIRootUID=1 before hitting enter. If that doesn't work then try PCIRootUID=1 -x or just -x which will enter Mac OS X Safe Mode and will allow you to proceed.
    9. Partition your hard drive to GUID Partition Table
    10. Format your hard drive to Mac OS Extended (Journaled).   NOTE: Chameleon can only boot from a disk or partition of 1 TB or less.  Partition larger drives.
    11. For the purposes of this guide, name it Snow Leopard.  You can rename it later.
    12. Close Disk Utility
    13. When the installer asks you where to install, choose Snow Leopard
    14. Choose Customize‚ and uncheck additional options.  This will hasten the install process.  You can always install this stuff later.
    15. Restart computer.
    16. Place iBoot back in drive.
    17. When you get to the Chameleon boot selection screen, choose your new Snow Leopard installation.
    18. View the super-cool Mac OS X Snow Leopard Welcome Video, and set up your computer!

    STEP 3: UPDATE TO 10.6.7
    Upon the release of 10.6.2 and the 27" Intel Core i5 and i7 iMacs, Mac OS X Snow Leopard officially supports the Core i5 750 and Core i7 860.  The 10.6.6 Update will install a Vanilla Kernel, as well as a host of security and stability fixes. Details are available on Apple's website.
    1. Open Finder and navigate to your Snow Leopard drive.
    2. Right-click and delete Mac OS X Install Folder.  This folder is an unnecessary remnant of the installation process, and serves no purpose.
    3. Download the Mac OS X 10.6.7 Combo Update
    4. Download MultiBeast
    5. Open MultiBeast- don't run it yet, just leave it open.  Set up windows as shown.
    6. Mount MacOSXUpdCombo10.6.7.dmg
    7. Install MacOSXUpdCombo10.6.7.pkg
    8. Upon completion, the installer will ask you to reboot.  DO NOT REBOOT.
    9. Switch to the already open MultiBeast.  If it closes, just re-open it.
    STEP 4: MULTIBEAST
    MultiBeast is an all-in-one post-installation tool designed to enable boot from hard drive, and install support for Audio, Network, and Graphics. It contains two different complete post-installation solutions: EasyBeast and UserDSDT.  In addition it includes System Utilities to rebuild caches and repair permissions and a collection of drivers, boot loaders, boot time config files and handy software.

    Choose one of the following options directly following a fresh installation and update:  

    EasyBeast is a DSDT-free solution for any Core/Core2/Core i system. It installs all of the essentials to allow your system to boot from the hard drive. Audio, Graphics and Network will have to be enabled separately.  

    UserDSDT is a bare-minimum solution for those who have their own pre-edited DSDT. Place your DSDT.aml on the desktop before install. Audio, Graphics and Network will have to be enabled separately.  HINT: Check the DSDT Database for a pre-edited DSDT.
    1. Run MultiBeast.
    2. If you have a custom DSDT that's been edited, place the file on your desktop and choose UserDSDT.
    3. All others select EasyBeast 
    4. Select System Utilities.
    5. Optionally, you may install further drivers via Advanced Options to enable ethernet, sound, graphics, etc...  Be sure to read the documentation provided about each installation option.  NOTE: EasyBeast, and UserDSDT install Chameleon 2.0 RC5 by default, so you'll not need to check that option.     
    6. Install to Snow Leopard- it should take about 4 minutes to run scripts.
    7. Eject iBoot.
    8. Reboot- from your new Snow Leopard installation drive.

    Congratulations!  You're done!!

    Your PC is now fully operational, while running the latest version of Mac OS X Snow Leopard!  And you have a nice Boot CD to get into your system in case things go awry.  Boot your system from iBoot if you have issues.  You may run MultiBeast as often as you like.

    If you can't boot, try typing -x at the Chameleon prompt to enter safe mode, or just boot with iBoot.  When you get to the desktop, you can make all of the changes you need to.  The best way to start fresh is delete whatever you're trying to get rid of- including the whole /Extra folder, as most kexts are installed there.  Then you can re-run MultiBeast.  As long as you rebuild caches and repair permissions after you're done, you can do just about anything you want to /Extra/Extensions and /System/Library/Extensions.  Anything can be tweaked and enabled upon subsequent uses of MultiBeast.

    If you've had success using iBoot + MultiBeast, consider a contribution to help keep the sites going.  We're constantly updating and tweaking our tools to help you.

    Thanks in advance!

    -tonymacx86 & MacMan


    PS: For our most current workarounds and solutions for issues such as USB and audio, check out the Mac OS X 10.6.3 Update Mac OS X 10.6.4 Update,  Mac OS X 10.6.5 UpdateMac OS X 10.6.6 Update, and Mac OS X 10.6.7 Update articles.   Good luck, and see you on the forum!

    Related Posts: Dual Boot Windows 7 and OS X Snow Leopard Using Chameleon
    For discussions on this and other topics, register today at tonymacx86.com!
    Building a CustoMac: Three Updated LGA 1156 Builds for OS X

    By request, here are three updated builds, based on the original CustoMac post from June 2010.  These builds are our most current 1156 recommendations for fully compatible budget builds running Mac OS X as the primary operating system.  

    All three builds include:
    • Gigabyte LGA 1156 Motherboard
    • Intel Core i-series Quad-Core CPU
    • 4GB or 8GB of RAM, expandable up to 16GB
    • 1 TB Hard Drive
    • CD/DVD Burner
    • Case and Power Supply
    • Mac OS X Snow Leopard Retail DVD
    We've included all components besides monitor, as any standard monitor will do.  You can use these recommendations as a jumping off point for further customization, or as a shopping list.  Prices reflect those as of February 2011, and do not include shipping or tax. 

    Budget Power Build 1
    Core i5-760 / Gigabyte GA-H55M-UD2H / GeForce GT 240 / 4GB DDR3 RAM
    $683.88

    Motherboard:  GA-H55M-UD2H $94.99

    Hard Drive: Samsung Spinpoint 1 TB $62.99

    CD/DVD Burner: Sony Optiarc Black $36.95

    Power Supply: Antec 550W Continuous Power $64.99

    Operating System: Mac OS X Snow Leopard $29.00

    Budget Power Build 2
    Core i7-870 / Gigabyte GA-H55M-UD2H / Radeon HD 5770 / 4GB DDR3 RAM
    $991.23


    Motherboard:  GA-H55M-UD2H $94.99


    Hard Drive: Samsung Spinpoint 1 TB $62.99

    CD/DVD Burner: Sony Optiarc Black $36.95

    CPU Cooler: Scythe Mugen 2 $47.35

    Power Supply: Corsair 650HX Modular 650W $119.99

    Operating System: Mac OS X Snow Leopard $29.00

    Budget Power Build 3
    Core i7-870 / Gigabyte GA-P55A-UD3 / Radeon HD 5870 / 8GB DDR3 RAM
     $1211.41

    Motherboard: Gigabyte GA-P55A-UD3 $130.22

    Graphics: Diamond ATI Radeon HD 5870 1GB $234.99

    Hard Drive: Samsung Spinpoint 1 TB $62.95
    CD/DVD Burner: Sony Optiarc Black $36.95

    CPU Cooler: Scythe Mugen 2 $47.35
    Case: Antec 900 $99.99

    Power Supply: Corsair 650HX Modular 650W $119.99

    Operating System: Mac OS X Snow Leopard $29.00

    Optional Accessories
    NOTE: Only MODEL NO: ACB10us v1.0 will wake from sleep.

    Oh, and don't forget, if you end up buying anything, click through one of the links above, or in the sidebar.  That way, you'll be supporting the site, as well as getting the best prices.  Thanks in advance!   

    For discussions on this and other topics, register today at tonymacx86.com!