Showing posts with label leopard. Show all posts

Intel Core i3/i5 Dual-Core Processors and Mac OS X

EDIT: As of the release of Apple's new MacBook Pros, i3/i5/i7 notebook processors are supported!  Just use the new 10.3.1 Darwin Vanilla kernel.  It's available through the MacBook Pro Software Update.  Check out this thread for details on installation.

Intel's new Dual-Core Core i3 and Core i5 processors are currently (as of 10.6.2) not supported natively by Mac OS X. Furthermore, recent looks into the 10.6.3 developer build don't reveal any future support. This includes the following dual-core desktop and mobile processors:

Core i3-530
Core i3-540
Core i5-650
Core i5-660
Core i5-661
Core i5-670
Core i3-330M
Core i3-350M
Core i5-520UM
Core i5-430M
Core i5-520M
Core i5-520E
Core i5-540M

If you own one of these processors, and would like to try to install Mac OS X, you can try my Boot CD Method with the default tonymacx86-P55BootCD. It has the Qoopz 10.0.0 kernel which is patched to run on unsupported processors. Issue this command at the Chameleon prompt:

busratio=20

If you don't type this command, your computer may instantly reboot. Also, when you update to 10.6.2, you'll have to use a patched kernel.

METHOD FOR UPDATING TO 10.6.2
  1. Download the Mac OS X 10.6.2 Combo Update here:
  2. http://www.apple.com/downloads/macosx/apple/macosx_updates/macosxv1062updatecombo.html
  3. Download MultiBeast
  4. Mount MacOSXUpdCombo10.6.2.dmg
  5. Install MacOSXUpdCombo10.6.2.pkg
  6. DO NOT REBOOT
  7. Run EasyBeast 10.6.2 Unsupported to install the patched mach_kernel.
  8. Reboot.
As of now the only Core i-series Intel processors that Apple has used in a Mac are the quad-core Core i5 750 and Core i7 860. Therefore these are the only ones that are supported natively by Mac OS X, and can therefore run the 10.6.2 Vanilla (default) kernel. Of course, Apple may release new Macs that run these processors, and at that point, they'll be supported.

EDIT: Here's a table of all of the actual bus/core ratios for every Intel Core i processor:
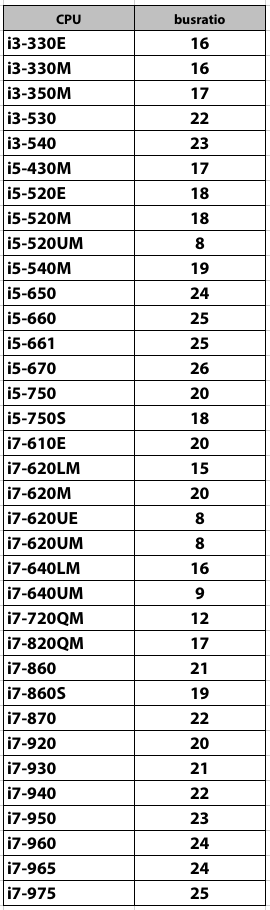

If you have had any success or failures using these new processors, be sure to let me know. Good luck!
For discussions on this and other topics, register today at tonymacx86.com!

Chameleon Documentation

I can't say enough great things about the Chameleon bootloader. One thing that I had some trouble finding at first was any documentation to accompany it. A lot of valuable information is supplied in the Doc folder if you download the source code of Chameleon RC3. Mostly it tells users how to set boot flags and advanced startup options to enable different functionality.

You can use these options from the Chameleon bootloader itself when starting up your machine. Stop the Chameleon countdown and type the command at the boot prompt. If you want any of the options to be selected by default, you must enter them into your com.apple.boot.plist- in your /Extra folder. Simply drag this file to the desktop, open and edit in TextEdit, then drag back to /Extra.

The following text is taken from the Chameleon documentation provided in the source folder available on http://chameleon.osx86.hu/ I edited and clarified where necessary.

The boot: prompt waits for you to type advanced startup options. If you don't type anything, the computer continues starting up normally. It uses the kernel and configuration files on the startup device, which it also uses as the root device.

Advanced startup options use the following syntax:
[device] [arguments]

Example arguments include:
device: rd= (e.g. rd=disk0s2)
device: rd=* (e.g. rd=*/PCI0@0/CHN0@0/@0:1)
kernel: kernel name (e.g. "mach_kernel" - must be in "/" )

flags:
-v (verbose)
-s (single user mode)
-x (safe mode)
-F (ignore boot configuration file)

"Graphics Mode"="WIDTHxHEIGHTxDEPTH"
(e.g. "1024x768x32")

kernel flags
(e.g. debug=0x144)

io=0xffffffff
(defined in IOKit/IOKitDebug.h)

Example:
mach_kernel rd=disk0s1 -v "Graphics Mode"="1920x1200x32"

If the computer won't start up properly, you may be able to start it up using safe mode. Type -x to start up in safe mode, which ignores all cached driver files.

Special booter hotkeys:
F5
Rescans optical drive.

F10
Scans and displays all BIOS accessible drives.

Special booter commands:
?memory
Displays information about the computer's memory.

?video
Displays VESA video modes supported by the computer's BIOS.

?norescan
Leaves optical drive rescan mode.

Additional useful command-line options:
config=
Use an alternate Boot.plist file.

Options useful in the com.apple.Boot.plist file:
Wait=Yes|No
Prompt for a key press before starting the kernel.

"Quiet Boot"=Yes|No
Use quiet boot mode (no messages or prompt).

Timeout=8
Number of seconds to pause at the boot: prompt.

"Instant Menu"=Yes
Force displaying the partition selection menu.

"Default Partition"=hd(x,y)
Sets the default boot partition,Where 'x' is the disk number, 'y' the partition number.

GUI=No
Disable the GUI (enabled by default).

"Boot Banner"=Yes|No
Show boot banner in GUI mode (enabled by default).

"Legacy Logo"=Yes|No
Use the legacy grey apple logo (disabled by default).

GraphicsEnabler=Yes|No
Automatic device-properties generation for graphics cards.

VideoROM=
Use an alternate ROM image (default path: /NVIDIA.ROM).

VBIOS=Yes|No
Inject VBIOS to device-properties.

EthernetBuiltIn=Yes|No
Automatic "built-in"=yes device-properties generation for ethernet interfaces.

USBBusFix=Yes
Enable the EHCI and UHCI fixes (disabled by default).

EHCIacquire=Yes
Enable the EHCI fix (disabled by default).

UHCIreset=Yes
Enable the UHCI fix (disabled by default).

Wake=No
Disable wake up after hibernation (enbaled by default).

ForceWake=Yes
Force using the sleepimage (disabled by default).

WakeImage=
Use an alternate sleepimage file. (default path is /private/var/vm/sleepimage).

DropSSDT=Yes
Skip the SSDT tables while relocating the ACPI tables.

DSDT=
Use an alternate DSDT.aml file. (default path: /DSDT.aml /Extra/DSDT.aml)

SMBIOS=
Use an alternate smbios.plist file. (default path: /smbios.plist /Extra/smbios.plist bt(0,0)/Extra/smbios.plist).

SMBIOSdefaults=No
Don't use the Default values for SMBIOS overriding. If smbios.plist doesn't exist, factory values are kept.

"Scan Single Drive"=Yes|No
Scan the drive only where the booter got loaded from. Fix rescan issues when using a DVD reader in AHCI mode.

Rescan=Yes
Enable CD-ROM rescan mode.

"Rescan Prompt"=Yes
Prompts for enable CD-ROM rescan mode.

I hope this helps clear up some questions you might have had about using Chameleon!


For discussions on this and other topics, register today at tonymacx86.com!

Enable the Apple Boot Screen


By default, the installation guides on this site put the -v (verbose) boot flag into your com.apple.boot.plist that is located in /Exra. The reason I did this is so that you can watch as the system boots and debug. If you are done with tinkering with kexts, and have your system running 100%, you may want your Hackintosh to look more like a real Mac starting up. Simply drag your com.apple.boot.plist to the desktop, open it in TextEdit and remove the -v flag from the Kernel Flags string. Then put the file back into /Extra and reboot.

NOTE: By default, Chameleon uses an updated shiny Apple logo. To make the boot screen look like the above photo, insert the string Legacy Logo=Yes into your com.apple.boot.plist.

TO SET/CHANGE RESOLUTION: Add your desired resolution to your /Extra/com.apple.boot.plist:


For discussions on this and other topics, register today at tonymacx86.com!

Create a Chameleon Boot USB Drive

A good thing to have if you're updating or changing your Hackintosh is a Chameleon boot USB drive. It is a USB drive or key that has nothing on it but the Chameleon bootloader- therefore it can be a cheap 512mb or 1gb drive! You can always boot directly from it in case your install or update doesn't work.
  1. Boot into your existing OS X Installation.
  2. Insert your USB drive.
  3. Open Applications/Utilities/Disk Utility.
  4. Highlight your USB drive in the left column.
  5. Click the Partition Tab.
  6. Click Volume Scheme- choose 1 Partition.
  7. Click Options…
  8. Select GUID Partition Table. Click OK.
  9. In the Name: field type: ChameleonBoot
  10. In Format: field select Mac OS Extended (Case Sensitive, Journaled)
  11. Click Apply, then click Partition.
  12. Close Disk Utility
  13. Download tonymacx86-snowleopard.zip
  14. Open and place tonymacx86-snowleopard folder on the desktop.
  15. Open Apps folder
  16. Open PC EFI 10.1
  17. Select ChameleonBoot and click Continue.
  18. Click Install, and then type your password.
  19. Open Terminal.
  20. Type: sudo rm /Volumes/ChameleonBoot/boot and type your password. (this deletes the boot file installed from PC EFI 10.1)
  21. Click and drag boot, DSDT.aml, and Extra from tonymacx86-snowleopard to ChameleonBoot. Or drag your own files from your existing Snow Leopard drive.
That's it- the drive is done. Just set your BIOS Hard Disk Priority to boot from USB first. Hope this helps!

For discussions on this and other topics, register today at tonymacx86.com!

Advanced DSDT Fixes: nVidia Graphics

I've been receiving a lot of requests to do a step by step guide on how to enable graphics by DSDT injection. As stated in my post Enable Full Graphics Card Acceleration, there are many ways to enable graphics on your Hackintosh. This guide will allow you to directly inject information via your DSDT, therefore eliminating the use of methods such as Enabler kexts, or EFI Strings.

NOTE TO ATI USERS: I did not include a solution for ATI graphics card in this post. Although you could probably work it out, I do not own an ATI card, so I can't test. I'd love to duplicate this post for ATI users. Contact me on the forum if you've successfully injected DSDT code for ATI cards. Download an untested example of the code- the process seems a bit more involved.

BEFORE YOU BEGIN
This guide assumes you've read and understand the following DSDT posts, and are familiar with the editing process. You will need to have enabled full graphics acceleration (QE/CI) via Enabler kext or EFI Strings.
You will also need to have XCode, Apple's Development platform for OS X installed on your system. It is an optional install on your Mac OS X Retail DVD. You can also download the full version for free here.

The main tool we'll be using is IORegistryExplorer which is located in /Developer/Applications/Utilities on the root of your Snow Leopard drive. This application gives us a view of the hardware registry. I encourage you to explore the full version of XCode, but if you want to simply get the IORegistryExplorer application only, it is available here.

STEP 1: INSERT DSDT GRAPHICS CODE TEMPLATE
In this step you will insert a template of DSDT code from tonymacx86-DSDT-FIXES.dsl into your DSDT.aml that will enable Graphics detection.
  1. Download the updated tonymacx86-DSDT-FIXES.zip
  2. Open DSDTSE. You can download the application from here.
  3. Open tonymacx86-DSDT-FIXES.dsl in DSDTSE.
  4. Locate 09 - DSDT Graphics - nVidia
  5. Open your DSDT.aml in DSDTSE.
  6. Type Device (PCI0) in the search box.
  7. You'll see something like this:
  8. Copy and paste the updated code as shown in tonymacx86-DSDT-FIXES.dsl
STEP 2: EDIT YOUR DSDT WITH YOUR REGISTRY INFORMATION
In this step, you'll examine your registry information and modify the template. You can check your work by comparing to my fully edited GA-P55M-UD2 DSDT with 9400 GT and Core i5 SpeedStep as a guide.
  1. Open /Developer/Applications/IORegistryExplorer
  2. Locate your display data as shown:
  3. Highlight display@0 in the left column.
  4. Locate AAPL,gart-width in right column.
  5. Find the entry for "VRAM,totalsize" in the DSDT graphics code.
  6. Edit your information to match. This entry will be 0x40 for 1GB cards, 0x20 for 512MB cards. 0x10 for 256MB cards If yours doesn't match, make sure you use these values.
  7. Locate NVCAP in right column.
  8. Find the matching entry for "NVCAP" in the DSDT code.
  9. Edit your information to match the NVCAP values.
  10. Locate the following section in your DSDT
  11. Customize this text with your specific card's information.
  12. Save your DSDT.aml
  13. When you are finished making changes, click Tools and choose Compile.
  14. If you don't get any errors, click Tools and choose DSDT files folder.
  15. Your DSDT files folder (/Library/Application Support/EvOSoftware/DSDT) will open in Finder. Helpful Hint: you can pull this folder into the sidebar to bookmark it.
  16. Copy your dsdt.aml.
  17. Paste your dsdt.aml into the root / of your hard drive (or /Extra folder for Chameleon RC4).
  18. Capitalize DSDT.aml
STEP 3: REMOVE ALL EXISTING GRAPHICS ENABLERS
You must now remove all Enablers, GraphicsEnabler=Yes, and EFI Strings from your system to test the new injection.
  1. Open /System/Library/Extensions
  2. Delete any Kext Enablers (NVEnabler, NVInject, NVKush, etc…) from your system.
  3. Drag /System/Library/Extensions to Kext Utility
  4. Open /Extra/Extensions/ and open com.apple.boot.plist in TextEdit
  5. Remove any EFI String information and GraphicsEnabler=Yes
STEP 4: REBOOT AND INSPECT PERFORMANCE AND DETECTION
Now is the moment you've been waiting for! To see if it worked.
  1. Reboot your system.
  2. Check your system for QE/CI acceleration.
  3. Open Utilities/System Profiler
  4. You should see the correct information under Graphics as shown below:

Congratulations! You've just hard-coded your graphics information directly into your DSDT! Enjoy your somewhat more 'vanilla' Hackintosh installation!

If QE/CI doesn't work, or you can't change resolutions, check the DSDT code and IORegistryExplorer entries again. You will have to insert your previous method (Enabler/EFI String) back into your system and restart the process. This guide worked on my GA-P55M-UD2 and nVidia 9400 GT, but I haven't tested on any other systems or cards. Other hardware may need different modifications to operate effectively. Post on the forum in the DSDT section if you're having issues.

-tonymacx86

PS: Despite successfully completing this guide, I'm still using NVEnabler64.kext for my system. Unfortunately this method does NOT enable enable TV-OUT (mirroring) on my 9400 GT. I'll update the DSDT code and this page when I find a way. Below is what I see using the NVEnabler64 kext. As I always say, whatever works best! This method may not be relevant to you. Good luck!


For discussions on this and other topics, register today at tonymacx86.com!

Updated ALC 888b DSDT for GA-P55M-UD2


Just a quick post to let GA-P55M-UD2 owners know that I've changed the HDEF section of code in the default tonymacx86-DSDT-FIXES.zip DSDT.aml so that you no longer have to use the old AppleHDA.kext! I've modified the ALC 888b code in the DSDT for the P55M-UD2 so that the LegacyHDA_888b.kext now works with the vanilla 10.6.2 AppleHDA!

You must update to the latest GA-P55M-UD2 bios for this to work! Also, please note that you must enable the proper output in System Preferences/Sound.

I updated all of the files that utilize the UD2 DSDT. Here are some links for all of you UD2 owners. Post your results with this new tweak in the forum here.

Updated tonymacx86-DSDT-FIXES.zip
Includes updated GA-P55M-UD2 DSDT.aml with fixes for CMOS reset, UHCI/EHCI, IDE (SATA), PIC/TMR/HPET, SBUS, and HDEF.
http://www.tonymacx86.com/Public/tonymacx86-DSDT-FIXES.zip

10.6.2 Vanilla AppleHDA.kext
http://www.tonymacx86.com/Public/10.6.2%20AppleHDA.kext.zip


For discussions on this and other topics, register today at tonymacx86.com!

How To Install Chameleon Manually From Terminal

There are various pkg installers to install Chameleon to your boot drive through a GUI. You may find it necessary to replace your Chameleon with a new version. Usually, if you have previously installed Chameleon 2.0, all you must do is replace the boot file. But if you want to replace the entire thing, or if installing for the first time, there are a few simple Terminal commands you must issue.


1. Download any Chameleon binary source (For this example: Chameleon-2.0-RC2-r640-bin)
2. Unzip the folder and place it on the desktop as shown in the picture.
2. Open Applications/Utilities/Terminal
3. Type: diskutil list
4. Locate your OS X installation partition. It will be under IDENTIFIER. Be sure to use the correct one. (For this example: disk0s2)
5. Type: cd
6. Click and drag the Chameleon folder to Terminal, creating a path to it. This is a cool trick that you can use instead of typing the whole path. The command will become: cd /Users/****/Desktop/Chameleon-2.0-RC2-r640-bin
7. Type cd i386
8. Type: sudo fdisk -f boot0 -u -y /dev/rdisk0
9. Type: sudo dd if=boot1h of=/dev/rdisk0s2 (your disk IDENTIFIER from step 4)
10. Type: sudo cp boot /

That's it! If you want to use a different boot file (like PC EFI 10.5), you must delete the installed boot file and drag the new one to the root of your drive. Here's how to do that:

1. Open Applications/Utilities/Terminal
2. Type: sudo rm /boot
3. Drag new boot file to your install drive.

I hope this helps you become more familiar with the Terminal! Good luck with your manual installation of Chameleon!


For discussions on this and other topics, register today at tonymacx86.com!

OSx86 Help Desk

Hey everyone-

Just thought I'd create a post where you can come with your questions about anything OSx86 related. Post specific issues, install problems, screenshots, etc... I'll try my best to help you out any way I can!

The OSx86 Help Desk- working to answer your questions- for free, for fun, for you!

;)

EDIT: The OSx86 Help Desk is now moved to the forum!

For discussions on this and other topics, register today at tonymacx86.com!

Tweaking Your System: Get Rid of PlatformUUID.kext

After establishing a working system with all components functioning, some advanced users begin to try to make their Hackintosh as 'Vanilla' as possible. This quest, an attempt to get the hard drive clean of all edited kexts is an ongoing one, especially for the new P55 boards. Besides the warm fuzzy feeling of having a cleaner more Mac-like experience, there are advantages to doing this. Theoretically you could swap out the hard drive with a real Mac, by installing Chameleon and your /Extra folder to the GUID partition format's 200mb EFI partition. This will be covered in an upcoming guide. Or you can make your system safeguarded against any potentially damaging Apple Update by removing any non-vanilla kexts. Suffice to say, a cleaner more streamlined OS X installation is attractive to most users.

So we've already begun the process of enabling all CPU functions and system components using DSDT edits. Recent tweaks of the new Chameleon 2.0 RC4 bootloader have unearthed a way to establish your system's UUID without the use of PlatformUUID.kext. Normally without this kext, you can't use Time Machine and Superduper! without getting Universal Unique Identifier disk errors. Also, every time you start iTunes it acts like you've never started it before- and gives you the EULA to agree to.

One of the latest forks of the Chameleon 2.0 RC4 bootloader by Insanelymac user rekursor establishes a hack that will let you get rid of PlatformUUID.kext once and for all.
  1. Download the edited Chameleon 2.0 RC4 source by rekursor here.
  2. Navigate to the sym folder and locate the boot file. It's 324kb.
  3. Replace the boot file at the root / of your Snow Leopard installation with this new modified one.
  4. Open Utilities/Disk Utility.
  5. Right click on your Snow Leopard installation in the left column and choose Information.
  6. Check to see what your hard drive's UUID is under Universal Unique Identifier. Mine is C0CE2600-93D7-3B41-843A-4D7C8E2C12E2. Write this number down or copy/paste it to a new text file.


  7. Open your com.apple.Boot.plist in TextEdit or Property List Editor. It should be located in /Extra.


  8. Add the SystemID key and string as shown in the above photos.
  9. Save your com.apple.Boot.plist.
  10. Remove PlatformUUID.kext from /Extra/Extensions.
  11. Rebuild your Extensions.mkext cache by dragging /Extra/Extensions to Kext Utility
  12. Reboot.
Enjoy your somewhat shorter list of extra kexts! This version of the Chameleon 2.0 RC4 incorporates some of the GraphicsEnabler features of netkas' PC-EFI 10.5 fork for more advanced cards. If you have tried RC4 without success for your graphics card, now is the time to give it another chance. For more information, check out this post. Special thanks to rekursor! Good luck!

For discussions on this and other topics, register today at tonymacx86.com!

Tweaking Your System: Get Rid of Restart Kexts & New Chameleon RC4 Development

Chameleon 2.0 RC4 open source development has been fast and furious over the past couple of weeks. I've hardly been able to keep track of all of the fixes being developed, but I thought I'd report another leap forward.

With new tweaks to the codebase of the Chameleon 2.0 RC4 bootloader, you can now remove any restart kexts such as OpenHaltRestart.kext or EvOReboot.kext from your /Extra/Extensions folder. The fix was originally developed a few weeks ago by Duvell300 on the Insanelymac forums. You can read more about this development here.

More interestingly, user AsereBLN has wrapped a host of tweaks and code improvements together. He has been working with the Chameleon code as well, incorporating automatic memory recognition in System Profiler, the Platforum UUID fix, Duvell300's RestartFix by default, and more. Other than rolling everything together, one of the coolest new features is that your system will report memory information correctly including manufacturer (Corsair, G.Skill, etc…) to the System Profiler. You must remove all of the Memory information from your smbios.plist for this to work. Check out AsereBLN's original post for the full documentation.


To test out these changes for yourself, download the latest version of AsereBLN's Chameleon 2.0 RC4, and simply replace the boot file at the root of your OS X partition or EFI partition. NOTE: The download includes a few versions of the boot file- the default boot has no Chameleon GUI. Make sure to rename the file boot. Then remove any restart kexts from your /Extra/Extensions folder (don't forget to rebuild caches). If you are unsure of what to remove in your smbios.plist, you can replace yours with my edited iMac 11,1 smbios.plist. You shouldn't have to add anything to your com.apple.boot.plist other than the device-id change referenced in Tweaking Your System: Get Rid of Platform UUID. Also, please note that you will need to move your DSDT.aml to the /Extra folder instead of the root. Or you can specify DSDT='path to your DSDT.aml' in com.apple.boot.plist.

Once again, I'm happy to report anything that will improve your Hackintosh. Special thanks to tonyd for referencing AsereBLN's thread! I'll try to keep this post updated with the latest changes. Have fun!


For discussions on this and other topics, register today at tonymacx86.com!

Chameleon 2.0 RC4 Released: P55 Supported by Default


Today, the Chameleon team released Chameleon 2.0 RC4. This is the 4th major update of the Chameleon 2.0 bootloader. The major news for us is that the Nehalem patch has now been made standard, meaning that all P55 Core i5 and Core i7 users can use Chameleon 2.0 RC4's boot file without modifications. Until now, P55 users had to patch their boot file or the system would run about 1.5x too fast.

You can read more about the various changes at the Chameleon site. New functionality has been added to hide partitions from the bootloader, and specify PCI root for your devices. You must add flags to your com.apple.Boot.plist to enable these features.

To test the new bootloader for yourself, download this Chameleon 2.0 RC4 boot file. If you have already installed Chameleon or PC-EFI, simply drop the boot file in the root of your OS X partition. You will not need to change anything else. If you need to install from scratch, use the PC-EFI 10.1 installer located in tonymacx86-snowleopard.zip. Then replace the boot file with this new one. Or you can install all of the new files manually from the Chameleon binaries using this guide.

Good luck and let me know how it goes for you!

For discussions on this and other topics, register today at tonymacx86.com!

DSDT Database Redesigned

We've completely redesigned the DSDT Database and it's now hosted on the tonymacx86 Forum.  As part of the improvements we've opened it up to all manufacturers of socket 1156 and 1366 motherboards.  In addition to improving usability, we will now list current and previous DSDT versions.

We will continue to collect and edit with minimal edits all Gigabyte H55 / P55 / X58 DSDTs here:


But will accept and collect all other pre-edited DSDTs here:


As always, we are committed to being the premier site for OSx86 resources! 

-tonymacx86 & MacMan
For discussions on this and other topics, register today at tonymacx86.com!

Great OSx86 Community Software

There are a ton of great pieces of software that have been developed by the OSx86 community. Some are GUIs for simple Terminal commands, and others are 1 function scripts. The following list includes some my favorite free tools.

Kext Utility
Developer:cVaD

Installs kexts one at a time, and does 'full service' Extensions.mkext creation. The best feature of Kext Utility is its interface to create caches- you simply drag the Extensions folder directly on top of the icon in /Applications folder or Dock.

ShowAllFiles
Developer: Open source script

Handy 1 function script app. ShowAllFiles enables view in Finder of all hidden files. Very useful for locating hidden boot files, mach_kernel, etc... The latest version works in Snow Leopard.

DSDTSE
Developer:EvOSX86 Team

Code editor specifically for DSDT.dsl files. DSDTSE does full service extract/compile of DSDT.aml files. It also features a DSDT editing guide built-in, with copy/pasteable code snippets, color coding, and search functionality.

Kext Helper b7
Developer: delish

The drag n' drop kext installer Kext Helper b7 lets you install multiple kexts at once, and also repairs kext permissions and creates a script to tag cache rebuild.

OSx86Tools
Developer: PCWiz Computer

An all-in-one utility, OSx86Tools installs kexts, kernels, creates and deletes caches, automatically installs EFI boot strings, and much more. Some features such as About This Mac and CPU information editing are buggy in Snow Leopard. Not currently under development.

Pacifist

Developer: Charles Srstka

Not technically an OSx86 community project, but honorable mention goes to the shareware application Pacifist- which allows you to extract OS X Package files to show, download, change and install contents. You can also open Apple Install Discs and URLs.

If any of these pieces of software have helped you, or you have ideas for additions to this list, post in comments. Have fun!

For discussions on this and other topics, register today at tonymacx86.com!

Enable High Definition Audio on P55 Motherboards

Enabling High Definition Audio (HDEF) on your Hackintosh can be accomplished a number of different ways. My personal preference is to modify DSDT.aml with hardware-specific information, and install a LegacyHDA.kext in /Extra/Extensions. You must replace all references of AZAL in your DSDT with HDEF, then insert code that references your specific ins and outs.
Alternately, a solution that works for many people is to use HDAEnabler.kext combined with a modified AppleHDA.kext. There are drawbacks to this solution, as each time Apple pushes an update, Apple's AppleHDA.kext is overwritten, and will have to be replaced in System/Library/Extensions.
The most universal audio fix is VoodooHDA.kext- it is an enabler which at startup uses brute force to probe your system and get any kind of audio output. Most often it is not optimized, and can leave you with audio artifacts, stuttering, volume issues and popping sounds.

I added a new set of DSDT fixes to tonymacx86-DSDT-fixes.zip with instructions on how to enable the HDEF fix in DSDT.aml to use a LegacyHDA.kext. I also optimized each DSDT in the DSDT Database to include hardware-specific HDEF fixes. Good luck!

NOTE: Here are the currently recommended LegacyHDA.kexts for P55 motherboards. For use in combination with HDEF DSDT edits.
Legacy888bHDA.kext.zip
Legacy888HDA.kext.zip
Legacy889HDA.kext.zip
Legacy889aHDA.kext.zip


For discussions on this and other topics, register today at tonymacx86.com!

PC-EFI 10.6 Released: P55 Supported By Default


Today, netkas released PC-EFI 10.6. It is based on Chameleon RC3. According to his post:

New in this release:
* Support for desktop Radeons 4300/4500/4600 in GraphicsEnabler
* Added system-id fix, system doesn’t forget your keyboard settings anymore
* Added fix for lynnfield cpus

I put together an unofficial installer package using netkas' source. Just run it and reboot! You can also use this on a fresh system to install Chameleon.

Download the PC-EFI 10.6 Installer Package

Please note that this is an unofficial release, and any issues related should not be submitted to netkas or the Chameleon team. Let me know if you have any questions or concerns.

For discussions on this and other topics, register today at tonymacx86.com!

DSDT Database for P55 Motherboards

NOTE: The DSDT Database has been redesigned, expanded and relocated to tonymacx86.com/dsdt

For discussions on this and other topics, register today at tonymacx86.com!

Advanced DSDT Fixes: Enable Native Intel SpeedStep on P55 Motherboards

NOTE: This guide is somewhat outdated- in order to enable SpeedStep for Core i5 750 and Core i7 860, all you need to do is use iMac11,1 smbios.plist.  It's available in Multibeast.  

By adding correct SSDT.aml code to your DSDT, you can enable the native Intel SpeedStep technology of your CPU in Mac OS X. According to Wikipedia, "SpeedStep is a trademark for a series of dynamic frequency scaling technologies (including SpeedStep, SpeedStep II, and SpeedStep III) built into some Intel microprocessors that allow the clock speed of the processor to be dynamically changed by software. This allows the processor to meet the instantaneous performance needs of the operation being performed, while minimizing power draw and heat dissipation."

This is not a necessary fix, but you can gain noticeable power savings and/or performance gains. This fix may also extend the life of your hardware by enabling OS X to use advanced features that your Intel CPU was made for.

I added a new set of edits to the tonymacx86-DSDT-FIXES.dsl with speedstep information for the Core i5 750 and Core i7 860. Simply download the updated tonymacx86-DSDT-FIXES.zip, search for SpeedStep, and you'll find code additions for your CPU. You can copy and paste the CPU information from there. The example P55M-UD2 DSDT included has SpeedStep fixes, as well as every other edit that is referenced.

If you're feeling adventurous, you can check the values of your own CPU and make the edits yourself. The easiest way to view this information is to-open DSDTSE, go into the sidebar, and choose SSDT.aml, For example, the edits are made as in the pictures below. The left hand code is from the UD2 SSDT.aml, and the fixed code is on the right. You can then see the values to use when editing. Use the DSDT-FIXES guide for the rest of the code block.


You can check to see if your DSDT is working correctly by using the free application MSR Tools. In order for it to run, you must start up Snow Leopard in 32-Bit mode. Restart your computer, pause the Chameleon countdown and type arch=i386. Download it here.

WARNING: Improper use of SpeedStep code in your DSDT can cause major problems with your system including hardware damage and failure. Again, you do not need to do this fix for a stable system. If you're having any issues, take the SpeedStep code out immediately and reboot. Also, do NOT overclock with SpeedStep- it's known to cause performance decreases. Use with care!

Special thanks to the Insanelymac P55 Thread for the Core i7 edits!

SPEEDSTEP EXAMPLES: Due to popular demand, here is a zip of 2 versions of the GA-P55M-UD2 DSDT- 1 with Core i5 750 SpeedStep and the other with i7 860 SpeedStep. Use these as an example to modify your own DSDT, or if you have a GA-P55M-UD2, you can use this, but be sure to use the correct version! Have fun!
tonymacx86 DSDT-P55M-UD2 - SpeedStep

For discussions on this and other topics, register today at tonymacx86.com!