Here are 10 simple tricks for APT, the Advanced Packaging Tool used on Debian and Debian-based distributions like Ubuntu.
1. View all the packages installed on a system
The easiest way to do it is:
dpkg --get-selections
It does not require to be root, and will display all the packages installed via APT. For example, the first lines may look something like:
$ dpkg --get-selections | head
acetoneiso2 install
acidrip install
acpi-support-base install
acpid install
adduser install
akregator install
alien install
alsa-base install
alsa-oss install
alsa-utils install
You can also put the entire list in a text file by redirecting the output, like this:
dpkg --get-selections > installed_packages.txt
Then read this file with a text editor or using less installed_packages.txt.
2. List files which get installed by a package
-L is a handy parameter to dpkg which will show you what files a package will install.
dpkg -L package_name
For example:
dpkg -L amarok
Will show all the files which are going to be installed by package amarok. You don't have to be root to run it.
3. Upgrade your system using a one-liner
Type as root:
apt-get update && apt-get dist-upgrade
This command will update your list of packages, and if its return status is successful, it will proceed to the next command, apt-get dist-upgrade, which will upgrade all of your packages and will install new dependencies if needed. Use dist-upgrade when you want all of your packages to be installed, and no package left as being kept back.
4. Install the dependencies of an application
Sometimes you need to compile from source a newer version of an application which is already included in the repositories. For example, to install the development libraries for BasKet, you would run as root:
apt-get build-dep basket
And then you can proceed to compile your application. Note that sometimes newer versions of applications may depend on newer libraries or other packages than you do not have in the repositories, so this won't always work.
5. Remove unused package files
When you install software using APT, the DEB packages are kept inside the /var/cache/apt/archives directory. In time, the size of it could get very large. To see what is the size of that directory, you can use:
$ du -h /var/cache/apt/archives/
4.0K /var/cache/apt/archives/partial
956M /var/cache/apt/archives/
In order to clean up all these packages you can use, as root:
apt-get clean
This command will remove all the packages except files which are locked. There is another command, apt-get autoclean, which will remove all the packages which are no longer available in the repository (older versions of packages which can't be downloaded any more).
6. Add repositories from a CD or DVD
If you need an offline repository for packages, you can download all the ISO images for your distribution, eventually burn them on CDs/DVDs and add them manually to the /etc/apt/sources.list file using apt-cdrom (as root):
apt-cdrom add
Enter the CD/DVD in the drive and let APT scan for packages.
Another great solution is to not even burn the ISO images to CD, just mount them and add them to your sources.list this way. Here's what you have to do:
First, type:
apt-cdrom -d=/cdrom add
Or replace /cdrom with some empty directory of your choice, that's where the ISO images will be mounted. I use here /mnt/iso0, /mnt/iso1 etc. Just make sure the directory is empty. The output of the above command looks something like this:
# apt-cdrom -d=/cdrom add
Using CD-ROM mount point /cdrom/
Unmounting CD-ROM
Waiting for disc...
Please insert a Disc in the drive and press enter
Now don't press Enter, instead open another terminal session and mount the image in that directory (as root):
mount -o loop /path/to/iso/file.iso /cdrom
Then return to the shell where you started apt-cdrom and press Enter. It should scan the directory where the ISO image was mounted. I'm not very sure this is the only method, but this worked very well for me. If you mount the ISO the first time and then execute apt-cdrom, it first umounts it and then it fails with the message E: Failed to mount the cdrom.
7. Use dpkg -S to search for a specific file
dpkg -S filename will search for filename in all the packages available and return all the packages which have a file (or the path to that file) with the same name. Notice that the name can also be included in the found files. For example, typing dpkg -S bash will return all the packages which contain the name 'bash' in their files, including mybashburn, bash and several other packages. On the other hand, searching for dpkg -S /bin/bash will only return package bash, since dpkg will match the whole path to the bash binary. See the screenshots below for examples:
8. Use apt-file to search for files in packages
This is a tool which creates a cache with info about all the packages available in the repositories, and it allows to search for specific files in a package and show what files a package will install (including packages which are not already installed). To get it, type as root:
sudo apt-get install apt-file
Next, update its cache:
sudo apt-file update
Use it like this:
apt-file search filename
Or:
apt-file search file_path
This will also return paths which include the name file_path. To show what files a package will install, use:
apt-file show package_name
9. Remove unnecessary packages
This was a feature which existed for while in aptitude, but not in apt. Once you remove an application, it may be possible that some libraries on which that application depended to remain installed in the system. In order to get rid of those too, use:
apt-get autoremove --purge
Notice that this command will only remove packages which are not needed any more by some other application or that are not marked as 'installed manually'. This means packages which you did not specifically installed yourself.
10. List files in a package
Just use dpkg -L package_name for this one. Example:
dpkg -L amarok
dpkg -L bash
...
This will list all the packages installed by the respective package. Notice that it won't list anything if the specified package is not installed.
Showing posts with label command. Show all posts
Showing posts with label command. Show all posts
keyboard shortcuts
Getting used to using your keyboard exclusively and leaving your mouse behind will make you much more efficient at performing any task on any Windows system. I use the following keyboard shortcuts every day:
Windows key + R = Run menu
This is usually followed by:
cmd = Command Prompt
iexplore + "web address" = Internet Explorer
compmgmt.msc = Computer Management
dhcpmgmt.msc = DHCP Management
dnsmgmt.msc = DNS Management
services.msc = Services
eventvwr = Event Viewer
dsa.msc = Active Directory Users and Computers
dssite.msc = Active Directory Sites and Services
Windows key + E = Explorer
ALT + Tab = Switch between windows
ALT, Space, X = Maximize window
CTRL + Shift + Esc = Task Manager
Windows key + Break = System properties
Windows key + F = Search
Windows key + D = Hide/Display all windows
CTRL + C = copy
CTRL + X = cut
CTRL + V = paste
Also don't forget about the "Right-click" key next to the right Windows key on your keyboard. Using the arrows and that key can get just about anything done once you've opened up any program.
Keyboard Shortcuts
[Alt] and [Esc] Switch between running applications
[Alt] and letter Select menu item by underlined letter
[Ctrl] and [Esc] Open Program Menu
[Ctrl] and [F4] Close active document or group windows (does not work with some applications)
[Alt] and [F4] Quit active application or close current window
[Alt] and [-] Open Control menu for active document
Ctrl] Lft., Rt. arrow Move cursor forward or back one word
Ctrl] Up, Down arrow Move cursor forward or back one paragraph
[F1] Open Help for active application
Windows+M Minimize all open windows
Shift+Windows+M Undo minimize all open windows
Windows+F1 Open Windows Help
Windows+Tab Cycle through the Taskbar buttons
Windows+Break Open the System Properties dialog box
acessability shortcuts
Right SHIFT for eight seconds........ Switch FilterKeys on and off.
Left ALT +left SHIFT +PRINT SCREEN....... Switch High Contrast on and off.
Left ALT +left SHIFT +NUM LOCK....... Switch MouseKeys on and off.
SHIFT....... five times Switch StickyKeys on and off.
NUM LOCK...... for five seconds Switch ToggleKeys on and off.
explorer shortcuts
END....... Display the bottom of the active window.
HOME....... Display the top of the active window.
NUM LOCK+ASTERISK....... on numeric keypad (*) Display all subfolders under the selected folder.
NUM LOCK+PLUS SIGN....... on numeric keypad (+) Display the contents of the selected folder.
NUM LOCK+MINUS SIGN....... on numeric keypad (-) Collapse the selected folder.
LEFT ARROW...... Collapse current selection if it's expanded, or select parent folder.
RIGHT ARROW....... Display current selection if it's collapsed, or select first subfolder.
Type the following commands in your Run Box (Windows Key + R) or Start Run
devmgmt.msc = Device Manager
msinfo32 = System Information
cleanmgr = Disk Cleanup
ntbackup = Backup or Restore Wizard (Windows Backup Utility)
mmc = Microsoft Management Console
excel = Microsoft Excel (If Installed)
msaccess = Microsoft Access (If Installed)
powerpnt = Microsoft PowerPoint (If Installed)
winword = Microsoft Word (If Installed)
frontpg = Microsoft FrontPage (If Installed)
notepad = Notepad
wordpad = WordPad
calc = Calculator
msmsgs = Windows Messenger
mspaint = Microsoft Paint
wmplayer = Windows Media Player
rstrui = System Restore
netscp6 = Netscape 6.x
netscp = Netscape 7.x
netscape = Netscape 4.x
waol = America Online
control = Opens the Control Panel
control printers = Opens the Printers Dialog
internetbrowser
type in u're adress "google", then press [Right CTRL] and [Enter]
add www. and .com to word and go to it
make a batch file to clean ur pc
Hello friends
Can any one pl edit this file for me.
The problem is when i reinstall windows, my id changes from
admin to admin.windows or administrator.whatever
I want %% to be used so that the batchfile can locate the
Windows XP directory and my documents and settings folder.
Any help will be appreciated.
*********************************************
@echo off
if %username% == Administrator.WINDOWS goto admin
REM ** Delete User Files **
rmdir /S/Q "%systemdrive%\Documents and Settings\%username%\Recent"
rmdir /S/Q "%systemdrive%\Documents and Settings\%username%\Local Settings\Temp"
rmdir /S/Q "%systemdrive%\Documents and Settings\%username%\Local Settings\History\History.ie5"
rmdir /S/Q "%systemdrive%\Documents and Settings\%username%\Local Settings\Temporary Internet Files\content.ie5"
goto end
:admin
REM ** Do some extra stuff here **
REM ** What ever you want..... **
ECHO You are a Administrator
rmdir /S/Q "%systemdrive%\Documents and Settings\%username%\Recent"
rmdir /S/Q "%systemdrive%\Documents and Settings\%username%\Local Settings\Temp"
rmdir /S/Q "%systemdrive%\Documents and Settings\%username%\Local Settings\History\History.ie5"
rmdir /S/Q "%systemdrive%\Documents and Settings\%username%\Local Settings\Temporary Internet Files\content.ie5"
REM ** Do more stuff here **
REM ** Blah, blah, blah......**
:end
exit
Outsmarting System File Protection
A lot of people are having troubles with System File Protection (SFP for short). This can be a major pain in the butt unless you know the tricks to it. Having only tweaked Windows 2000 Service Pack 3 I figured out a few things about SFP and replacing files:
1) TaskManger is your best friend when replacing files in 2k/XP.
When you open task manager you can do just about as much as you can do with Explorer just by going File>NewTask(Run..). From here you can either use the Run Dialog to launch programs one at a time, or select 'Browse' and explore. Using right click menu commands to do the bulk of your work (Copy, Paste, Rename). Problem is often times you can't replace items do to the fact that your browse is making calls to things you want to delete.
2) CommandLine or Cmd.exe is like that other friend you have that likes to help out.
One plus this has over TaskMan is you don't use the file you are trying to replace. A minus is that it can be a pain if you aren't an experienced DOS user.
3) Backups are your ace in the hole.
Always back your files up prior to doing anything (sometimes I don't bother and wish I did.). Keep It Simple Stupid applies here. Save yourself a few keystrokes and place your backups in something like C:\back\
4) SafeMode is the rest of the hand.
Windows2000 and XP (I believe) can both be booted into SafeMode. When your computer is first booting up, after your bios screen but before the Windows is Starting screen (I could be slightly wrong here seeing how I don't know the timing for sure.) you hit F4 or F8 to get the SafeMode menu. Select 'SafeMode with CommandPrompt'. Welcome to "DOS" on 2k/XP. Anything that can't be replaced while Windows is running can be replaced here. (url.dll) Syntax would be Copy c:\url.dll "c:\Program Files\Internet Explorer\" quotations allow you to put spaces in the path (I didn't know this)
...
Here we go. System File Protection, of Sytem File Checker is a neato feature of Windows meant to protect Joe Computeruser's PC from being ruined. When a needed System file is being replaced your File Checker says "Wait a minute this isn't mine." While this can be great in the long run, it's not a positive thing in Windows Hacking. The trick is to replace the files it uses to replace files.
...
1) First up you need to find the file you want to hack and then replace. Start>Search>Files and Folders>dllname. It's good to actually search for the file so you can find out all of the locations of all copies. Let the search finish just in case. If you have installed any service packs you will have probably have copies of the file in:
\winnt\servicepackfiles\i386\ (Win2k)
\windows\servicepackfiles\i386\ (XP)
As well as:
\winnt\system32\dllcache\ (hidden folder in Win2k)
\WINDOWS\system32\dllcache\ (hidden folder in XP)
\winnt\system32\ (win2k)
\windows\system32\ (XP)
2) Now that you have all of the locations, write them down on paper or your forehead just to be safe (backwards so it shows up in the mirror).
3) Make a backup (remember K.I.S.S.)
4) Hack your file and save it c:\ for simplicity.
5) Open TaskManger (Right click on your taskbar and select TaskManger)
6) Go to the 'Processes' Tab and find 'Explorer.exe' highlight it and push the 'End Process' button. Say Yeah to the popup.
7) Go to the first tab in TaskManger and select 'File>NewTask>Run>Browse' from this Window navigate to c:\ and higlight your hacked file. Right clic on it and select 'Copy' (don't Cut it.)
8) Nagivate to your Windows directory, open the \servicepackfiles\i386\ folder. Paste your hacked file and replace the copy that is in that folder.
9) Navigate to your respective dllcache folder, paste the file there too.
10) Replace the normail copy in system32 finally (or wherever it might be).
11) Reboot. Don't LogOff , Reboot.
Now chances are this won't go that smoothly. Either the file you want to replace is in use, or your pal and mine SFP will pop-up. It can mess with you in odd ways. I've replaced the servicepackfiles version and the dllcache files, then had SFP grab the normal and replace the other two with it. This can be frustrating. Or maybe the file is in use. This is where the Command Prompt comes into play. If you already replaced the files and rebooted to no change, launch TaskMan again, kill explorer.exe, then go 'File>NewTask>Run>Cmd.exe' Use the DOS commands to try to replace all of the copies of the file in that order using your hacked version in C:\
This is usually where you get the message from SFP telling you it's alive and kicking. You will get a rather urgent looking pop-up telling you that a file that Windows needs is being replaced by a different file. It will then ask you if you want keep the modified files. Say 'yes'. Next it will prompt you to insert your Windows cd to retrieve a copy of the file it needs. Click 'Cancel'. As a good rule of thumb, when you get this message replace what you need then reboot!
If your file still isn't changing, boot into SafeMode with CommandLine. Wait for Windows to take it's sweet time loading. Then just type copy c:\file.dll c:\winnt\servicepackfiles\i386\. Rinse and Repeat. Then reboot. This has worked for me 100% of the time, if followed it will work for you as well.
http://pixelarmy.org
Open Command Prompt Shell Extension
- What is the Open Command Prompt Shell Extension?
-
The Open Command Prompt Shell Extension adds an "Open Command Prompt" menu item to the context menus (right-click menus) in Windows Explorer so that you can open a command prompt in the selected directory (or directories) or in the current directory that you are viewing.
The Open Command Prompt Shell Extension is very lightweight (less than 16 KiB installed!), supports network paths, supports both x86-32 and x86-64, supports multiple language locales, and is open-source.

- How is this different from Microsoft's Open Command Window Here PowerToy?
-
The Open Command Prompt Shell Extension was created primarily to address the shortcomings of the Open Command Window Here PowerToy. Improvements include:
- The ability to open a command prompt in the directory that you are currently in by right-clicking on any empty screen space in the directory. This eliminates the need to navigate up a level in order to open a command prompt in the current directory.
- Support for opening command prompts with UNC paths (directories on network shares).
- Support for multiple languages.
Note: If you already have the Open Command Window Here PowerToy installed, you should uninstall it before installing the Open Command Prompt Shell Extension.
- How is this different from BackgroundCMD?
-
The Open Command Prompt Shell Extension offers these improvements over BackgroundCMD:
- All-in-one functionality: BackgroundCMD only opens command prompts for the current directory, so in order to open a command prompt for a subdirectory, it had to be combined the Open Command Window Here PowerToy.
- Support for Unicode paths.
- Support for 64-bit Windows.
- Much smaller size: The final installed size is less than 16 KiB, and this was achieved without any sort of PE packing!
- How is this different from the "Open Command Window Here" feature in Vista?
-
Windows Vista offers a similar built-in feature, but I personally prefer to use the Open Command Prompt Shell Extension for these reasons:
- The built-in context menu option in Windows Vista only appears if the
SHIFTkey is held down while right-clicking. This can become tedious, so if you want this menu option to be available without holding downSHIFT, you will need to use this extension. To avoid the duplication of menu options, this extension will be automatically disabled when youSHIFT-right-click in Windows Vista (this does not affect versions of Windows prior to Vista). - The "Open Command Window Here" feature in Windows Vista handles UNC paths using the
pushdcommand, which creates a temporary mapped drive. There are various advantages (e.g., fewer quirks and errors) and disadvantages (e.g., inability to navigate up) to usingpushd.
- The built-in context menu option in Windows Vista only appears if the
- Is this free?
-
Yes! The Open Command Prompt Shell Extension is open-source, licensed under a BSD-style license.
- How do I get the Open Command Prompt Shell Extension?
-
The download link can be found at the top of this page. Download, unzip, and run the installer found inside (
CmdOpenInstall.exe). The source code is included in the download package.Note: If you already have the Open Command Window Here PowerToy installed, you should uninstall it before installing the Open Command Prompt Shell Extension.
(For advanced users) To run the installer in quiet (unattended) mode, run "
CmdOpenInstall.exe /quiet", and to extract the files to the current directory without installing, run "CmdOpenInstall.exe /extract". - What languages are supported?
-
The following languages are supported:
- English
- 中文 (简体/繁體)
- Deutsch
- ελληνικά (translator: "XhmikosR")
- español
- français
- italiano (translators: "Davide" and "mf3imp")
- 日本語 (translator: "yumeyao")
- Nederlands
- Polski (translator: Adam Kłos)
- português (PT/BR) (pt-BR translator: "0d14r3")
- русский
- Türkçe (translator: "MrNxDmX")
Translations are welcome! Just translate this file and send me the translations.
- Why "Open Command Prompt"?
-
After much deliberation, "Open Command Prompt" was chosen over the more common "Open Command Window Here" as the menu text for this extension. First, while the command prompt is referred to as the "command prompt" all throughout Windows, the Open Command Window Here PowerToy oddly decided to call it a "command window", leading an inconsistency in nomenclature. Second, the "Here" used in the PowerToy is redundant, since it is implied; after all, the other built-in menu items are "Open", "Explore" and "Search", not "Open Here", "Explore Here", and "Search Here". Finally, "Open Command Prompt" is shorter and does not stretch out the context menu as much.
- Version History
-
- 2008/12/20 - 1.1.8
- Added Portuguese (pt-BR) translation. (translator: "0d14r3")
- Added Russian translation.
- 2008/12/17 - 1.1.7
- Added Polish translation. (translator: Adam Kłos)
- 2008/12/12 - 1.1.6
- Added Greek translation. (thanks "XhmikosR"!)
- 2008/12/03 - 1.1.5
- Added Turkish translation. (thanks "MrNxDmX"!)
- 2008/12/02 - 1.1.4
- Added Japanese translation. (thanks "yumeyao"!)
- Changed the access keys for the Chinese translations
- 2008/11/27 - 1.1.3
- Added Dutch translation.
- 2008/10/27 - 1.1.2
- Eliminated the msvcp60.dll (C++ runtime library; STL) dependency.
- 2008/10/16 - 1.1.1
- Various minor improvements to the installer.
- 2008/10/13 - 1.1.0
- Unified installer: instead of using separate setup packages for 32-bit and 64-bit systems, there is now one single setup package for both platforms. The installer will take care of everything, simplifying distribution and installation. Note that, for Windows x64, the installer will install both the 32-bit and 64-bit binaries (any 32-bit application making use of shell components, such as a file picker dialog, would need the 32-bit extension, even if Windows is 64-bit).
- The self-installation function (
DllInstall) has been improved, is more robust, and is less likely to fail. - The installer now exclusively uses
DllInstalland no longer relies on INF files; this resolves some issues that the old installer had with in-use file replacement during update installs. - Added keyboard navigation access keys to the context menu item.
- Added Portuguese (pt-PT) translation.
- 2008/09/11 - 1.0.5
- The 64-bit build is now compiled with the PSDK compiler, which makes eliminating the static linking of the CRT possible. This significantly reduces the file size of the 64-bit version (its size is now comparable to that of the 32-bit build), and being able to use the same CRT as the host shell process conveys other benefits, including a reduced memory footprint (not that anyone running a 64-bit OS would ever notice a few kilobytes).
- The 32-bit build was version-bumped to 1.0.5 in order to keep the version numbers in sync, but no changes were made (the CRT was never statically-linked in the 32-bit build).
- 2008/09/04 - 1.0.4.2
- The 64-bit build is now compiled with VC9SP1 instead of VC8SP1.
- Fixed compile-time error if VC9 or newer is used to build the 32-bit source.
- 2008/09/02 - 1.0.4.1
- New: 64-bit build (requires a 64-bit version of Windows). The 32-bit build is unchanged.
- 2008/07/03 - 1.0.4
- Added Italian translation. (thanks "Davide" and "mf3imp"!)
- 2007/08/31 - 1.0.3
- Installation and uninstallation can now be invoked via standard
DllInstallcalls. - Improved the installer.
- Installation and uninstallation can now be invoked via standard
- 2007/08/21 - 1.0.2
- Improved error checking.
- 2007/08/13 - 1.0.1
- Added German, Spanish, and Traditional Chinese translations.
- 2007/08/08 - 1.0.0
- Initial version.
- 2008/12/20 - 1.1.8
What is svchost.exe And Why Is It Running?
You are no doubt reading this article because you are wondering why on earth there are nearly a dozen processes running with the name svchost.exe. You can't kill them, and you don't remember starting them… so what are they?
So What Is It?
According to Microsoft: "svchost.exe is a generic host process name for services that run from dynamic-link libraries". Could we have that in english please?
Some time ago, Microsoft started moving all of the functionality from internal Windows services into .dll files instead of .exe files. From a programming perspective this makes more sense for reusability… but the problem is that you can't launch a .dll file directly from Windows, it has to be loaded up from a running executable (.exe). Thus the svchost.exe process was born.
Why Are There So Many svchost.exes Running?
If you've ever taken a look at the Services section in control panel you might notice that there are a Lot of services required by Windows. If every single service ran under a single svchost.exe instance, a failure in one might bring down all of Windows… so they are separated out.
Those services are organized into logical groups, and then a single svchost.exe instance is created for each group. For instance, one svchost.exe instance runs the 3 services related to the firewall. Another svchost.exe instance might run all the services related to the user interface, and so on.
So What Can I Do About It?
You can trim down unneeded services by disabling or stopping the services that don't absolutely need to be running. Additionally, if you are noticing very heavy CPU usage on a single svchost.exe instance you can restart the services running under that instance.
The biggest problem is identifying what services are being run on a particular svchost.exe instance… we'll cover that below.
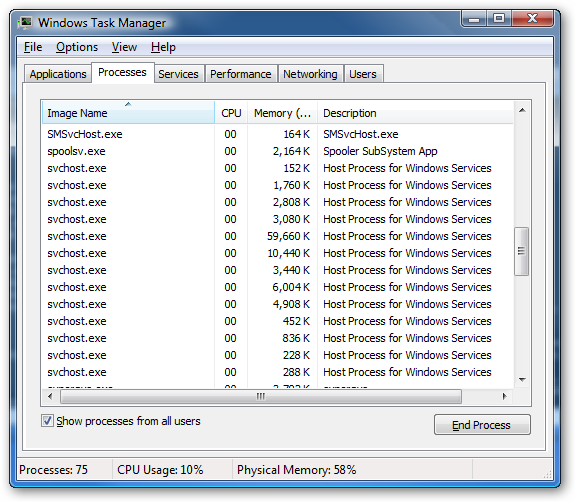
If you are curious what we're talking about, just open up Task Manager and check the "Show processes from all users" box:
Checking From the Command Line (Vista or XP)
If you want to see what services are being hosted by a particular svchost.exe instance, you can use the tasklist command from the command prompt in order to see the list of services.
type: tasklist /SVC
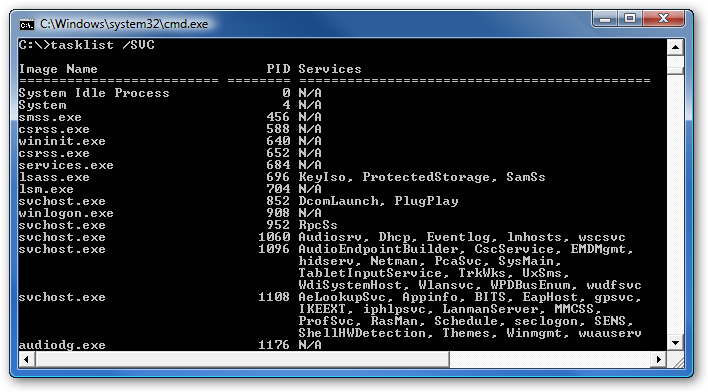
The problem with using the command line method is that you don't necessarily know what these cryptic names refer to.
Checking in Task Manager in Vista
You can right-click on a particular svchost.exe process, and then choose the "Go to Service" option.

This will flip over to the Services tab, where the services running under that svchost.exe process will be selected:

The great thing about doing it this way is that you can see the real name under the Description column, so you can choose to disable the service if you don't want it running.
Using Process Explorer in Vista or XP
You can use the excellent Process Explorer utility from Microsoft/Sysinternals to see what services are running as a part of a svchost.exe process.
Hovering your mouse over one of the processes will show you a popup list of all the services:
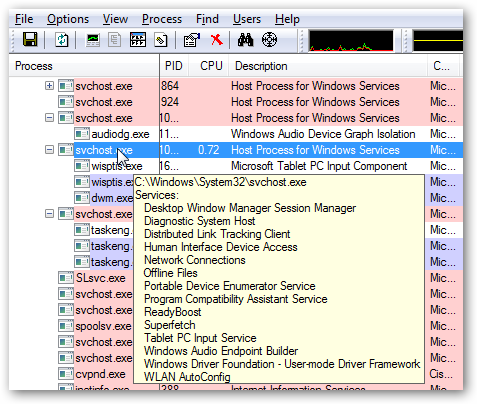
Or you can double-click on a svchost.exe instance and select the Services tab, where you can choose to stop one of the services if you choose.

Disabling Services
Open up Services from the administrative tools section of Control Panel, or type services.msc into the start menu search or run box.
Find the service in the list that you'd like to disable, and either double-click on it or right-click and choose Properties.

Change the Startup Type to Disabled, and then click the Stop button to immediately stop it.
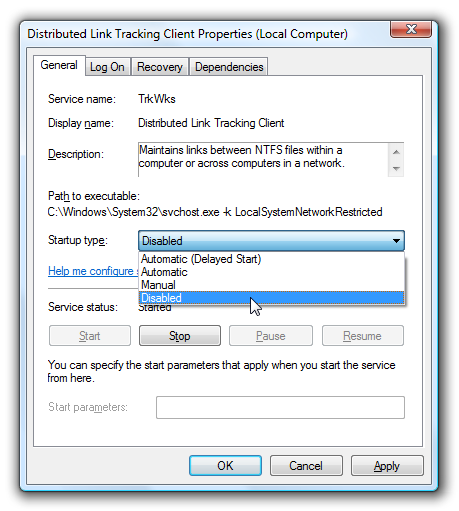
You could also use the command prompt to disable the service if you choose. In this command "trkwks" is the Service name from the above dialog, but if you go back to the tasklist command at the beginning of this article you'll notice you can find it there as well.
sc config trkwks start= disabled
Hopefully this helps somebody!
How To Convert File System, fat - fat32 to ntfs
open a dos prompt and give the command
convert d: /fs:ntfs
this command would convert your d: drive to ntfs.
if the system cannot lock the drive, you will be prompted to convert it during next reboot.
Normally you should select yes.
Conversion from fat/fat32 to ntfs is non-destructive, your data on the drive will NOT be lost.
Be aware that converting to ntfs will make that partition of your
drive unreadable under dos unless you have ntfs utilites to do so.
Restricting login hours
To restrict a users logon hours , use the net user command. These commands are used from the Command Prompt. (Start - RUN - and type cmd)
Below are some examples:
1 - net user Joanna /time:M-F,08:00-17:00
2 - net user Ninja /time:M-F,8am-5pm
3 - net user Echelon /time:M,4am-5pm;T,1pm-3pm;W-F,8:00-17:00
4 - net user Shine /time:all (this one means this user can always log on)
Note:You can only restrict when a user can log on to the system. On a stand alone computer, there is no way to force a user to log off when their hours expire, without a third party script or software.
Bulk editing of .xxx to .zip or .mp3
ets us say you have just download a new album or game
but all the files are .xxx and you need them to be
zip's, rar's, mp3's etc.....
then do the following
-create a new folder
-put all the files needing editing in the new folder
-then goto "run" in the start menu
-type in CMD and click ok
-the next thing needsa few bits of old dos commands
-you need to navagate CMD to the folder whree the files are
-you can do this by 1st getting the total adress of the folder
-and then typing it in cmd with a "cd" in frount
QUOTE
cd c:\xxx\yyy\ccc\
once you in the folder where the files are you can move on
nb u can cheek you in the right folder by typing dir to get a list of files
-now type in....
QUOTE
rename *.* *.zip
Nb change the zip to what ever the extention needs to be (.rar, .mp3 ect)
all done
you should hv now changed the .* to what ever you needed
happy downloading Benji
(by Benji)
nb to exit CMD type in "exit"
Add the open cmd prompt to folder context menus
also drives and My Computer
copy what's in the code area to notepad and save as cmd here.reg
CODE
Windows Registry Editor Version 5.00
[HKEY_CLASSES_ROOT\Drive\shell\cmd]
@="Command Prompt"
[HKEY_CLASSES_ROOT\Drive\shell\cmd\command]
@="cmd.exe /k \"cd %L\""
[HKEY_CLASSES_ROOT\Directory\shell\cmd]
@="Command Prompt"
[HKEY_CLASSES_ROOT\Directory\shell\cmd\command]
@="cmd.exe /k \"cd %L\""
[HKEY_LOCAL_MACHINE\SOFTWARE\Classes\CLSID\{20D04FE0-3AEA-1069-A2D8-08002B30309D}\shell\cmd]
@="Command Prompt"
[HKEY_LOCAL_MACHINE\SOFTWARE\Classes\CLSID\{20D04FE0-3AEA-1069-A2D8-08002B30309D}\shell\cmd\command]
@="cmd.exe /k \"cd %L\""
computer acronyms
ADSL - Asymmetric Digital Subscriber Line
AGP - Accelerated Graphics Port
ALI - Acer Labs, Incorporated
ALU - Arithmetic Logic Unit
AMD - Advanced Micro Devices
APC - American Power Conversion
ASCII - American Standard Code for Information Interchange
ASIC - Application Specific Integrated Circuit
ASPI - Advanced SCSI Programming Interface
AT - Advanced Technology
ATI - ATI Technologies Inc.
ATX - Advanced Technology Extended
--- B ---
BFG - BFG Technologies
BIOS - Basic Input Output System
BNC - Barrel Nut Connector
--- C ---
CAS - Column Address Signal
CD - Compact Disk
CDR - Compact Disk Recorder
CDRW - Compact Disk Re-Writer
CD-ROM - Compact Disk - Read Only Memory
CFM - Cubic Feet per Minute (ft�/min)
CMOS - Complementary Metal Oxide Semiconductor
CPU - Central Processing Unit
CTX - CTX Technology Corporation (Commited to Excellence)
--- D ---
DDR - Double Data Rate
DDR-SDRAM - Double Data Rate - Synchronous Dynamic Random Access Memory
DFI - DFI Inc. (Design for Innovation)
DIMM - Dual Inline Memory Module
DRAM - Dynamic Random Access Memory
DPI - Dots Per Inch
DSL - See ASDL
DVD - Digital Versatile Disc
DVD-RAM - Digital Versatile Disk - Random Access Memory
--- E ---
ECC - Error Correction Code
ECS - Elitegroup Computer Systems
EDO - Extended Data Out
EEPROM - Electrically Erasable Programmable Read-Only Memory
EPROM - Erasable Programmable Read-Only Memory
EVGA - EVGA Corporation
--- F ---
FC-PGA - Flip Chip Pin Grid Array
FDC - Floppy Disk Controller
FDD - Floppy Disk Drive
FPS - Frame Per Second
FPU - Floating Point Unit
FSAA - Full Screen Anti-Aliasing
FS - For Sale
FSB - Front Side Bus
--- G ---
GB - Gigabytes
GBps - Gigabytes per second or Gigabits per second
GDI - Graphical Device Interface
GHz - GigaHertz
--- H ---
HDD - Hard Disk Drive
HIS - Hightech Information System Limited
HP - Hewlett-Packard Development Company
HSF - Heatsink-Fan
--- I ---
IBM - International Business Machines Corporation
IC - Integrated Circuit
IDE - Integrated Drive Electronics
IFS- Item for Sale
IRQ - Interrupt Request
ISA - Industry Standard Architecture
ISO - International Standards Organization
--- J ---
JBL - JBL (Jame B. Lansing) Speakers
JVC - JVC Company of America
- K ---
Kbps - Kilobits Per Second
KBps - KiloBytes per second
--- L ---
LG - LG Electronics
LAN - Local Are Network
LCD - Liquid Crystal Display
LDT - Lightning Data Transport
LED - Light Emitting Diode
--- M ---
MAC - Media Access Control
MB � MotherBoard or Megabyte
MBps - Megabytes Per Second
Mbps - Megabits Per Second or Megabits Per Second
MHz - MegaHertz
MIPS - Million Instructions Per Second
MMX - Multi-Media Extensions
MSI - Micro Star International
--- N ---
NAS - Network Attached Storage
NAT - Network Address Translation
NEC - NEC Corporation
NIC - Network Interface Card
--- O ---
OC - Overclock (Over Clock)
OCZ - OCZ Technology
OEM - Original Equipment Manufacturer
--- P ---
PC - Personal Computer
PCB - Printed Circuit Board
PCI - Peripheral Component Interconnect
PDA - Personal Digital Assistant
PCMCIA - Peripheral Component Microchannel Interconnect Architecture
PGA - Professional Graphics Array
PLD - Programmable Logic Device
PM - Private Message / Private Messaging
PnP - Plug 'n Play
PNY - PNY Technology
POST - Power On Self Test
PPPoA - Point-to-Point Protocol over ATM
PPPoE - Point-to-Point Protocol over Ethernet
PQI - PQI Corporation
PSU - Power Supply Unit
--- R ---
RAID - Redundant Array of Inexpensive Disks
RAM - Random Access Memory
RAMDAC - Random Access Memory Digital Analog Convertor
RDRAM - Rambus Dynamic Random Access Memory
ROM - Read Only Memory
RPM - Revolutions Per Minute
--- S ---
SASID - Self-scanned Amorphous Silicon Integrated Display
SCA - SCSI Configured Automatically
SCSI - Small Computer System Interface
SDRAM - Synchronous Dynamic Random Access Memory
SECC - Single Edge Contact Connector
SODIMM - Small Outline Dual Inline Memory Module
SPARC - Scalable Processor ArChitecture
SOHO - Small Office Home Office
SRAM - Static Random Access Memory
SSE - Streaming SIMD Extensions
SVGA - Super Video Graphics Array
S/PDIF - Sony/Philips Digital Interface
--- T ---
TB - Terabytes
TBps - Terabytes per second
Tbps - Terabits per second
TDK - TDK Electronics
TEC - Thermoelectric Cooler
TPC - TipidPC
TWAIN - Technology Without An Important Name
--- U ---
UART - Universal Asynchronous Receiver/Transmitter
USB - Universal Serial Bus
UTP - Unshieled Twisted Pair
--- V ---
VCD - Video CD
VPN - Virtual Private Network
--- W ---
WAN - Wide Area Network
WTB - Want to Buy
WYSIWYG - What You See Is What You Get
--- X ---
XGA - Extended Graphics Array
XFX - XFX Graphics, a Division of Pine
XMS - Extended Memory Specification
XT - Extended Technology
Create A Huge File
You can create a file of any size using nothing more than what's supplied with Windows. Start by converting the desired file size into hexadecimal notation. You can use the Windows Calculator in Scientific mode do to this. Suppose you want a file of 1 million bytes. Enter 1000000 in the calculator and click on the Hex option to convert it (1 million in hex is F4240.) Pad the result with zeroes at the left until the file size reaches eight digits—000F4240.
Now open a command prompt window. In Windows 95, 98, or Me, you can do this by entering COMMAND in the Start menu's Run dialog; in Windows NT 4.0, 2000, or XP enter CMD instead. Enter the command DEBUG BIGFILE.DAT and ignore the File not found message. Type RCX and press Enter. Debug will display a colon prompt. Enter the last four digits of the hexadecimal number you calculated (4240, in our example). Type RBX and press Enter, then enter the first four digits of the hexadecimal size (000F, in our example). Enter W for Write and Q for Quit. You've just created a 1-million-byte file using Debug. Of course you can create a file of any desired size using the same technique.
Now open a command prompt window. In Windows 95, 98, or Me, you can do this by entering COMMAND in the Start menu's Run dialog; in Windows NT 4.0, 2000, or XP enter CMD instead. Enter the command DEBUG BIGFILE.DAT and ignore the File not found message. Type RCX and press Enter. Debug will display a colon prompt. Enter the last four digits of the hexadecimal number you calculated (4240, in our example). Type RBX and press Enter, then enter the first four digits of the hexadecimal size (000F, in our example). Enter W for Write and Q for Quit. You've just created a 1-million-byte file using Debug. Of course you can create a file of any desired size using the same technique.
Hard drive gone bad
The most common problems originate
from corruption of the master boot record, FAT, or directory.
Those are soft problems which can usually be taken care of
with a combination of tools like Fdisk /mbr to refresh the
master boot record followed by a reboot and Norton disk doctor
or Spinneret.
The most common hardware problems are a bad controller, a bad
drive motor, or a bad head mechanism.
1. Can the BIOS see and identify the hard drive correctly? If
it can't, then the hard drives onboard controller is bad.
2. Does the drive spin and maintain a constant velocity? If it
does, that's good news. The motor is functioning.
3. If the drive surges and dies, the most likely cause is a
bad controller (assuming the drive is cool). A gate allowing
the current to drive the motor may not be staying open. The
drive needs a new controller.
4. Do you hear a lot of head clatter when the machine is
turned on and initialized (but before the system attempts to
access the hard drive). Head clatter would indicate that the
spindle bearings are sloppy or worn badly. Maybe even lose and
flopping around inside.
5. There is always the possibility that the controller you are
using in the machine has gone south.
1. If the drive spins, try booting to the A> prompt, run Fdisk
and check to see if Fdisk can see a partition on the hard
drive. If Fdisk can see the partition, that means that it can
access the drive and that the controller electronics are
functioning correctly. If there is no head clatter, it may be
just a matter of disk corruption which commonly occurs when a
surge hits you machine and overwhelms the power supply voltage
regulator. It commonly over whelms the system electronics
allowing an EM pulse to wipe out the master boot record, file
allocations table, and primary directory. Fdisk can fix the
master boot record and Norton Disk Doctor can restore the FAT
and Directory from the secondaries.
2. The drive spins but Fdisk can't see it. Try the drive in
another system and repeat the test to confirm that Fdisk can't
read through the drives onboard controller. If it sees it in
another system, then your machines hard drive interface is
bad. You can try an upgraded or replacement controller card
like a Promise or CMD Technologies (there are others) in you
machine after disabling the integrated controller in the BIOS,
but if the integrated controller went south, it may just be
symptomatic of further failures and you'd be wise to replace
the motherboard. Trying the drive in another machine also
eliminates the variable that your machines 12 volt power
output being bad
3. If you get head clatter but a constant velocity on the
drive motor (no surging), you might try sticking the hard
drive in the freezer for about 12 hours. This is an old trick
from back in the days of the MFM/ESDI driver era. This can
cause the drive components to shrink enough to make the track
marker align with the tracks. We don't see that kind of
platter spindle wear much anymore, but back in the old days,
the balancing and bearings weren't as good. Still, under the
right circumstances, it might help. It would depend on how old
the drive is and how many hours of wear have occurred. You
have to be quick to get your info off the drive when it works.
Back then, the drives were much smaller, so there wasn't so
much to copy. So, go after the important data first.
4. The drive doesn't spin. Either the onboard controller is
bad or the motor is bad (assuming you did try the drive in
another machine). It's time to hit the net and local
independent shops to see if you can locate another drive of
the same make and model that's good. Since the drive is
probably an older drive and no longer in distribution, your
best bet is to find an identical used drive. If you know
someone with the same make and model, you might be wise to try
and persuade them to sell you their drive with an offer of
providing them with a free upgraded drive. If you can locate
an identical drive, start with the controller replacement ...
this is the simplest and least invasive. If swapping the
controller doesn't produce the desire result, you can tear
into the drive and swap the motors. While you have both drive
opened up to accomplish this, scrutinize the platters, heads
and armatures. You might even hook the drive up and power it
from a system with both drives attached. This way, you could
see anything that deviates between the actions of both drives
when they are initialized. Swapping patters is unlikely to
produce any positive result. They are a balanced system like
the tires on your car and I suspect that the balance will be
different for each drive as will other variables.
5. There's always Ontrack Corp. who will attempt to recoup
your info starting at $500 and going up from there. They don't
fix and return the drive either.
If the info is all that important to you, I would seek some
professional and experience technician in your locality who
makes his living from servicing and building computer systems
... not just selling them. If you have had much experience
salvaging information from bad hard drives, your likelihood of
success is low. In the case of soft corruption, all utilities
have their eccentricities. Often times, Norton Disk Doctor
will go too far (if you let it). It's wise to just let those
utilities small steps and then have a look at the drive and
see if you can copy it off. Norton will go so far as to rename
directories and files, and even delete them or break them up
into fragments which are useless.
_________________
How Long Has Your System Been Running?
Here's how you verify system uptime:
Click Start | Run and type cmd to open a command prompt.
At the prompt, type systeminfo
Scroll down the list of information to the line that says System Up Time.
This will tell you in days, hours, minutes and seconds how long the system has been up.
Note that this command only works in XP Pro, not in XP Home. You can, however, type net statistics workstation at the prompt in Home. The first line will tell you the day and time that the system came online.
Automated scp on Linux
Scenario
You would like to automate the export of SQL dump files from one Linux server to another using scp. These dump files are to be generated and exported once every two weeks. You also wish to archive these dump files on the source server.
So let’s say the servers and directories are as follows:
Source
Hostname: perak
Username: nazham
Dump file directory: /home/nazham/data_export/current
Archive directory: /home/nazham/data_export/archive/yyyymmdd
Target
Hostname: selangor
Username: romantika
Target directory: /home/romantika/data_import
Passwordless scp
First you need to set it up so that you don’t need to enter a password for scp. The overall picture is as follows:
- At the source server, generate a pair of public and private keys [1] using RSA.
- Store the private key in a specific place in the source server.
- Store the public key in a specific place in the destination server.
- And that’s it! Now you’ll no longer be prompted for a password when using scp.
One-off steps
# login to perak with username nazham
ssh-keygen -t rsa
# choose default location, no passphrase - just press enter at all prompts
scp ~/.ssh/id_rsa.pub romantika@selangor:/home/romantika/.ssh/authorized_keys
# I'm assuming the file authorized_keys does not exist!
# otherwise, you need to append the contents of id_rsa.pub to it.
crontab -e
# add the following:
# 1 0 1,15 * * nazham /home/nazham/run_data_export >> /dev/null 2>&1
# which means, run at 12:01 am every 1st and 15th of the month
mkdir ~/data_export
mkdir ~/data_export/current
mkdir ~/data_export/archive
The run_data_export script
todaysDate=`date +%Y%m%d`
oldDate=`date -d '1 year ago' +%Y%m%d`
exportDir=data_export
mysqldump -u username -ppassword -r ~/$exportDir/current/filename dbname tablenames
echo $todaysDate > ~/$exportDir/current/importdate.txt
scp ~/$exportDir/current/* romantika@selangor:/home/romantika/data_import
mkdir ~/$exportDir/archive/$todaysDate
rm ~/$exportDir/current/importdate.txt
mv ~/$exportDir/current/* ~/$exportDir/archive/$todaysDate
if [ -d ~/$exportDir/archive/$oldDate ]; then rm -r ~/$exportDir/archive/$oldDate; fi
The Linux date command
I’m very impressed by the Linux date command. This might be old news to some, but the fact that I’m able to say date -d '1 year ago' or date -d '30 days ago' completely blows the mind.
Notes
[1] From Pass on Passwords with scp: “If you’re not familiar with public key cryptography, here’s the 15-second explanation. In public key cryptography, you generate a pair of mathematically related keys, one public and one private. You then give your public key to anyone and everyone in the world, but you never ever give out your private key. The magic is in the mathematical makeup of the keys; anyone with your public key can use it to encrypt a message, but only you can decrypt it with your private key.”
Subscribe to:
Posts (Atom)