Showing posts with label Freeware. Show all posts

Two applications for safer computing

I recently suffered from the DNSChanger trojan. This particularly nasty piece of malware changes the DNS settings on the infected PC to a server which then redirects the web browser either to advertising or more maliciously to phishing sites. Unfortunately the virus checking software that I was using at the time - AVG Free - failed to pick up the trojan.

This failure along with a number of other gripes that I had with AVG resulted in me looking for a new free anti-virus package. In the end I decided on Avira AntiVir Personal, after having read good things about it on a number of forums. The only issue that I have with this software is that it pops-up an advertisement every time that it updates, but this is a small price to pay. Avira has something of a reputation for finding a lot of false positive, which is when a safe file is mistakenly identified as a virus; however, this is preferable to the opposite problem, when the software fails to identify an infected file.

I finally managed to remove the trojan from my PC using the excellent Malwarebytes' Anti-Malware. A version of this software is available for free that allows you to scan your drives for any infections. You can pay for another version that offers real-time protection from malware.

Tag those audio files and show them to the World

If you have a large collection of MP3s, WMAs and other audio files, you probably have quite a few where the tag information isn't set up properly. In other words, they don't come up with the correct track name or artist in your media player.


Editing these tags manually can be a laborious task, but fear not, the contributers at MusicBrainz offer a solution to your problem. As they say themselves:
MusicBrainz is a community music metadatabase that attempts to create a comprehensive music information site. You can use the MusicBrainz data either by browsing this web site, or you can access the data from a client program — for example, a CD player program can use MusicBrainz to identify CDs and provide information about the CD, about the artist or about related information. You can also use the MusicBrainz Tagger to automatically identify and clean up the metadata tags in your digital music collections.

The website has a number of applications that you can download which access the database. The one I found most useful was Picard, which provides an interface to search the database and use the information to rename and tag the audio files with the correct information. I didn't find Picard particularly intuitive to use; however, the authors have provided some quality documentation to instruct users on how the application works. Here are a few images of the software in action. If anyone struggles with the software after reading the instructions, leave a comment on this post and I will record and post a video of how to use it.

Here is that list of badly tagged mp3 files in Picard.

Using the search facility on Picard opens up a listing of matching information on the MusicBrainz website. I navigated to the appropriate album listing, and pressed the green 'Tagger' button.

Picard presented the information in the right pane. I selected the files in the left pane, pressed the 'Scan' button, and when the list in the left pane was empty I pressed 'Save' to make the changes.

Here is the file listing with the correct tag information in place.

I finally decided that I needed to create and correct the tag information on my audio files after becoming sick and tired of some of them not registering with Audioscrobbler, which is the software used on the music based social-networking site LastFM. The software records all the music you play on your computer, and even some portable audio players, and creates charts from the information. You can see my page here. The site enables you to create fancy widgets to put on your blogs, social networking pages and other websites too, like this one:


So get those audio files tagged and let the World that you are obsessed with prog rock.

From screen to video: recording Windows

As you will have seen in my last post I have at last added video to this site. I used a handy freeware application called CamStudio to record what I was doing on my screen.

This software has some excellent features that include: recording of vocal commentary; addition of captions; and even picture-in-picture video of yourself if you have a webcam. There is some help for using the software at Nick the Geek's Support Helpdesk, but I will give you a few tips to get you started.

Firstly, it is best to select a different video codec (the way that the video is encoded and compressed) than the default one to keep the file sizes small. From the Options men select Video Options. Pick a compressor from the list. There is a lossless video codec available to download on the CamStudio site. You can also reduce the quality of the video on the Video Options page to further reduce the size of the video file. You will have to make sure that the people who view the video have the correct codec installed on their machine.

Next, select the area you wish to record. To do this pull down the Region menu and select Fixed Region (you can also record the whole screen). Click on the Select button and hold down the left-button on the mouse and drag it to select the region of the screen you wish to record.
It is best to make sure that the height and width are an even number of pixels, as this is a requirement of some video codecs. Click OK.

You can now hit the record button, the red circle, move the selection box over the part of the screen you wish to record and left-clik the mouse, and now the software will record anything that happens in that part of your screen. Click the blue square to stop recording, and then select a file name and a location for the video file.

Check out the other settings for adding audio and webcam screen-in-screen. Happy movie making.

Bring files back from the dead, continued...

The authors of PC Inspector File Recovery recommend that you install it on a different drive from the one you want to retrieve lost files from. This may not always be possible, but if you have a second drive or a USB memory stick, then install the software onto one of these.

Once installed, run the software.

Select your language when prompted.

Click on the 'Recover Deleted Files' tab as shown on the left of this image.

As you can see, I have a number of drives on my PC. On most machines there will only be two drives listed in the list. Select the drive you wish to search for deleted files, usually this will be 'Windows drive C:', and click on the tick.

The software may take some time to scan your drive, when finished it will present you with a list of deleted files and folders that it has found. Note that each file's condition is listed and even when the file condition is 'good' it may not be restored in totality.

Try to locate the lost file in the list. If you find it, right-click on it and select 'Save as'. If possible select a location of a different hard-drive or a USB memory stick. With luck your file will be restored.

If you can't find your file in the list, try searching for it by clicking on the magnifying glass icon, and typing in the filename of the lost file. The search engine supports wild-cards. Click here for a previous post that explains the use of wild-cards. If the software finds your file you can right-click on it and save it as above.

This guide explores only one aspect of the software as a file recovery tool. Check out the help file and the website for instructions on the other features, but be warned, these tools are not designed for novices.

Note: I had some problems using this software on NTFS drives. To find out if your drive is NTFS or FAT32: go to My Computer select your drive. The file system should appear in the 'Details' section on the left-hand side. Try looking in the drives listed as being 'on fixed disk' as well as those the 'on Windows drive' entries on the 'Select drive' dialog. To select a different drive open the Object menu and click on Drive...

Linux Applications: Part 4 - Internet

Having switched to Linux a while ago, I finally have settled on a variety of Internet applications that do what I want. I listed a variety of web browsers in a previous post, so this time I will look at other Internet clients.

I have been on-line for many years, so this list includes some applications for systems you may never have heard of, but you may want to try anyway and impress friends and family with your 'old school' credentials.

IRC Client - XChat
Internet Relay Chat (IRC) was the online chat system of choice in the days before Internet messaging apps such as ICQ, AIM, Windows Live Messenger, and Yahoo! Messenger. There are a number of IRC clients available for Linux, but I have settled on the fully featured XChat, which is also available for Windows.

Usenet client - Pan

Usenet resembles a Bulletin Board System (BBS) or a web forum. It enables you to access a number of newsgroups either provided by your ISP or available on an open server. I still check newsgroups occasionally, so I needed a decent application to do so. I chose Pan, because it had all the features I needed including support for binaries.


Voice over IP client - Skype
This popular VoIP/messenger/videoconferencing client is also available for a number of Linux distributions. While it is not as fully-featured as the Windows version, it still does all that I need.

How to save paper when printing pdf files

In these days of environmental concern and financial insecurity every little helps, including being able to save paper when printing documents. The Portable Document Format is an incredibly popular file format that can be viewed in Acrobat Reader (developed by the inventors of the file format, Adobe) and in other more lightweight applications, such as the excellent Foxit Reader. Both these programs support printing more than one page of the pdf onto one sheet of paper, as explained below:


Adobe Acrobat
Pull down the 'File' menu and select 'Print'.
On the 'Print' window pull down the drop-down list marked 'Page Scaling' and select 'Multiple pages per sheet'.
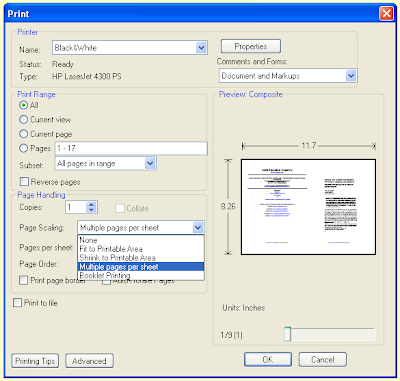
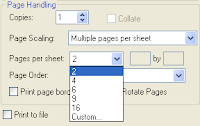
Use the other settings to adjust how many pages appear on each sheet. I do not suggest selecting any more than two as this may make the text too small to read. Use the preview on the 'Print' window to make sure that your selections are correct.

You can also select the order in which the pages are placed on the sheet. Setting this to 'Horizontal' will put the first page on the left and the second on the right of the printed sheet, and so on for the rest.
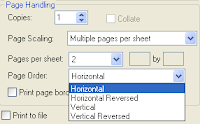
You can also print a border round the page and rotate the pages should you desire by ticking the appropriate boxes.

If the version of Acrobat Reader doesn't have this facility, you can upgrade to the latest version for free. These instructions should also apply for the latest versions of Acrobat Reader on Mac OSX and Linux.


Foxit Reader
The process is pretty much the same in Foxit Reader; although, the interface is slightly different.

Pull down the 'File' menu and select 'Print'.
On the 'Print' window pull down the drop-down list marked 'Page Arrange' and select 'Multiple pages per sheet'.
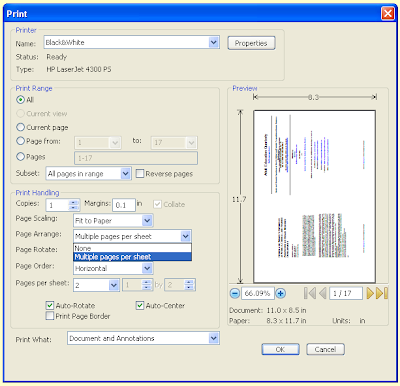
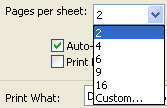
Select how many pages you want to appear on each printed sheet. As with Acrobat, two is probably the best choice.

Set the page order. Usually this will be 'Horizontal'.

Make sure that 'Auto-Rotate' and 'Auto-Center' are ticked.
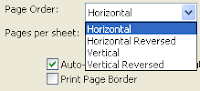
Tick the 'Print Page Border' box if you want to have each page appear in a box; although you may consider this to be a waste of ink.

Foxit Reader also has a preview of what the first page will look like on the Print window, so you can confirm that your selections are correct.

Weekend Website: PortableApps.com

I have not run this feature in ages, but I decided to bring it out of retirement to feature an excellent site: PortableApps.com. With the increasing popularity of USB flash drives and memory cards many software producers are creating versions of their software tailored to run from these devices. This means that you can carry your favourite applications round with you on your portable drives and use them on whatever Windows computer you like.

PortableApps.com not only provide links to download free portable software but also have packaged the most popular software, which can be executed using their own menu. Applications available on the site include GIMP, Firefox, OpenOffice.org, and even a portable version of the antivirus software ClamWin. The site also offers support for all the available applications and has forums where you can join in discussions about portable computing.

"Can you hear it?" Three Freeware Audio Applications

Winamp has long been a popular mp3 player developing a large user community. Members of this community submit a plethora of skins, plug-ins and other add-ons to the Winamp website. Winamp also offers support for iPods and other mp3 players, and functions as an adequate video player.

If you have ever made an audio mix CD from mp3 files, you have probably been annoyed to find that all the tracks play at different volume levels, spoiling that overall ambiance you wished to create with your selection of top tunes. If this problem is a source of vexation for you, try mp3gain. With this program you can quickly balance the levels of a selection of mp3 files, so as to further impress that prospective partner, work colleague, or friend with your eminently good taste.

The best freeware audio editor available is Audacity. It provides support for mp3 files - as well as a number of other formats - and offers enough editing features and effects to meet most user's needs. Unfortunately, Audacity does not support proprietary formats such as wma, but there are plenty of audio file converters available like dBpoweramp.

Where has all my hard-drive space gone? - Reloaded

Just as you can never have enough cupboard space in your home, you can never have enough hard-drive space. Nevertheless, occasionally we all have to sort through our storage and throw out a few things to make some more room. This is often easier said than done when it comes to your PC as it is not always clear what is taking up all the space.

The free version of TreeSize provides a graphical representation of how much hard-drive space your folders are using. Simply right-click on a particularly bloated folder and click on 'Explore' from the menu. This will open up that folder so you can set about deleting any files that are surplus to requirement. Remember to empty the recycle bin when you are finished. I would suggests that you leave the 'Program Files' and 'Windows' folders alone unless you know what you are doing.

If you use Internet Explorer you may want to delete its cache of temporary files. From the 'Tools' menu select 'Internet Options.' If you use IE version 6 or earlier, click on the 'Delete Files' button. For later versions click the button marked 'Delete...' in the 'Browsing History' section. Click the 'Delete Files' button on the box that opens. You will then be asked whether you are sure, click 'Yes.' Deletion of all the temporary internet files may take a while.
In Firefox, go to the 'Tools' menu and select 'Options..' Click on the 'Advanced' icon. Click on the 'Network' tab. There you will find a button labelled 'Clear now', pressing this will empty the cache.
Also, the save files of many computer games can be quite large. You may want to delete a few of these and the best way to do so is within the game. Usually this facility is located on the 'load game' screen. See these related posts for more ways to recover drive space:-
Spring Cleaning: How to clear out temporary files
Time for a purge: reclaiming hard-drive space

This post comprises amended information from two earlier posts Where has all my hard-drive space gone? and Keyboard shortcut of the week: refreshing changes both posted on 30th August 2007

A Safari through Windows and a new Firefox

Safari
Apple's web browser is now available for Windows XP and Vista. Safari had previously only been available on Macintosh operating systems. The browser is certainly quick and uses about as much memory as Mozilla Firefox; however, Safari takes up more hard drive space than Firefox: around 60Mb. Nevertheless, Safari is yet another alternative to Internet Explorer.

You can download Safari for Windows for free from here.


Firefox
There is also a new version of Firefox in the offing. At present it is still in Beta, which means that it is being tested by users and should not be considered to be finished software. According to Mozilla, Firefox 3 uses less memory than the old version - a particular complaint of mine.

You can download the Firefox 3 Beta 5 for free from here. (But be aware this is far from bug free software).

Five top freeware applications

Before spending your hard earned cash on software, it is always worth looking to see what is available for free. In this article I will look at five free applications that I use myself.

First up, and probably most importantly, we have a virus checker. AVG anti-virus free edition has all the features I want from anti-virus software. It loads quickly, doesn't take up much system resource, updates itself regularly, and only bothers me when it finds a problem.

After viruses, spyware is the next major problem that arises from using the Internet. I use Spyware Terminator, which has many of the same virtues as AVG anti-virus, in that it is not constantly bothering me with messages. In my opinion, such software should sit quietly in the background doing its job.

Quick tip: when you run a scan on your PC looking for spyware the software 'looks' at each file, which means that the virus checker also checks that file. So by running a spyware scan you also effectively run a virus scan.

Do you use Windows Media Player to watch video files? Do some videos not load into it? Does it complain about needing something called a 'codec'? You can do worse than try the VideoLAN VLC media player. VLC supports most common media types, both audio and video, and is available in versions for Linux and Macs too.

The last two freeware applications have been featured in previous articles here. TreeSize is a program that provides a graphical representation of how much hard-drive space each folder is using; very useful for working out where all your hard-drive space has gone. The other is Startup Control Panel, which provides a means to manage which programs run automatically when Windows starts.

Make any window stay on top

Some applications have an option to make their windows stay visible even when you select another application. While using my webcam on Skype the other day I went searching for the option to make the webcam window stay on top but I could not find it anywhere. There are a number of free tools available to apply this feature to all windows, but I settled on Tummy's Power Menu 1.5.1.

Not only does Power Menu add the 'stay on top' option to all windows, but also it allows you to set the transparency of the window to make it see-through. This software also enables you to minimise an application to the Systray (the collection of icons near the clock on the Taskbar). Power Menu even lets you adjust an application's priority within windows, although I do not recommend setting this unless you are confident that you know what you are doing.

Power Menu works on all modern versions of Windows including XP and Vista. Once you have installed the software you can access the new features by pulling down the control menu of a window by clicking on its icon at the right hand of the title bar. The following images demonstrate Power Menu's excellent features:-

The extra features on the control menu.

A semi-transparent Notepad.

Firefox minimised to the Tray. Click on the icon to restore it.

Five freeware image manipulation tools

The GIMP
This is a fully featured image editor with an interesting name - it stands for GNU Image Manipulation Program (apparently). This is an incredibly powerful application with features that rivals professional software like Photoshop. Whilst this software was originally developed for a Linux environment there is a Windows version available; however, in my experience it does not work well on Windows. Nevertheless many people do use it on Windows machines and enjoy its powerful features although for the novice user it's stark interface may take some getting used to.

Paint.net
Whereas the GIMP's interface may take some getting used to Paint.net's is friendly and intuitive, and while Pain.net is not as feature-rich as the GIMP it is still a powerful image manipulation tool with many of the features found in commercial image editing packages. Because it is quick and easy to use it has become my image editor of choice.

IrfanView32
IrfanView is an image viewer which has few editing features, but it is still a worthy inclusion on this list; although, not even as an image viewer (the one built into most versions of Windows is good enough). The reason I have included it is the batch image process feature, with which you can change the format of many files in one go, say from 'bmp' to 'jpeg', rather than open and save each file separately.


Beneton Movie GIF
This application can be used to create animated GIFs. I used it myself to create the animated advert for a friend's website - the one for younilife that you can see at the top right hand of this page. The software works on the same principle as a flipbook: draw the pictures in an image editor such as paint.net; open them all in Beneton Movie GIF; select the order in which they are to be shown and set the length of time each frame is to be shown for. This may sound a little complicated but it is quite intuitive after a while. The software includes some fancy transition features to create dynamic looking animations.

IcoFX

IcoFX is an icon editor. I used it myself to create the favicon for Bloody Computer! (the yellow exclamation mark that you see next the this webpages' URL in the address bar). This software supports all the various Windows icon formats, including those for Vista.

Command Window Here: Free MS PowerToy for XP

In the last post I have instructions for using the Command Prompt to navigate to a particular folder; however, there is an easier way to do this in Windows XP by installing a PowerToy (this feature is already available in Vista).

To install this feature, look for 'Open Command Window Here' the list of PowerToys on the right hand side of the page and click on CmdHere.exe to download it (or simply click here - if this links stops working please leave a comment). After installing the software, when you right click on a folder icon, or on the empty space within a folder, you will see a new entry in the menu that opens: 'Open Command Window Here'. Click on this to open up a Command Prompt window that will already be focused on the current folder.

There are a number of other PowerToys available, including the excellent Clear Type Tuner, which was the subject of an earlier post. In future posts on this blog, I will look at some of the other tools available to enhance Windows XP.

Tweak UI: free MS Power Toy for Windows XP

I should start with an apology for not having posted anything here for a while. I have been rather busy for the last few weeks, but I am back now posting more PC help and advice starting with the most powerful of Microsoft's Power Toys for XP: Tweak UI.

You can download the software from here (or here if you have an Itanium™-based system).

Note: this software is designed for Windows XP (and 2003 Server), some users have reported some success with it on 32-bit versions of Vista, but not on Vista64.

Once downloaded and installed, Tweak UI (UI meaning 'user interface') will appear in your Control Panel. If you run it you will be presented with the following:

If you select a category from the tree-list on the left the right panel will show any relevant tweaks that can be made to the Windows interface. For example, Tweak UI offers some extra settings for the mouse. Click on the + next to 'Mouse' in the tree-list, and then click on 'Wheel' to see the following:


As you can see, I have chosen to use mouse wheel for scrolling 3 lines at a time. Notice that there is a description of what the tweak does, and that this change applies only to the user you are logged on with, not every user as some changes will. Browse through all the settings and see the other tweaks that you can make. Click the 'OK' button to apply the changes and close Tweak UI, or just click the 'Apply' button to see your changes in action while keeping Tweak UI open in case you wish to revert to your previous settings.

If you have any problems with or questions about Tweak UI feel free to leave a comment on this post. Happy tweaking!

Making Windows run faster: programs that run automatically

The more programs you have running on your computer the slower it is. So one way to squeeze better performance out of your PC is to run fewer programs. Many applications you have installed will run programs when you start up Windows. Not all of these programs are essential, although, some are - such as your virus checker and anti-spyware software. In this article we will look at the various ways that Windows runs these programs and how to remove the non-essential ones.

The safest way to stop these programs from running is to tell them not to run in the first place. If you look down by the time on your taskbar you will see a line of icons. Each of these icons indicates a program that is running. Hover the mouse over them to see what they are. Select one that you have decided is non-essential, for example, an icon for a media player update checker. Right-click on the icon to reveal a menu. From this menu select 'Options', 'Settings' or 'Preferences' (whichever appears). Look around these options and try to find one that says something along the lines of 'Run at start-up.' De-select this option and the next time you start Windows that icon should no longer appear.

You may find a few icons from applications that you installed and now never use. The best way to deal with these is to uninstall them. To do this go to 'Add/Remove Programs' in your Control Panel. (Comment to this article if you need help doing this. If there is enough interest I will write a beginners guide to removing applications).

Windows has a number of other ways to start programs: there is a Startup folder in the All Programs section of your Start Menu; there are settings in the mystical thing known as the Registry. To manage all these I use Mike Lin's excellent free Startup Control Panel. Follow the instructions on the Mike's website to install and run the program. A major advantage of Startup Control Panel is that you can remove the tick from the entries on the various tabs and see what the results are. If you then decide that you do need to run a program when Windows starts you can go back to Startup Control Panel and tick them again.