It's time to delve a bit deeper and uncover some of Windows XP's secrets.
1. It boasts how long it can stay up. Whereas previous versions of Windows were coy about how long they went between boots, XP is positively proud of its stamina. Go to the Command Prompt in the Accessories menu from the All Programs start button option, and then type 'systeminfo'. The computer will produce a lot of useful info, including the uptime. If you want to keep these, type 'systeminfo > info.txt'. This creates a file called info.txt you can look at later with Notepad. (Professional Edition only).
2. You can delete files immediately, without having them move to the Recycle Bin first. Go to the Start menu, select Run... and type 'gpedit.msc'; then select User Configuration, Administrative Templates, Windows Components, Windows Explorer and find the Do not move deleted files to the Recycle Bin setting. Set it. Poking around in gpedit will reveal a great many interface and system options, but take care -- some may stop your computer behaving as you wish. (Professional Edition only).
3. You can lock your XP workstation with two clicks of the mouse. Create a new shortcut on your desktop using a right mouse click, and enter 'rundll32.exe user32.dll,LockWorkStation' in the location field. Give the shortcut a name you like. That's it -- just double click on it and your computer will be locked. And if that's not easy enough, Windows key + L will do the same.
4. XP hides some system software you might want to remove, such as Windows Messenger, but you can tickle it and make it disgorge everything. Using Notepad or Edit, edit the text file /windows/inf/sysoc.inf, search for the word 'hide' and remove it. You can then go to the Add or Remove Programs in the Control Panel, select Add/Remove Windows Components and there will be your prey, exposed and vulnerable.
5. For those skilled in the art of DOS batch files, XP has a number of interesting new commands. These include 'eventcreate' and 'eventtriggers' for creating and watching system events, 'typeperf' for monitoring performance of various subsystems, and 'schtasks' for handling scheduled tasks. As usual, typing the command name followed by /? will give a list of options -- they're all far too baroque to go into here.
6. XP has IP version 6 support -- the next generation of IP. Unfortunately this is more than your ISP has, so you can only experiment with this on your LAN. Type 'ipv6 install' into Run... (it's OK, it won't ruin your existing network setup) and then 'ipv6 /?' at the command line to find out more. If you don't know what IPv6 is, don't worry and don't bother.
7. You can at last get rid of tasks on the computer from the command line by using 'taskkill /pid' and the task number, or just 'tskill' and the process number. Find that out by typing 'tasklist', which will also tell you a lot about what's going on in your system.
8. XP will treat Zip files like folders, which is nice if you've got a fast machine. On slower machines, you can make XP leave zip files well alone by typing 'regsvr32 /u zipfldr.dll' at the command line. If you change your mind later, you can put things back as they were by typing 'regsvr32 zipfldr.dll'.
9. XP has ClearType -- Microsoft's anti-aliasing font display technology -- but doesn't have it enabled by default. It's well worth trying, especially if you were there for DOS and all those years of staring at a screen have given you the eyes of an astigmatic bat. To enable ClearType, right click on the desktop, select Properties, Appearance, Effects, select ClearType from the second drop-down menu and enable the selection. Expect best results on laptop displays. If you want to use ClearType on the Welcome login screen as well, set the registry entry HKEY_USERS/.DEFAULT/Control Panel/Desktop/FontSmoothingType to 2.
10. You can use Remote Assistance to help a friend who's using network address translation (NAT) on a home network, but not automatically. Get your pal to email you a Remote Assistance invitation and edit the file. Under the RCTICKET attribute will be a NAT IP address, like 192.168.1.10. Replace this with your chum's real IP address -- they can find this out by going to www.whatismyip.com -- and get them to make sure that they've got port 3389 open on their firewall and forwarded to the errant computer.
11. You can run a program as a different user without logging out and back in again. Right click the icon, select Run As... and enter the user name and password you want to use. This only applies for that run. The trick is particularly useful if you need to have administrative permissions to install a program, which many require. Note that you can have some fun by running programs multiple times on the same system as different users, but this can have unforeseen effects.
12. Windows XP can be very insistent about you checking for auto updates, registering a Passport, using Windows Messenger and so on. After a while, the nagging goes away, but if you feel you might slip the bonds of sanity before that point, run Regedit, go to HKEY_CURRENT_USER/Software/Microsoft/Windows/Current Version/Explorer/Advanced and create a DWORD value called EnableBalloonTips with a value of 0.
13. You can start up without needing to enter a user name or password. Select Run... from the start menu and type 'control userpasswords2', which will open the user accounts application. On the Users tab, clear the box for Users Must Enter A User Name And Password To Use This Computer, and click on OK. An Automatically Log On dialog box will appear; enter the user name and password for the account you want to use.
14. Internet Explorer 6 will automatically delete temporary files, but only if you tell it to. Start the browser, select Tools / Internet Options... and Advanced, go down to the Security area and check the box to Empty Temporary Internet Files folder when browser is closed.
15. XP comes with a free Network Activity Light, just in case you can't see the LEDs twinkle on your network card. Right click on My Network Places on the desktop, then select Properties. Right click on the description for your LAN or dial-up connection, select Properties, then check the Show icon in notification area when connected box. You'll now see a tiny network icon on the right of your task bar that glimmers nicely during network traffic.
16. The Start Menu can be leisurely when it decides to appear, but you can speed things along by changing the registry entry HKEY_CURRENT_USER/Control Panel/Desktop/MenuShowDelay from the default 400 to something a little snappier. Like 0.
17. You can rename loads of files at once in Windows Explorer. Highlight a set of files in a window, then right click on one and rename it. All the other files will be renamed to that name, with individual numbers in brackets to distinguish them. Also, in a folder you can arrange icons in alphabetised groups by View, Arrange Icon By... Show In Groups.
18. Windows Media Player will display the cover art for albums as it plays the tracks -- if it found the picture on the Internet when you copied the tracks from the CD. If it didn't, or if you have lots of pre-WMP music files, you can put your own copy of the cover art in the same directory as the tracks. Just call it folder.jpg and Windows Media Player will pick it up and display it.
19. Windows key + Break brings up the System Properties dialogue box; Windows key + D brings up the desktop; Windows key + Tab moves through the taskbar buttons.
20. The next release of Windows XP, codenamed Longhorn, is due out late next year or early 2003 and won't be much to write home about. The next big release is codenamed Blackcomb and will be out in 2003/2004.
Showing posts with label tricks. Show all posts
Showing posts with label tricks. Show all posts
How to set up and Use Internet Connection Sharing
With Internet Connection Sharing (ICS) in Windows XP, you can connect one computer to the Internet, then share the Internet service with several computers on your home or small office network. The Network Setup Wizard in Windows XP Professional will automatically provide all of the network settings you need to share one Internet connection with all the computers in your network. Each computer can use programs such as Internet Explorer and Outlook Express as if they were directly connected to the Internet.
You should not use this feature in an existing network with Windows 2000 Server domain controllers, DNS servers, gateways, DHCP servers, or systems configured for static IP addresses.
Enabling ICS
The ICS host computer needs two network connections. The local area network connection, automatically created by installing a network adapter, connects to the computers on your home or small office network. The other connection, using a 56k modem, ISDN, DSL, or cable modem, connects the home or small office network to the Internet. You need to ensure that ICS is enabled on the connection that has the Internet connection. By doing this, the shared connection can connect your home or small office network to the Internet, and users outside your network are not at risk of receiving inappropriate addresses from your network.
When you enable ICS, the local area network connection to the home or small office network is given a new static IP address and configuration. Consequently, TCP/IP connections established between any home or small office computer and the ICS host computer at the time of enabling ICS are lost and need to be reestablished. For example, if Internet Explorer is connecting to a Web site when Internet Connection Sharing is enabled, refresh the browser to reestablish the connection. You must configure client machines on your home or small office network so TCP/IP on the local area connection obtains an IP address automatically. Home or small office network users must also configure Internet options for Internet Connection Sharing. To enable Internet Connection Sharing (ICS) Discovery and Control on Windows 98, Windows 98 Second Edition, and Windows Millennium Edition computers, run the Network Setup Wizard from the CD or floppy disk on these computers. For ICS Discovery and Control to work on Windows 98, Windows 98 Second Edition, and Windows Millennium Edition computers, Internet Explorer version 5.0 or later must be installed.
To enable Internet Connection Sharing on a network connection
You must be logged on to your computer with an owner account in order to complete this procedure.
Open Network Connections. (Click Start, click Control Panel, and then double–click Network Connections.)
Click the dial–up, local area network, PPPoE, or VPN connection you want to share, and then, under Network Tasks, click Change settings of this connection.
On the Advanced tab, select the Allow other network users to connect through this computer's Internet connection check box.
If you want this connection to dial automatically when another computer on your home or small office network attempts to access external resources, select the Establish a dial–up connection whenever a computer on my network attempts to access the Internet check box.
If you want other network users to enable or disable the shared Internet connection, select the Allow other network users to control or disable the shared Internet connection check box.
Under Internet Connection Sharing, in Home networking connection, select any adapter that connects the computer sharing its Internet connection to the other computers on your network. The Home networking connection is only present when two or more network adapters are installed on the computer.
To configure Internet options on your client computers for Internet Connection Sharing
Open Internet Explorer. Click Start, point to All Programs, and then click Internet Explorer.)
On the Tools menu, click Internet Options.
On the Connections tab, click Never dial a connection, and then click LAN Settings.
In Automatic configuration, clear the Automatically detect settings and Use automatic configuration script check boxes.
In Proxy Server, clear the Use a proxy server check box.
You should not use this feature in an existing network with Windows 2000 Server domain controllers, DNS servers, gateways, DHCP servers, or systems configured for static IP addresses.
Enabling ICS
The ICS host computer needs two network connections. The local area network connection, automatically created by installing a network adapter, connects to the computers on your home or small office network. The other connection, using a 56k modem, ISDN, DSL, or cable modem, connects the home or small office network to the Internet. You need to ensure that ICS is enabled on the connection that has the Internet connection. By doing this, the shared connection can connect your home or small office network to the Internet, and users outside your network are not at risk of receiving inappropriate addresses from your network.
When you enable ICS, the local area network connection to the home or small office network is given a new static IP address and configuration. Consequently, TCP/IP connections established between any home or small office computer and the ICS host computer at the time of enabling ICS are lost and need to be reestablished. For example, if Internet Explorer is connecting to a Web site when Internet Connection Sharing is enabled, refresh the browser to reestablish the connection. You must configure client machines on your home or small office network so TCP/IP on the local area connection obtains an IP address automatically. Home or small office network users must also configure Internet options for Internet Connection Sharing. To enable Internet Connection Sharing (ICS) Discovery and Control on Windows 98, Windows 98 Second Edition, and Windows Millennium Edition computers, run the Network Setup Wizard from the CD or floppy disk on these computers. For ICS Discovery and Control to work on Windows 98, Windows 98 Second Edition, and Windows Millennium Edition computers, Internet Explorer version 5.0 or later must be installed.
To enable Internet Connection Sharing on a network connection
You must be logged on to your computer with an owner account in order to complete this procedure.
Open Network Connections. (Click Start, click Control Panel, and then double–click Network Connections.)
Click the dial–up, local area network, PPPoE, or VPN connection you want to share, and then, under Network Tasks, click Change settings of this connection.
On the Advanced tab, select the Allow other network users to connect through this computer's Internet connection check box.
If you want this connection to dial automatically when another computer on your home or small office network attempts to access external resources, select the Establish a dial–up connection whenever a computer on my network attempts to access the Internet check box.
If you want other network users to enable or disable the shared Internet connection, select the Allow other network users to control or disable the shared Internet connection check box.
Under Internet Connection Sharing, in Home networking connection, select any adapter that connects the computer sharing its Internet connection to the other computers on your network. The Home networking connection is only present when two or more network adapters are installed on the computer.
To configure Internet options on your client computers for Internet Connection Sharing
Open Internet Explorer. Click Start, point to All Programs, and then click Internet Explorer.)
On the Tools menu, click Internet Options.
On the Connections tab, click Never dial a connection, and then click LAN Settings.
In Automatic configuration, clear the Automatically detect settings and Use automatic configuration script check boxes.
In Proxy Server, clear the Use a proxy server check box.

Have a Personalized Logon Wallpaper in Windows XP
Have you always wanted to have your image displayed as a log on banner whenever you start your PC? This article explains the exact procedure required to have your own photo or your pet's photo being displayed as one such banner. With this trick, you can have a personalized wallpaper which would appear before your log in screen each time you start your computer.
To use this trick, you need to have a bmp file. If your image is of any other format, you can save it in bmp format using MS Paint or Irfan View(To download Irfan View, visit 5 Essential Freewares for your PC).
Now that you have the bmp file, follow the steps given below.

Once the changes are applied, each time you start your PC , you will see the log on wallpaper. To undo the trick, simply delete the address to your image in Step 5.
P.S: I have my photo as the log on wallpaper. What is yours?
To use this trick, you need to have a bmp file. If your image is of any other format, you can save it in bmp format using MS Paint or Irfan View(To download Irfan View, visit 5 Essential Freewares for your PC).
Now that you have the bmp file, follow the steps given below.
- Click on Start.
- Click on Run.
- Type "regedit" in the dialog box without quotes.
- Navigate to HKEY_USERS\.DEFAULT\Control Panel\Desktop.
- In the right hand pane, double click on the value Wallpaper.
- In the Value Data option, enter the full path to your bmp file you created to be your wallpaper. Example: For a file named image.bmp placed in Windows folder, type "C:\WINDOWS\image.bmp" without the quotes.
- Double click on Wallpaper Style, and change its value to 2 to get a stretched image.
Once the changes are applied, each time you start your PC , you will see the log on wallpaper. To undo the trick, simply delete the address to your image in Step 5.
P.S: I have my photo as the log on wallpaper. What is yours?
Windows 2k/XP Tweaks
General Windows 2000/2003 Server/XP Tweaks and tips.

How to Change the boot screen
This is a pretty common question on the newsgroups, and also came up on e-mail this morning - how do you change the Windows XP Embedded boot screen/logo ?
From Sysinternals.com - modify your boot.ini as follows.
/BOOTLOGO Use this switch to have Windows XP or Windows Server 2003 display an installable splash screen instead of the standard splash screen.
First, create a 16-color (any 16 colors) 640x480 bitmap and save it in the Windows directory with the name Boot.bmp.
Then add "/bootlogo /noguiboot" to the boot.ini selection.
There are a ton of other boot.ini flags listed on the Sysinternals site.
From Sysinternals.com - modify your boot.ini as follows.
/BOOTLOGO Use this switch to have Windows XP or Windows Server 2003 display an installable splash screen instead of the standard splash screen.
First, create a 16-color (any 16 colors) 640x480 bitmap and save it in the Windows directory with the name Boot.bmp.
Then add "/bootlogo /noguiboot" to the boot.ini selection.
There are a ton of other boot.ini flags listed on the Sysinternals site.
How to Turn Off the Licensing Feature in Windows XP
Everybody but the record industry agrees that the Microsoft licensing feature is awful. Luckily, you have a way to turn it off:
1. Choose Options from Media Player's Tools menu.
2. Click the Copy Music tab.
3. Remove any check mark from the box marked Protect Content.
If no check mark is there, Media Player doesn't embed any license or copy protection in your copied files. Disabling the licensing feature lets you copy your files to any of your computers and portable music devices.
1. Choose Options from Media Player's Tools menu.
2. Click the Copy Music tab.
3. Remove any check mark from the box marked Protect Content.
If no check mark is there, Media Player doesn't embed any license or copy protection in your copied files. Disabling the licensing feature lets you copy your files to any of your computers and portable music devices.
How to fix error message: "Memory cannot be written at 0x000000"

Dun worry! here's the solution.
1. Start--> Run --> type"cmd"-> enter
2. in the DOS prompt screen, type
"for %1 in (%windir%\system32\*.dll) do regsvr32.exe /s %1"
3. you will then see a run text from buttom to the top
4. wait until it stop.
5. DONE!
This command is to re-register all the DLL files in the system32 folder.
How to Disable CD Autorun
( WinXP PRO Only)
1) Click Start, Run and enter GPEDIT.MSC
2) Go to Computer Configuration, Administrative Templates, System.
3) Locate the entry for Turn autoplay off and modify it as you desire.
How to Speed up your browsing of Windows 2000 & XP
Here's a great tip to speed up your browsing of Windows XP machines. Its actually a fix to a bug installed as default in Windows 2000 that scans shared files for Scheduled Tasks. And it turns out that you can experience a delay as long as 30 seconds when you try to view shared files across a network because Windows 2000 is using the extra time to search the remote computer for any Scheduled Tasks. Note that though the fix is originally intended for only those affected, Windows 2000 users will experience that the actual browsing speed of both the Internet & Windows Explorers improve significantly after applying it since it doesn't search for Scheduled Tasks anymore.
Here's how :Open up the Registry and go to :
HKEY_LOCAL_MACHINE/Software/Microsoft/Windows/Current Version/Explorer/RemoteComputer/NameSpace
Under that branch, select the key :
{D6277990-4C6A-11CF-8D87-00AA0060F5BF}
and delete it.
This is key that instructs Windows to search for Scheduled Tasks. If you like you may want to export the exact branch so that you can restore the key if necessary.
This fix is so effective that it doesn't require a reboot and you can almost immediately determine yourself how much it speeds up your browsing processes.
Here's how :Open up the Registry and go to :
HKEY_LOCAL_MACHINE/Software/Microsoft/Windows/Current Version/Explorer/RemoteComputer/NameSpace
Under that branch, select the key :
{D6277990-4C6A-11CF-8D87-00AA0060F5BF}
and delete it.
This is key that instructs Windows to search for Scheduled Tasks. If you like you may want to export the exact branch so that you can restore the key if necessary.
This fix is so effective that it doesn't require a reboot and you can almost immediately determine yourself how much it speeds up your browsing processes.
Cool Keyboard Tricks (Windows) : Make a Disco
Keyboards usually have small LED's which indicate whether different types of locks are activated or not. Here is a trick to use the lights of your keyboard in a more creative manner in Windows.
This trick uses a simple Visual basic script which when activated makes your scroll lock, caps lock and num locks LED's flash in a cool rhythmic way which gives the perception of a live disco on your keyboard.

To make your own live disco, follow the steps given below:-
1. Open Notepad.
2. Copy paste the exact code given below:-
![]()
Double click on the Saved file to see the LED lights on your keyboard go crazy and make your own cool disco.
This trick has been tested on Windows XP, Windows Vista and Windows 7 and found to be working perfectly.
You can disable the keyboard disco by starting Task Manager and ending the wscript.exe process.
This trick uses a simple Visual basic script which when activated makes your scroll lock, caps lock and num locks LED's flash in a cool rhythmic way which gives the perception of a live disco on your keyboard.
To make your own live disco, follow the steps given below:-
1. Open Notepad.
2. Copy paste the exact code given below:-
Set wshShell =wscript.CreateObject("WScript.Shell")3. Save the file as Disco.vbs or "*.vbs".
do
wscript.sleep 100
wshshell.sendkeys "{CAPSLOCK}"
wshshell.sendkeys "{NUMLOCK}"
wshshell.sendkeys "{SCROLLLOCK}"
loop
Double click on the Saved file to see the LED lights on your keyboard go crazy and make your own cool disco.
This trick has been tested on Windows XP, Windows Vista and Windows 7 and found to be working perfectly.
You can disable the keyboard disco by starting Task Manager and ending the wscript.exe process.
Change Processor Name Permanently
A while ago on Technology Inspired, I published an article on changing your processor name. But recently, Technology Inspired reader Anil Kumar pointed out that the trick only changed the name temporarily.
After a user restarts his computer, the name reverted back to original which is obvious as each time Windows boots, it checks the connected hardware and updates the registry value automatically. So, changing the processor name using the earlier article did not had permanent effect on the processor name.
Thus, the alien processor name you had earlier again reverted back to the boring old one.

Problem: To, make the name change permanent, it was required that the user updates the Processor Name String registry key each time when Windows starts.
Solution: It is very easy to change your processor name permanently by creating a registry key and placing a shortcut to it in the windows start up folder. To do so, just follow the steps given below:-
Steps :-
1. Open Notepad.
2. Copy and paste the exact code given below:-
3. Click on File Menu, click on Save As and select "All Types" in Save as Type option. Save the file as ProcessorNameChange.reg or *.reg.
4. Create a new shortcut on your desktop. Enter regedit / S "Location of the .reg file" as the location of the item. For example, enter regedit /S "C:\Processor Name.reg" if your registry file is located in the root of C:\ drive.
5. Copy the created Shortcut file.
6. Navigate to C:\Documents and Settings\All Users\Start Menu\Programs\Startup (in Windows XP) or to C:\Users\ User-Name\AppData\Roaming\Microsoft\Windows\Start Menu\Programs\Startup (in Windows 7 and Windows Vista . Also remember that AppData is a hidden folder.) if C: is your System drive.
7. Paste the copied file.
This registry file would now execute each time when windows starts and the Processor Name String would be modified each time. So, even upon restarting your computer, you will see that the changed processor name is permanent.
After a user restarts his computer, the name reverted back to original which is obvious as each time Windows boots, it checks the connected hardware and updates the registry value automatically. So, changing the processor name using the earlier article did not had permanent effect on the processor name.
Thus, the alien processor name you had earlier again reverted back to the boring old one.
Problem: To, make the name change permanent, it was required that the user updates the Processor Name String registry key each time when Windows starts.
Solution: It is very easy to change your processor name permanently by creating a registry key and placing a shortcut to it in the windows start up folder. To do so, just follow the steps given below:-
Steps :-
1. Open Notepad.
2. Copy and paste the exact code given below:-
Windows Registry Editor Version 5.00To change the processor name, edit the part of the code given in blue. Also understand that \0 in the above code should only be present if Windows store your processor name at that location. Please open Registry Editor and navigate to the above mentioned keys to check whether or not to include the \0.
[HKEY_LOCAL_MACHINE\HARDWARE\DESCRIPTION\System\CentralProcessor\0]
"ProcessorNameString"="My Processor name 50000MHz"
3. Click on File Menu, click on Save As and select "All Types" in Save as Type option. Save the file as ProcessorNameChange.reg or *.reg.
4. Create a new shortcut on your desktop. Enter regedit / S "Location of the .reg file" as the location of the item. For example, enter regedit /S "C:\Processor Name.reg" if your registry file is located in the root of C:\ drive.
5. Copy the created Shortcut file.
6. Navigate to C:\Documents and Settings\All Users\Start Menu\Programs\Startup (in Windows XP) or to C:\Users\ User-Name\AppData\Roaming\Microsoft\Windows\Start Menu\Programs\Startup (in Windows 7 and Windows Vista . Also remember that AppData is a hidden folder.) if C: is your System drive.
7. Paste the copied file.
This registry file would now execute each time when windows starts and the Processor Name String would be modified each time. So, even upon restarting your computer, you will see that the changed processor name is permanent.
Install/ Boot Windows from USB Pen Drive/ Thumb, Flash Drive Easily
Normally, Windows is installed using optical media like DVDs and CDs but there are times when it is not possible to boot into the windows setup using disks probably because your DVD drive is not working or, if you are using one of those ultra-portable laptops, it is not there at all.
 To overcome this problem, one can either use external disks and install windows normally or create a bootable pen drive (flash drive) to install Windows on the go. In this tutorial, we will discuss about the latter and learn how can we create a bootable USB drive for installing Windows XP, Windows Vista or Windows 7. Moreover, as installing Windows from a CD/ DVD is much slower than from a flash drive, installation will also take less time.
This article assumes that your computer has a mother board which supports booting from USB drives. Most modern laptops and desktops support it. If you have bought your computer in the past 5 years, then you do not need to worry about this.
Installation Requirements
This article assumes that your computer has a mother board which supports booting from USB drives. Most modern laptops and desktops support it. If you have bought your computer in the past 5 years, then you do not need to worry about this.
Also Read: How to virus-proof your PC?
Installation Requirements
- An empty Flash drive with a storage capacity of 1GB for Windows XP and 3GB for Windows 7, Windows Vista and Windows Server 2008.
- Windows Installation Disk or Windows Installation files stored somewhere on your computer.
Steps to create a Bootable USB Flash Drive/ Pen Drive
- Download Win to Flash. The software is still in beta phase so it is possible that it has some bugs although I have personally faced none. The latest version of Win to Flash can be downloaded from here. To avoid this tutorial from getting outdated, I would advise to download the software from the former link.
- Extract the downloaded zip file to any folder on your desktop.
- Open the folder and run WintoFlash.exe by double clicking on it.
- Click Next, check I accept EULA, click Next and Next again. Wait for the software to load some ads, click Next and Next again.
- A welcome screen like one in the image below will show up.
- Click on the big green tick. The welcome screen will turn translucent and WinToFlash wizard will open.
- Click Next. On Windows File path entry, click Select button and select the location of your Windows disk, or the folder containing the Windows setup files and click OK.
- On USB Drive path entry, select your USB flash drive's location and click OK.
- Click Next button. In the dialog box, encircle I accepted the license agreement and click Continue.
- A warning message will be displayed saying that Formatting will erase all data on the disk. Click OK in the message.
- WintoFlash will show a Windows with a progress bar like one in the image below.
- After the progress bar reaches the end, press Next and then press Exit. A notification to update WintoFlash might be shown, click No just close to close it.
 |
| Win to Flash welcome screen |
 |
| Wizard showing the various version of Windows it supports |
 |
| Preparing a bootable Pen Drive |
That's it. You now have a bootable pendrive that can be used to install Windows.
This tutorial works on all versions of Windows including Windows 7, Windows Xp and Windows Vista.Install Windows from the bootable USB pen drive/ flash drive/ Thumb Drive
- Plugin your thumb drive.
- Start your computer. Go into BIOS setup by pressing the delete key. In the boot menu, select your flash drive as the first boot device. Save Settings and Restart your PC. (This step might be different for different computers. Check your system guide to know how to change the boot order in your PC.)
- Windows setup will load.
- Install Windows by following instructions on the Screen.
Password Protect/ Lock folders in Windows without any Software
Most of us have private data. Not all of us have a private computer to keep that data. So, we just end up with other people viewing that data. Although password protecting software do work, it is almost useless to hide private data with these software(because we are always questioned as to what it is that we are hiding with the help of these software).
Hidden folders do not work as they can be easily searched with Windows Search. So, we need an alternative way to create hidden password protected folders which only we can access. And that is exactly what we will learn in this post.
With this trick, you can create a secure password protected folder in Windows which no one except you can access. To use this trick, follow the instructions given below:-
1. Open Notepad.
2. Copy and paste the exact code given below:-

3. Click on the File Menu. Click on Save As.
4. Select All Types in the Save As Type dropdown menu. Save the file as *.bat or Locker.bat.
After creating the file, double click on the Saved file. A new folder will be created. Enter your data in the folder. Again, double click on the batch file. Type Y and press Enter. The folder will be hidden from view.
To re-view your folder, double click on the saved batch file. Enter password as "computer-help-tips.blogspot.com" without quotes and press Enter key. This is also the default password. Your folder will be visible again.
To change the default password, edit the part of the code given in blue and enter your own password.
The overall usability of this trick can be improved by deleting the batch file after hiding your folder and re-creating it when you wish to access your folder again.
If you face any problem using this trick, you can write a comment and I will do my best to help you.
Note: This works on Windows 7, Windows XP and Vista. First try this on useless data to be sure and then only hide your personal data.
Hidden folders do not work as they can be easily searched with Windows Search. So, we need an alternative way to create hidden password protected folders which only we can access. And that is exactly what we will learn in this post.
With this trick, you can create a secure password protected folder in Windows which no one except you can access. To use this trick, follow the instructions given below:-
1. Open Notepad.
2. Copy and paste the exact code given below:-
cls
@ECHO OFF
title computer-help-tips.blogspot.com
if EXIST "Control Panel.{21EC2020-3AEA-1069-A2DD-08002B30309D}" goto UNLOCK
if NOT EXIST MyFolder goto MDMyFolder
:CONFIRM
echo Are you sure to lock this folder? (Y/N)
set/p "cho=>"
if %cho%==Y goto LOCK
if %cho%==y goto LOCK
if %cho%==n goto END
if %cho%==N goto END
echo Invalid choice.
goto CONFIRM
:LOCK
ren MyFolder "Control Panel.{21EC2020-3AEA-1069-A2DD-08002B30309D}"
attrib +h +s "Control Panel.{21EC2020-3AEA-1069-A2DD-08002B30309D}"
echo Folder locked
goto End
:UNLOCK
echo Enter password to Unlock Your Secure Folder
set/p "pass=>"
if NOT %pass%== computer-help-tips.blogspot.com goto FAIL
attrib -h -s "Control Panel.{21EC2020-3AEA-1069-A2DD-08002B30309D}"
ren "Control Panel.{21EC2020-3AEA-1069-A2DD-08002B30309D}" MyFolder
echo Folder Unlocked successfully
goto End
:FAIL
echo Invalid password
goto end
:MDMyFolder
md MyFolder
echo MyFolder created successfully
goto End
:End
3. Click on the File Menu. Click on Save As.
4. Select All Types in the Save As Type dropdown menu. Save the file as *.bat or Locker.bat.
After creating the file, double click on the Saved file. A new folder will be created. Enter your data in the folder. Again, double click on the batch file. Type Y and press Enter. The folder will be hidden from view.
To re-view your folder, double click on the saved batch file. Enter password as "computer-help-tips.blogspot.com" without quotes and press Enter key. This is also the default password. Your folder will be visible again.
To change the default password, edit the part of the code given in blue and enter your own password.
The overall usability of this trick can be improved by deleting the batch file after hiding your folder and re-creating it when you wish to access your folder again.
If you face any problem using this trick, you can write a comment and I will do my best to help you.
Note: This works on Windows 7, Windows XP and Vista. First try this on useless data to be sure and then only hide your personal data.
Change Facebook Theme Color, Appearance, Skin, Style or Template
Facebook is a social networking site which enable people to connect with friends and people around. But it has one flaw, the default blue theme in Facebook is really boring.
It is a fact that almost everyone is on Facebook but it is also a fact that not everyone is happy with the default blue theme on Facebook. Some even consider it a turnoff while visiting Facebook.
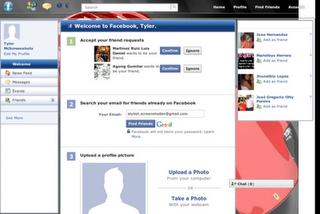
It is relatively easy to change the Facebook theme to a stylish one using a Firefox addon and a custom theme which are available free of cost on the internet.
The final outcome would be something like in the image.
Requirement: The basic requirement for this to work is to have Mozilla Firefox 3.5 or higher.
Steps: The following steps should be carried out to successfully change Facebook theme.
Now whenever you open Facebook, it will show the theme that you have installed with Stylish instead of the boring old blue theme.
It is a fact that almost everyone is on Facebook but it is also a fact that not everyone is happy with the default blue theme on Facebook. Some even consider it a turnoff while visiting Facebook.
It is relatively easy to change the Facebook theme to a stylish one using a Firefox addon and a custom theme which are available free of cost on the internet.
The final outcome would be something like in the image.
Requirement: The basic requirement for this to work is to have Mozilla Firefox 3.5 or higher.
Steps: The following steps should be carried out to successfully change Facebook theme.
- Open Mozilla Firefox and install 'Stylish' addon using this link.
- Follow the basic steps and install the addon.
- Restart Firefox after successfully installing the stylish addon.
- Login to your Facebook Account and click on the small 'S' button in your Firefox status bar.
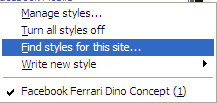
- Click on "Find Styles for this Site" to open a new tab with free themes to use for Facebook.
- Click on any theme and a preview will be shown.
- If everything is fine in the previewed theme, click on "Install with Stylish" button at the top right corner of the page.
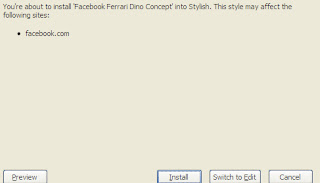
- A dialog box will open.
- Click on Install in the dialog box.
Now whenever you open Facebook, it will show the theme that you have installed with Stylish instead of the boring old blue theme.
Make your Computer Welcome You
Do you watch movies? Have you always loved the way how Computers in movies welcome their users by calling out their names? I bet that you too would want to know how you can achieve similar results on your PC and have a computer said welcome.
Also: Make your Computer Talk
Then you are at the right place, this article describes exactly how you can make your computer welcome you like this.
With this trick, you can make your Computer welcome you in its computerized voice instead of having a human said Welcome. You can make your Windows based computer say "Welcome to your PC, Username."
Make Windows Greet you with a Custom Voice Message at Startup
To use this trick, follow the instructions given below:-
4. Click on File Menu, Save As, select All Types in Save as Type option, and save the file as Welcome.vbs or "*.vbs".
5. Copy the saved file.
6. Navigate to C:\Documents and Settings\All Users\Start Menu\Programs\Startup (in Windows XP) or to C:\Users\ User-Name\AppData\Roaming\Microsoft\Windows\Start Menu\Programs\Startup (in Windows 7 and Windows Vista) if C: is your System drive.
7. Paste the file.

Now when the next time you start your computer, Windows will welcome you in its own computerized voice.
Note: For best results, it is recommended to change sound scheme to No Sounds.
You can change the sound scheme to No Sounds by following the steps given below:-

Try it yourself to see how it works. In my personal opinion, this is an excellent trick. Whenever I start my PC in front of anybody and the PC welcomes me, the fellow is left wondering how brilliant a computer do I have.
Also: Make your Computer Talk
Then you are at the right place, this article describes exactly how you can make your computer welcome you like this.
With this trick, you can make your Computer welcome you in its computerized voice instead of having a human said Welcome. You can make your Windows based computer say "Welcome to your PC, Username."
Make Windows Greet you with a Custom Voice Message at Startup
To use this trick, follow the instructions given below:-
- Click on Start. Navigate to All Programs, Accessories and Notepad.
- Copy and paste the exact code given below.
Dim speaks, speech3. Replace Username with your own name.
speaks="Welcome to your PC, Username"
Set speech=CreateObject("sapi.spvoice")
speech.Speak speaks
4. Click on File Menu, Save As, select All Types in Save as Type option, and save the file as Welcome.vbs or "*.vbs".
5. Copy the saved file.
6. Navigate to C:\Documents and Settings\All Users\Start Menu\Programs\Startup (in Windows XP) or to C:\Users\ User-Name\AppData\Roaming\Microsoft\Windows\Start Menu\Programs\Startup (in Windows 7 and Windows Vista) if C: is your System drive.
7. Paste the file.
Now when the next time you start your computer, Windows will welcome you in its own computerized voice.
Note: For best results, it is recommended to change sound scheme to No Sounds.
You can change the sound scheme to No Sounds by following the steps given below:-
- Go to Control Panel.
- Then click on Switch to Classic View.
- Then Click on Sounds and Audio Devices.
- Then Click on the Sounds Tab.
- Select No Sounds from the Sound Scheme option.
- If you wish to save your Previous Sound Scheme, you can save it by clicking Yes in the popup menu.
- Click on OK.
Try it yourself to see how it works. In my personal opinion, this is an excellent trick. Whenever I start my PC in front of anybody and the PC welcomes me, the fellow is left wondering how brilliant a computer do I have.
Cool Javascript Tricks: Edit Websites in Browser (Live)
Imagine a world where you are a God and have ultimate control on what happens and more importantly, how it happens. Seems too good a dream. Now it has come true, at least for the online world.
 Using this trick, you will be able to edit any webpage live in your browser as if it was a Wiki and change the details according to your wish. Yes, you read that right. You can even edit Google or even Facebook for that matter right in your browser and that too without requiring any technical know-how or getting deep into hacking and cracking.
Here is an example picture demonstrating the Google Homepage edited by me to say that I own Google.

This is just an example. You can use it for anything like showing wrong traffic stats or for fooling people by showing that someone said something about them on Facebook or Twitter. It depends only on your creativity. But I would advise you to stay ethical and use it for entertainment purposes only.
To use this trick, all you need to do is just copy the code given below and paste it in your address bar after you have opened the website you wish to edit. And start editing.
Or, alternatively you can use the following bookmarklets by dragging them to your Bookmarks bar.
The editing that you do will however be temporary as it is not server-sided. You can also save the modified website through Firefox by File>Save. This works on all common web browsers including Chrome, Firefox , Opera and Internet Explorer.
Also Read
Here is an example picture demonstrating the Google Homepage edited by me to say that I own Google.
This is just an example. You can use it for anything like showing wrong traffic stats or for fooling people by showing that someone said something about them on Facebook or Twitter. It depends only on your creativity. But I would advise you to stay ethical and use it for entertainment purposes only.
To use this trick, all you need to do is just copy the code given below and paste it in your address bar after you have opened the website you wish to edit. And start editing.
javascript:document.body.contentEditable%20=%20'true';%20document.designMode='on';%20void%200You can capture a screenshot by pressing the Print Screen key or by using the Snipping Tool if you use Windows 7 or Windows Vista. If you wish to again make the website non-editable to give a more authentic look, copy and paste the code given below in the address bar after you are done editing.
javascript:document.body.contentEditable%20=%20'false';%20document.designMode='off';%20void%200
Or, alternatively you can use the following bookmarklets by dragging them to your Bookmarks bar.
1. Edit this Website
2. Done Editing
The editing that you do will however be temporary as it is not server-sided. You can also save the modified website through Firefox by File>Save. This works on all common web browsers including Chrome, Firefox , Opera and Internet Explorer.
Also Read
Cool Facebook Status, Chat Tricks and Tips
Most of us use Facebook to interact with some of our long separated friends but that does not mean we cannot have fun on Facebook. Here is a collection of tricks, tips and easter eggs you can use to enjoy your experience on Facebook.
Similarly, you can also turn Facebook upside down by selecting English(Upside Down) from the Languages dropdown. This will flip the entire Facebook interface but your status updates would still be "normal".


Facebook Easter Eggs: Pirate Language ,Turn Facebook Upside Down
Facebook is not as famous for its easter eggs as Microsoft but that does not mean that Facebook's easter eggs are not entertaining. The one which I especially find interesting is the Pirate Language trick. To enable Pirate Language in Facebook, login to Facebook, click on Account Tab, click on Account Settings, click on Language, and in the Primary Language dropdown menu, somewhere near the bottom, you would find English(Pirate). Select it and be the captain of your Pirate Ship. |
| Blabber t' yer mates |
Similarly, you can also turn Facebook upside down by selecting English(Upside Down) from the Languages dropdown. This will flip the entire Facebook interface but your status updates would still be "normal".
 |
| See. Mark Zuckerberg does know how to headstand. |
Chat on Facebook in your Firefox sidebar while browsing other Websites
To do this, you need to bookmark http://facebook.com/login.php. Then click on Show all Bookmarks (Manage Bookmarks in older versions) in the Bookmarks menu, then locate the newly created bookmark, single click on it, then click on more in the footer, then check Load this bookmark in Sidebar. Now, you can open that bookmark in Firefox's sidebar and keep on browsing other websites too.Show Facebook Status Updates only to Specific People or Hide them from someone
Facebook gives you the option to show your status updates to everyone or only your friends. You can further optimize Facebook so that your status updates are shown only to people you wish. Go to Customise Settings from My Account> Privacy Settings>Custom. Then, customize the Posts by Me section by choosing Make this Visible to Specific People and adding their names. You can hide your statuses from specific people by adding their name in the Hide from These section.Tag people in Status Updates, Wall Posts, Comments or Text
To tag someone in text in a manner that a link is created to the person's profile, use the @ symbol. eg. If you wish to tag John Jamison in your comment write @ John Jamison without any spelling mistake. If the person is in your friend list, a link in blue will be automatically created to the person's profile and he would be "tagged". |
| Facebook text tagging in action |
Write Upside Down, In Bubbles or Inverted Mirror-like text on Facebook
You might have seen many people update their Facebook status saying that "this was the last time they bought a keyboard on eBay" or "they have finally learnt how to update Facebook statuses while doing a headstand" written upside down. Here is how you too can flip text like that and add much more cool effects. Just go to Upside Down Text, uncheck Backwards effect, enter your text and copy the inverted one from the inverted text column and paste it in your status update or chats. You can also write inverted mirror like text by un-checking the upside down effect. To write in bubbles, click on the Bubble Ball text in the top Navigation bar.
e.g. Mirror Effect:- !rorrim a ni deppart ma I !oN hO
e.g. Upside Down Effect:- pɐɯu ʞǝʎqoɐɹp¡
e.g Both Mirror and Upside Down Effect:- ¡poפ ǝɯ dlǝH ˙ʎzɐɹɔ ƃuıʇʇǝƃ sı uıɐɹq ʎW
Create a Shortcut to lock your System
Have you ever left your PC in a hurry? Have you ever felt that it is a pain to lock your system and the simple way is too long for you? I would imagine that you have and then, this trick is for you.This trick enables you to create a shortcut to lock your system instead of doing CTRL+ALT+DEL. Thus, providing you a quick and easy way to lock your system whenever you have to leave your PC in a hurry.
Steps
Shortcut textbox.
4. Click on Finish.

To use this trick, follow the instructions given below:-
Steps
- Right Click on an empty slot on desktop, point to New, click on Shortcut.
- In the dialog box that pops up, type the following code without quotes in the Type the location of the item.
rundll32 user32.dll,LockWorkStation3. Click on Next and type a name for the shortcut in the Type a name for this
Shortcut textbox.
4. Click on Finish.
Now you will be able to lock your Computer by double clicking on the created Shortcut. You can also add this shortcut to Quick Launch toolbar to lock your system with one click.
Make your Computer Talk
Have you ever wondered how can you make your computer speak whatever you input to it like in the movies. Would it not be fun? If only it was possible! Rejoice, because now it is possible. Well, if you wish to know how to do this, then you have come to the right place. With this trick, you can create a script in Windows which will make your computer speak whatever you input to it.
To create one such talk script, follow the steps given below:-

Steps
Now your Computer will speak / talk what you typed in Step 4. Try it yourself.
Windows Compatibility: This VBS file can be executed on all versions of Windows including Windows XP, Windows Vista and Windows 7.
Personal Experience: I personally showed this trick to many of my friends and they were literally left awestruck. You too can impress your friends by making your PC talk and be the Computer Wiz.
Also Recommended Reading : Make your Computer Welcome You!
To create one such talk script, follow the steps given below:-
Steps
- Open Notepad.
- Copy and paste the exact code given below.
Dim Message, Speak
Message=InputBox("Enter text","Speak")
Set Speak=CreateObject("sapi.spvoice")
Speak.Speak Message
3. Click on File Menu, Save As, select All Types in Save as Type option, and save the file as Speak.vbs or "*.vbs".
4. Double click on the saved file, a window will open like the one in the image. Enter some text in enter text column and click OK.
Now your Computer will speak / talk what you typed in Step 4. Try it yourself.
Windows Compatibility: This VBS file can be executed on all versions of Windows including Windows XP, Windows Vista and Windows 7.
Personal Experience: I personally showed this trick to many of my friends and they were literally left awestruck. You too can impress your friends by making your PC talk and be the Computer Wiz.
Change your Processor's Name
Are you bored with your old processor? Do you want a new processor with a breath-stopping name but are not going to upgrade any time soon? No need to worry. You can still have that new processor's name in your computer. Well not only that, you can also have a better one than the one you are supposing to buy. Just follow this trick.
With this trick, you can change the name of your processor to a personalized one like My Processor or something alien like Decacore Processor 50 GHz . These are just a few examples. It is up to your creativity to change the name of your Processor to anything you like.
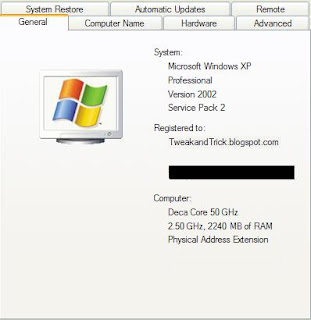
Right Click on Computer icon and select properties.The final outcome would be something like one in the image.
Try it on your PC and show it to your friends to see the fun.
P.S.: Personally, I have recently changed the name of my processor to "iLife Processor 7, Alien Technologies". Tell me what you changed yours to.
Note: This article changes the processor name temporarily. To permanently change processor name, visit Change Processor Name Permanently.
With this trick, you can change the name of your processor to a personalized one like My Processor or something alien like Decacore Processor 50 GHz . These are just a few examples. It is up to your creativity to change the name of your Processor to anything you like.
To have one such cool processor, just follow this step by step tutorial.
- Click on Start.
- Click on Run.
- Type "regedit" without quotes.
- Navigate to HKEY_LOCAL_MACHINE/HARDWARE/
- From HARDWARE, navigate to DESCRIPTION/System/CentralProcessor/.
- In the work area, double click on ProcessorNameString, and change its value according to your choice.
- Click OK
Right Click on Computer icon and select properties.The final outcome would be something like one in the image.
Try it on your PC and show it to your friends to see the fun.
P.S.: Personally, I have recently changed the name of my processor to "iLife Processor 7, Alien Technologies". Tell me what you changed yours to.
Note: This article changes the processor name temporarily. To permanently change processor name, visit Change Processor Name Permanently.
Subscribe to:
Posts (Atom)