Showing posts with label Blogger. Show all posts

How To Add Music To My Blog?


Wondering how to add your favorite music to your blog.adding some music also pleases the visitors.and in some way  increases the time on page.In this post you will know how easy it is.You will need to create an account in free music hosting site.(just search in Google for free music hosting sites) and also an account in mix pod.


In my case i will use Opendrive for free hosting.and also an account in mixpod 


Follow these Steps:


  1. Create an account in Opendrive
  2. Upload your favorite music 
  3. Get the direct link and save it in a text file
Example:
This is Direct link of the file that i uploaded at Opendrive

  
    4.  Create an account at Mixpod
    5.   Now Create a playlist there. add the direct link that you copied from opendrive and click  add track
    6. Select your favorite music player Skin

    7.And Save setting and get code


    8.Select any of the following options ,in my case i selected blogger and copied the code


   9.Go to page elements section in blogger and add a gadget select "HTML/JavaScript" and add the code 
      and save settings,its done,
"Let your visitors enjoy the music,Keep rocking"


popular incoming searches
1) how to add music to my blog
2)embed a mp3 player in blogger
3)add free music player to website

How to change your Blog address

A very simple tutorial to help you to change your blogger address.follow these simple steps and get your job done.


1)Click on Dashboard


2)Now click on Settings and then select Publishing


3)Enter the blog address you want and enter word verification


4) once its available click on save settings 

How to Stop Following a blog on blogger

What if you want to unfollow a blog that you are following.Doing this is very easy and much more easier with this tutorial.


 Follow this easy tutorial :


    1)  Log into Blogger,click on Dashboard


    2) Then scroll down click on Manage


    3)Then a new dialog box will open ,choose the blog you want to unfollow ,click settings


    4)log in using Google or any specified id


    5) Click on stop Following this site

    Free ways to bring traffic to your blog

    Free ways to bring traffic to your blog


    Every blogger loves constant traffic to their blogs and its really a hectic task .A lot of work is to be done so that the blog gets the needed publicity. There are two ways to achieve this PAID and FREE.People who don't have problem spending $$, use the PAID route,but bloggers like me who would first try to get decent traffic using all the free sources will constantly look for ways to do it.

    The sole purpose for the article is to help new bloggers to get some descent traffic to their blogs without spending a single penny!

    Here are the Free ways to get Traffic to your blog:
    1. Submit your blog to all search engines,use Submit Express
    2. Choose a short but sweet name for your blog.so that it would be easier for people to remember
    3. Use appropriate keywords,use Google keyword tool
    4. Create a Facebook community page
    5. Use twitter effectively, Re-tweet often
    6. Your blog should have an E-mail subscription form,its a cool way to get permanent members
    7. Add your blogs signature in your email
    8. Use pinging services like Pingomatic
    9. Join Mybloglog ,Blogcatalog ,create communities and add friends ( A female pic will attract visitors lol) 
    10. Submit your blog to Technorati
    11. Display you blogs code in you home page show that others can link to you
    12. Submit feed to yahoo.and also create set up Google websmaster tools
    13. Submit your blog to Blog directories 
    14. Answer questions on the forums from your niche and also leave a link to your blog if there is a solution
    15. Answer questions on yahoo answers
    16. Write articles to help new bloggers
    17. Publish a newsletter,make your the newsletter is short and attractive
    18. Leave an attractive comment on other blogs in your niche with your blog link below the comment
    19. Add alt text to images,in this way you will get traffic from image searches
    20. Add social bookmarking and sharing buttons in every post
    21. Be a Guest blogger on other blogs that allow to submit articles,or submit articles to Ezeinarticles
    22. Contact other bloggers in your niche and exchange links
    23. Use simple fonts and a professional looking template,easier to navigate
    24. Update the contents frequently
    25. Organize giveaways,everyone loves free gifts
    26. Add Top commentators list ,this will encourage people to comment frequently
    27. Submit articles to Digg,Delicious,Stumble upon,yahoo buzz,Google buzz,twitter, friend-feed, Reddit,etc
    28. Always ask your visitors to share the posts
    29. Setting up a live chat box is always beneficial use Yaplet
    30. Submit your blog to Review sites like Ratemysite com and coolsiteoftheday
    31. Using trackback link help
    32. Be patient :)

    Adding Meta Tags to blogger,website- seo

    meta tags in blogger 
    Here is a Simple tutorial on what are Meta Tags and how to add Meta Tags to blogger.Adding metatags is very important and if you need more traffic from Search engines then meta tags should be given priority.Meta Tags help search engines to Index your site easily,A lot of search engines still rely on Meta Tags .In simple words Meta Tags tell the search engine what is your site all about.

    Follow these simple steps to know how to add Meta tags:
    • You are required to sign into blogger. Then click on Design (layout)
    design section 
    • Now click on the Edit Html 
    edit html section

    • Search for the below code (press Ctrl + F)
     
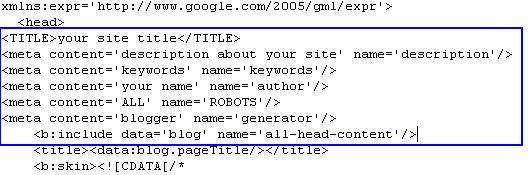
    • Add this code
    <title>your site title</title>
    <meta content='description must contain keywords' name='description'/>
    <meta content='keywords' name='keywords'/>
    <meta content='your name' name='author'/>
    <meta content='ALL' name='ROBOTS'/>
    <meta content='blogger' name='generator'/>
    <meta content='english' name='language'/>
    <meta content='United States' name='geo.placename'/>
    <meta content='x;x' name='geo.position'/>
    <meta content='usa' name='geo.region'/>

    • Note:Adding the  highlighted code  is not essential but its useful in case of some search engines
    • Look at the screen shot on how it looks after adding the Meta Tags
    screenshot
    •   Click on Save Template.Congratulations you have successfully added Meta Tags.
    Note: 1) Always Backup your Template before editing the code
             2)Don't just add any descriptions and keyword.add appropriate 
                keywords    
             3)Never just add just keywords in description
             4)Analyze your Meta Tags using Meta Tag Analyzer,check whether 
               meta tags are added properly

    (Popular incoming searches: how to add meta tags to blogger) 

    Related-Content.g?q= 404 Error 's Solution in Blogger Blogs

    Just after I published an article regarding the "related-content.g?q=" 404 error, a lot of webmasters have been asking questions about it both at the Google Webmaster and Blogger Help Forums to know if there was a solution.

    Update: It does look like that Blogger has finally taken action. They have disallowed the /related-content.g?q= in robots.txt file. So, it is no longer anything worth worrying about.

    Some of them have even asked the same question by commenting on this blog. Despite knowing a solution, I did not tell them because of my reluctance and hope that Google would probably solve this error, which seems very unlikely (like most errors on Blogger).

    The reason for my reluctance was that I was not sure if it was in agreement with Blogger's Terms of Service, violating which, will surely result in a blog being deleted.  I did not wish that Google deleted other people's blogs due to me. Today, I re-read the Terms of Service and came to know that it did not mention anything about this "hack". Although, it is in Google's discretion to change the terms any time to suit their needs, it is probably safe for now to remove the script causing the error. To remove the script, follow the steps given below.

    How to remove the related-content.g?q= 404 Error

    1. Login to Blogger.
    2. Click on Design.
    3. Click on Edit HTML.
    4. Search for </head> in your template.
    5. After locating it paste the following code immediately after the </head>.
    6. <!-- <body><div></div>  -->
    7. Click on Save Template.
    8. An error message like the one given in the image might be shown
    9. related-content.g?q=
    10. Click on Delete Widgets.

    What does this do?
    This removes the Blogger NavBar widget which is the root cause of this 404 error. As the new script inserted to Blogger blogs is added in this widget, removing this would remove the JavaScript too and would thus stop our blogs from linking to non-existent 404 pages.

    How long does it take to work?
    Well, it depends on your blog's crawl rate. If your blog gets crawled fast, Webmaster Tools might remove this error in a week. If that is not the case, it can take up to a month.

    P.S: As an additional benefit, deleting the Navigation Bar widget will reduce the number of errors and warnings in your blog's HTML validation through W3C.

    How to get in Blogger Related Content Search

    The new Blogger Search is still in development stages and Google as always is absolutely quiet on this. However, going by the source of code of the JavaScript inserted in all Blogspot blogs, one can conclusively find a sure shot way of getting included in the Blogger related content Search and benefit from the traffic received.
    Get in Blogger Related Content Search


    A fragment of JavaScript added to Blogspot blogs is as follows:-


    function showRelatedContent(args) {
    var el = document.getElementById('related-iframe');
    if (el.parentNode.style.display != 'none') {
    el.parentNode.style.display = 'none';
    document.onclick = showRelatedContent.prevOnClick;
    return;
    }

    Looking at it, one can obviously see a mention of the "parentNode.style.display !=none" referring to the iframe of Blogger's Navigation Bar which most of the blogspot users "hide" using the css #navbar-iframe{display:none}. So, it appears that blogs that have disabled the Navigation Bar will not show related content. Moreover, going by some preliminary tests, it appears that Blogger checks which blogs have disabled the Navigation bar and on its basis decides which blogs to include in Blogger related content search. This is much similar to the behavior shown by the Next Blog feature in Blogger's Navigation Bar which also only links to blogs that have shown the Navigation Bar. However, for non-competitive search queries, blogs without the Navigation Bar also appear in results. It also appears that recently updated content is given preference in terms of ranking.

    So ultimately, you must unhide the Blogger Navigation Bar if you wish to get included in Blogger Search results. So, it appears that Blogger Team is now playing smart to force people into showing the Navigation Bar.

    Blogger Related Content Search Engine-First Screenshot and Review

    After a lot of speculation over what "related-content.g?q=" was, I have finally come to know why a new piece of javascript was added to all the blogs hosted on blogger. Amazingly, it turned out to be much bigger a feature than I expected.

    The above mentioned JavaScript is added by Blogger to create a Blogspot only search engine to enable users to search updates made by blogspot users related to a particular topic. As an additional plus, it also displays realtime Twitter updates made by Twitter users on any particular topic. It also displays related videos probably from Youtube.

    Blogger_Related_Content
    Edited Image of Google Search. Not actual Blogger Search

    The search results page at this time is nothing but a crude HTML page clearly implying that the Blogger team is still developing it. Moreover, lack of custom styling indicates that there is still a lot of time before this feature goes public. Videos provided are still not linked but show only a thumbnail image. Going by the source code, Google real-time search has been used to display Twitter updates. Links on the result pages are dofollow without any involvement of JavaScript of any kind. Moreover, related-content.g is not disallowed in Blogger.com robots.txt implying that PageRank would certainly pass onto these links.
    Blogger Related Content Search
    This is how Blogger Related Content Search Results look like right now for the search term "Blogger"

    To see this in action, type http://blogger.com/related-content.g?q=[Your Search Query] in your address bar. e.g. If you wish to see content related to this blog, go to http://blogger.com/related-content.g?q=computer-help-tips.blogspot.com.

    Update:15/3/2011: Yesterday on the Blogger Buzz blog, Chang Kim, Product Manager at Blogger posted this:-

    We’ll also be showcasing our new content discovery feature that lets you uncover interesting and related content based on the topics of the blog you’re currently reading.
    Blogger Related Posts Media
    This is how Blogger's Related post and media search will look

    So, now it is official that such a feature is surely going to be added in Blogger. Also, Blogger is going to get an overhauled Wordpress like layout in the upcoming months. Still feel you should be on Wordpress? Nah!

    Read this on: How to get Included in Blogger Related Content Search.

    Solution for blogger XML error BX-bliced messages after upload new templates

    What to do: 1. Download the template you want to upload 2. Get the XML file and open in a WordPad (right click --> Open With --> WordPad). 3. Press “Ctrl + F” and in the search box type widget id 4. In every widget line it will display something like this : widget id='example1', replace that number for a any other one. Example, if the widget says 1, erases it and place number 2 instead. So you will have something like this now: widget id='example2' 5. Do this to all widgets you find in you XML code. When you finish SAVE(Press CTRL+S) 6. Go to Blogger --> Layout --> HTML 7. Upload --> Preview / Save Done! Enjoy it. Update* if you get this error bX-si9ejx, after edited your template, you should delete cookies and temporary internet files at your browser and upload template again.

    How to Insall Live Chat to Blogspot/Blogger

    Instantestore live chat
    Today I found an Interesting software called "Instantestore Live Chat"  The main advantage is that this software is completely free of cost.Although i had added it here,this type of live chat is really useful for people who run 
    E commerce websites.Customers can easily contact support by clicking the chat button.

    Features of Instantestore Live Chat
    • Chat with multiple customers
    • Add multiple chat operators
    • Instant pop-up alert on new chat request
    • 100% customizable live chat buttons
    • Fast & responsive chat system
    How to install live chat?
    Installing this software is a real breeze.just download it from their official website and install it in your PC.After the installation is complete,you get a code which you need to install in your blog/website.For blogger users just add a gadget,select HTML/JavaScript and paste the code.Now Live Chat is added to your blog/website

    You can also choose a variety of Live Chat buttons or Customize it according to your wish.Whenever you are logged in to the software the chat button in your blog/website will go green that means your are online.your customers can easily chat with you without needing a sign-up.

    Note: Requires the Microsoft .Net Framework installed. Don't have it?Download .Net Framework

    How To Make Blogger Fav Icon Appear In Firefox / FF

    fav iconMany a times I have seen people asking questions in the forum that the Fav icon is not appear in firefox(FF) whereas it works fine in IE and Chrome.The problem is with the code your are adding for the Fav icon.I would suggest to create a fav icon for your blog.it can be .png image,32x32px

    Steps you need to follow:
    • Go to the Edit HTML section in blogger and download full template (backup)
    • Find </head> use Ctrl+f  then paste the below code just before </head>
    <link href='https://blogger.googleusercontent.com/img/b/R29vZ2xl/AVvXsEhlsCF-SpBO4VcmTuXQNJRM_CnlnG0AtTBPl4_FJvfmk3pg7_nEyWEc5vKFBDPXdMSidS9UG5fGKprtwVVgFTD8aejF9yy_q0buhkRYut4DxjAd4m_kVNOsmu3mAK17gTynmM_49O1fqBw/s1600/logo2.PNG' rel='shortcut icon'/>

    <link href='https://blogger.googleusercontent.com/img/b/R29vZ2xl/AVvXsEhlsCF-SpBO4VcmTuXQNJRM_CnlnG0AtTBPl4_FJvfmk3pg7_nEyWEc5vKFBDPXdMSidS9UG5fGKprtwVVgFTD8aejF9yy_q0buhkRYut4DxjAd4m_kVNOsmu3mAK17gTynmM_49O1fqBw/s1600/logo2.PNG' rel='icon'/>
    • Remember to replace the highlighted link with the link of your fav icon link
    • Save the template.
    Related post in Blogger buster-<a href="http://www.bloggerbuster.com/2007/07/create-favicon-for-your-blog.html">Where you can host the fav icon in image hosting sites</a>.Whereas I have uploaded the Fav icon in blogger itself

    popular incoming searches:
    Fav icon not working in firefox/FF

    How to Delete a Blogger Blog Permanently

    delete blogger blog
    If you wish to delete your blogger blog permanently,there is an option in blogger to do so.Even if you delete your blog ,blogger gives you a chance to restore it within 90 days if you wish to.You can create another blog at this address using the Google Account you're currently logged in with."
    3 Easy Steps you need to follow:
    • Go to your blogger Dashboard and Click on settings
    setting tab in blogger
    • Under the Basic tab you will find an option "Delete Blog" click on it
    delete blog option in blogger
    • Once you do it blogger will ask your permission whether you really want to delete.
    confirm to delete blog
    • Click on Delete This Blog
    This was an easy tutorial on how to delete your blog.Most of the bloggers know about it but i hope there are many refreshes who will be benefited.Feel free to post in your comments and let us know  why you delete your blog? your reason as a comment below  

    Create a Forum in Blogger using Nabble Embeddable Forum

    nabble forums
    How to create a forum in blogger? This is the question most bloggers ask.There was no such option before, Bloggers use to create a forum and then link to their blogs.With Nabble you can embed a forum in a blog page.I was knowing about Nabble from the past 6 months.although its late i would say better late than never.
    It's really simple to embed  Nabble forums.You got to just copy the code and paste in your blog page,the forum automatically loads

    Steps to install a nabble forum:
    • Fill in the details and choose a forum name and Description
    nabble registration
    forum name and description

    • Click on create Forum.now confirm the registration by clicking on the confirmation link sent to your email 

    • Now they provide you with a code.just copy that code and paste it in your blog page.the forum will load automatically
    Although we have launched our forum which is oh phpBB Platform.Here is sample on how Nabble forums looks.Your comments are always welcomed.Let me know what do you think about Nabble Forums.If you know any other alternative please write down below as comments.


    How To Add Floating Share Buttons Easily In Blogger/Blogspot

    You might have seen cool floating buttons in many blogs and websites.The floating buttons are really useful as the readers can easily share,get email subscription,follow you on various social networking sites.Did you see the Floating button  at Pcpedia? Thinking of adding one such button to your blog.well its very easy .place the buttons in proper position where it will be easily visible.eg: center,left


    Follow these steps:
    1)Get buttons/icons in png format. you may use these (Note: not for commercial use)To use these icons just right click on the icon and select 
       save as. or download icons from DownloadChunks

    delicioustwitterdiggstumbleupomfacebook
    2)Upload these icons to Imageshack, Photobucket or Blogger itself and get the 
       direct link. I would recommend you to upload to blogger as it will help faster 
       loading of pages.if you would like to use the above icons,just right click and 
       select copy image url 
       

    3)Time to add the code.

     Code for twitter button:


     Code for Facebook button


    4)In similar way you can add Digg etc.just add the link to your Digg profile and the direct link of the digg icon.


    5)You can  adjust the position according to your wish .just change left: 4px; to 
       right: 4px;  to get the buttons on the right 


    6) To shift the  position of the buttons  change the value of bottom:350px; to  
        bottom:5px; it depends where you want your buttons to be positioned


    These Floating buttons are compatible with all browsers including internet explorer.What do you think about these floating share buttons.share your views !!


    Also read:How to transform your twitter page online
                   :Add Twitter buttons with counter
    popular incoming searches:
    1)floating facebook button for blogspot

    How to Fix Double Post Problem in Blogger/Blogspot


    Double post problem is not because of your template but it might have happened when you  tried to change the blog template. When you upload a new template for your blog ,Blogger ask you whether you want to delete these widgets or choose to keep it. This option is useful but the problem arises when the Blog1 widget and Blog2 Widget clashes. Blog1 and Blog2 are post widget so the post will appear double.


    In-order to fix this problem. You have to delete  a line of code Follow my steps:


    Note: Remember to backup your template before editing the code.


    1) Go to edit HTML

    2)  Find the below code


    or


    3)  Just delete the second  code 


    Thats it :) hope your problem is solved 


    popular incoming searches:
    1)how to fix blogger double post problem
    2)blogger double post
    3)my posts are getting doubled.

    Increase Traffic by 150-300% with Wahoha- Unique visitors

    doubled traffic

    Tired of submitting your blog to blog directories,rss directories,Bookmarking,pinging ,manual traffic 
    exchange.social networking and bookmarking sites!! well all these sources give traffic but no much and its just temporary and usually bounce rate increases.manual link exchanging does bring in traffic but its not guaranteed.
    now you might be wondering what  else is left and what am i going to post? Magic ! lol noways 


    I'm talking about a simple widget that displays thumbnails in your blog.with some title.This widget is from Wahoha  You may have noticed the widget at pcpedia (The  at the bottom).yes this little widget helps you in increasing your traffic by double.


    What is Wahoha widget and what are the thumbnails all about?
    Wahoha widget simply displays posts from other blogs,websites in form of thumbnails.when you click a particular pic you will be redirected to that blog.


    How does it actually  work?
    how to get traffic
    imgsrc
    For the numbers of visitors your blog sends to other blogs via this widget ,you get around 150-300% visitors from other blogs.Like i said, the thumbnails are nothing but posts from other blogs/site,in the same way your blog post  will be displayed as thumbnails on all other blogs that use wahoha.


    "For example if your blogs sends 100 visitors via this widget ,in return you get  150-300% traffic i.e 250 - 400 visitors"


    How to set up Wahoha for my blog?


    • Create an account an Wahoha 
    • Create a widget ,check on show advanced options to select from the categories 

    • Click on save , copy the code and place it on your blog.wherever you like
    • Now add your blog post at wahoha so that they can be displayed at other blogs 
    How to add post ?
    • Click on the post tab
    • Enter your post url for example (http://computer-help-tips.blogspot.com/2011/01/transform-your-new-twitter-page-online.html)
    • Add proper title and a neat description,select categories add tags
    • Now the most important part is to upload your post picture,add an attractive picture so that it attracts and stands out from the rest of  the pics
    • After this click on submit post
    • The more you add the better return rate you get ,but start with selected posts.
    Features:
    • All visits are unique
    • You can track no of clicks sent and received
    • Widget loads faster so no need to worry
    So why are you thinking, join wahoha and enjoy with continuous traffic 


    Imgsrc

    How to Stop Following a blog on Facebook


    In my previous post i explained on How to transform your twitter page online instantly .today i will post on how to stop following a blog in Facebook.Networked blog has an application that is integrated with Facebook which allows Facebook users to follow blogs from Facebook itself.what if you want to stop following a blog.its pretty simple.follow the steps


    Steps to stop following a blog:
    • Go to Networked blogs (make sure you are logged into Facebook)
    • Scroll down to see "Blogs I Follow
    • Find the blog you want to stop following and just click unfollow
    • Done,you have stopped following a blog