Showing posts with label TechnicalSupport. Show all posts

How to Replace a Computer Processor


You've decided to take the plunge and upgrade your computer's processor. This article will explain how to replace a computer processor.

Collecting Information

1. Before you open your computer, you need to do some preliminary work. Are you planning to upgrade to the next generation of processor? Are you moving from a Pentium III to a Pentium IV or from a Pentium IV to a Core Duo? If so, just buying a processor won't be enough. You will need a new motherboard and RAM memory in addition to the new CPU. You will need to make sure all these parts work together..
If you are upgrading within the same processor family--a faster version of the Pentium III or the Pentium IV or the Core Duo--to replace the one you're using now, you may be able to keep your existing motherboard and RAM memory. But again, you will have to do a little preliminary work.

2. Determine the make, model, and revision number of your motherboard. You will need this information to know what processor speeds it supports. If you bought your computer from Hewlett Packard or Dell or a retailer like Best Buy, call their technical support. Tell them which model you have--whether it's the HP Pavilion a6710 or the Dell Inspiron 530, for example. They should be able to locate this info for you. You could also open the case and look for identifying text on the actual component.


3. Determine the speed and type of your RAM memory. Is it DDR 333MHz? DDR 400 MHZ? It matters, because the speed of your new processor needs to be some multiple of your memory for them to work well together. Example: A 2.33 GHz processor is well matched with 333MHz or 667MHz memory, but not well matched with 400MHz or 800MHz memory. A 2.4 GHz processor is well matched with 400MHz or 800MHz memory but not 333MHz or 667MHz memory.
Note: In most cases, the new processor will still work with your memory. It will just run the memory at a lower but more compatible speed to eliminate these timing issues. You could decide to accept the penalty of course, but it partially defeats the purpose of moving to a faster processor if your memory runs slower.

Changing The Chip

1. You have chosen a CPU your motherboard supports and is an even multiple of your memory. It's time to install it. Disconnect the power and all cables from the back of your computer.


2. Remove the case. Note that older cases like this one use screws. Newer ones have done away with them in favor of an access panel with quick release levers.


3. Remove your graphics and other peripheral cards. Handle them by their edges. Do not touch the contacts on the bottom of the card.


4. Disconnect data and power cables from the motherboard.


5. Remove the screws holding the motherboard in place.


6. Remove your motherboard. Place it on an anti-static surface. In this case, the motherboard is sitting on an anti-static bag that previously contained a different motherboard.


7. Unlatch and remove the heat sink and fan. Note that the hardware holding a heat sink/fan combination in place always seems to change from one generation of processor to the next. The arrangement pictured here is for a Pentium 4 motherboard. So unless you are also upgrading a Pentium 4, you are likely to see a different latching mechanism.
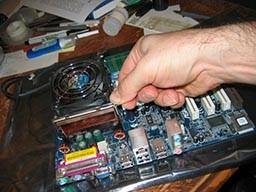


8. Release the Zero Insertion Force (ZIF) lever.


9. Remove your old chip. Be careful to touch it by the edges only.


10. Put in your new CPU and close the ZIF lever. Note that CPUs, whether from Intel or AMD, will have a marking like this arrow and/or a physical shape that assures it will only go in its socket one way.

11. Apply a small amount of heat paste. The purpose of this substance is to make sure there is good contact between the CPU and heat sink so that the latter will draw away heat.

12. Reinstall the heat sink and fan.
13. Return your motherboard to its case and refasten its screws. Plug in data and power cables. Plug in your expansion cards and close the case. You're ready to go again. Only a bit faster.


Warning!

Be careful when handling expansion cards, motherboards and CPUs. Do not touch exposed contacts. Not because it will hurt you, but because it will hurt your components. Your body produces enough static electricity to burn them out. You would be well advised to use a grounding strap. (A grounding strap can be nothing more than a long piece of wire with exposed conductor at each end. Wrap one end around your wrist and the other around some metal object. This will "ground" you, or drain away static electricity.)


Reasons for Hard Disk Drive Failure


         If you've been using computers for any length of time, you should know that one of the most important parts of a PC is the hard drive.Now, it is critical that you understand this - the hard drive is one of the most delicate components in a PC and it can fail.


The worst thing is, when that happens, you could lose your favorite data as well. So it is important to do regular backups of your data to ensure no problems occure.

This article will look into some reasons why hard drives fail and what you can do to protect your stuff.


1. Why Hard Drives Fail

What are the primary causes of hard drive failures? Here's a list to ponder over:

    *      Age - hard drives will grow old and get bad sectors. It is a fact of computer life.
       
    *      Viruses are dangerous programs which can infect your hard drive and make them unreadable. You'd be wise to invest in a good anti-virus program like McAfee VirusScan.
       
    *      Physical damage. If you happen to drop a hard drive, the disk can be severely damaged.
       

2. How to Protect Your Data

Since hard drives can fail, what do you do? Well, the wisest thing to do is to regularly back up your data. I think that backup needs to be stored outside of the hard drive. Here are some backup ideas:

    *

      Using a second hard driveicon. You can buy a second hard drive, install it and use it as a quick backup tool. Of course, it will cost you money.
       
    *

      CD-R/CD-RW or DVD-R/DVD-RWicon. This is the method I'd use. I currently use a lot of DVDs for backing up my own data. A CD can hold up to 650 MB and a DVD up to 4.7 GB. That's plenty, plenty of room.
       
    *      Online Storage. Another thing to consider is online storage. It is also very convenient but you probably only want to choose this route if you have a fast, broadband connection.
       

3. What Data Do I Back Up?

It's important to create a standard list of items that you need to backup. Here is my list:

    *

      Pictures
    *

      Music
    *

      Video files
    *

      Important Documents (e.g. Word, PowerPoint, Excel)
    *

      Internet Explorer or Firefox bookmarks
    *

      Email addresses
    *

      Old email

Tools Required For a PC

Essential Tools Required While Working on a PC


Whenever you start working on a PC, you need to ensure you have the correct set of tools. So here's a short list of essential tools you need to have when working on a PC.

Philips Screwdriver

This is the most important tool for me as a computer hardware enthusiast. All computer parts are connected by screws from add-on card slots to drive bays and PC casings. Remember to get a screwdriver that does not have a magnetic tip magnetized objects inside your PC may damage some circuits.

Cable Ties

Whenever we open up an old PC, we will see mess of wires inside. Here's where the humble cable tie (also known as zip ties) came in really handy. Organize those untidy cables into bundles, route them through specific paths and tie them up. This not only improves the look, it also helps airflow.
 

Tweezers

How are tweezers useful when working with a computer? When you accidentally drop a screw into the deep, dark regions of the motherboard. Use those tweezers to reach into tight spots or for retrieving that lost screw. Tweezers are also used for removing or changing jumpers on hard drives, optical drives and the motherboard.
 

Lint Free Cloth

If you have an old computer, for sure dust would be accumulated inside that PC. This can cause lots of problems - in particular, it can clog up fans and air slots, raising the PC's temperature. Using a lint free cloth you can wipe off that dust from your case or components.
 

Grounding Strap

Static electricity can cause severe damage to electrical components in your computer. Prevent this by using a grounding strap. This is usually a Velcro strap with a metal contact to help discharge any static charge built up on your PC.

How to Reduce the Noise Level in Home PC

3 Ways to reduce noise level in PC

If you have a desktop computer that operates really loudly, there are some tricks you can employ to make the computer operate more quietly.

Reasons for noise in the PC

Usually, the single noisiest component in the PC is the fan. This could be the CPU fan or another fan that is installed in the computer case to keep things cool. The other contributors to noise include the hard disk drive and DVD drive.

Replace The Fan


The first and most important way to reduce the noise level in your home PC is to replace the fan in the computer.Replace the fan attached to the computer case. You can easily buy computer fans for a cheap price and replace them. The CPU fan is something that is not recommended to touch. But if you think that the CPU fan is doing a lot of noise, you can also buy a replacement CPU fan as well.

Get A Better Processor


The another way to reduce the noise level in your home PC is to get a better processor. This might sound weird, but the truth is that when your CPU is slow, it causes lots of other components to chug along, especially the hard drive. That in turn causes heat build up, which forces fans to spin faster, creating more noise. So its better to get CPU and reduce the heat and fan noise in your PC.

Place The PC In A Cool Place


One good way to reduce the noise level in your home PC is to place the PC in a cool environment. When you do that, you reduce heat build up in the machine and prevent the fans from whirring too much to keep the PC cool. As a result, your home PC will emit less noise.

How to fix Keyboard not detected by the computer:


When you use a wired keyboard, you may experience one or more of the following problems:
  • The keyboard is not detected.
  • The keys on the keyboard do not work.
  • Wrong characters are typed.
  • The keyboard shortcuts do not work.
To work around keyboard is not detected, use the following methods
1.      Turn off your computer before troubleshooting. Verify that the keyboard is securely plugged in to your computer. Try another PS/2 or USB port if your computer has more than one, or try the connections on another computer, if applicable. If the keyboard  still doesn't work, then it may be defective and needs to be replaced.


2.      Confirm that the driver software was installed correctly by checking whether there is any error next to keyboard entry in device manager. Some keyboards, especially if they're wireless, require drivers in order to function properly. Also follow the instructions to install any software that came with the keyboard.


3.      Update the driver for your keyboard, if necessary. Open the control panel on your computer, check the hardware settings and then follow the commands to update the driver.


4.      Turn the keyboard upside down to remove any dust, debris or food crumbs. These particles can also prevent the keyboard from working properly. Clean out hard-to-reach areas of the keyboard with an air compressor or a "static-safe" vacuum cleaner.

5.      Fix the keyboard layout if the characters on screen don't match what you type. Select an input language on your computer, then choose the keyboard layout that matches that language from control panel( region and language settings)


HybridPower technology Nvidia Graphics


NVIDIA-based graphics hardware, HybridPower technology is designed to lower the power consumption of your computer. When your computer is performing non-intensive tasks, HybridPower automatically switches off your power-hungry graphics card and enables the onboard graphics chip instead. By default, the HybridPower feature is enabled on all capable systems. If for any reason you do not want this feature, you must disable it from within your system's BIOS.


Follow the below steps to disable hybrid power:
 

  • Save all your work and restart your computer.
  • Look closely at the first screen that loads for a message specifying what key is used to enter the BIOS setup.
  • Press the specified key repeatedly to enter your system BIOS.
  • Use the arrow keys on your keyboard to select "Advanced Chipset Options" and press the "Enter"
  • Select "Hybrid Support" by using the arrow keys and press "Enter."
  • Use your arrow keys to select "Disable" and press "Enter."
  • Press the "F10" key. This loads a "Save and Exit" prompt.
  • Press the "Y" key to confirm. Hybrid functionality is disabled.

Linksys Wireless N Home Router


Linksys Wireless N Home Router

 
With Linksys WRT150N Wireless-N Home Router, you will be able to do more than just share the Internet. Now you can stream video, share files, listen to digital music, and make Internet phone calls from anywhere in your home, with anyone - all at the same time.

The Access Point built into the Router uses the very latest wireless networking technology: Wireless-N (draft 802.11n). By overlaying the signals of multiple radios, Wireless-N's "Multiple In, Multiple Out" (MIMO) technology multiplies the effective data rate. Unlike ordinary wireless networking technologies that are confused by signal reflections, MIMO actually uses these reflections to increase the range and reduce "dead spots" in the wireless coverage area. The robust signal travels farther, maintaining wireless connections up to 3 times farther than standard Wireless-G.

With Wireless-N, the farther away you are, the more speed advantage you get. It works great with standard Wireless-G and -B equipment, but when both ends of the wireless link are Wireless-N, the router can increase the throughput even more by using twice as much radio band, yielding speeds up to 9 times as fast as standard Wireless-G. But unlike other speed-enhanced technologies, Wireless-N can dynamically enable this double-speed mode for Wireless-N devices, while still connecting to other wireless devices at their respective fastest speeds. In congested areas, the "good neighbor" mode ensures that the Router checks for other wireless devices in the area before gobbling up the radio band.

To help protect your data and privacy, the Router supports WPA2, WPA and WEP security features. It can serve as your network's DHCP Server, has a powerful SPI firewall to protect your PCs against intruders and most known Internet attacks, and supports VPN pass-through. Configuration is a snap with the web browser-based configuration utility.

Important Specifications:

Device type:
Wireless router

Wireless Network Standards:
- IEEE Draft 802.11n
- IEEE 802.11g
- IEEE 802.11b

Ports/Buttons:
- Internet: 1 10/100 RJ-45 Port
- LAN: Four 10/100 RJ-45 Switched Ports
- One Power Port
- One Reset Button

Security Features:
- Wireless Security Wi-Fi Protected Access (WPA, WPA2), WEP
- Wireless MAC Filtering
- Firewall, Internet Filter and Web filter
- Internet Access Policy

Supported VPN Pass-through Features:
- IPsec VPN Pass-through
- PPTP VPN Pass-through
- L2TP VPN Pass-through

Other Features:
- Port Forwarding
- Port Triggering
- DDNS
- DMZ
- Quality of Service

Wireless Router

Linksys E3000 High Performance Wireless-N Router

The Linksys E3000 high performance wireless-N router is a powerful dual-band Wireless-N router optimized for wireless entertainment. Connect your Blu-ray players, DVRs, and gaming consoles, and enjoy the smoother and faster HD video streaming and wireless gaming performance that simultaneous dual-band technology enables. A built-in USB port and UPnP AV media server let you share files over your network, as well as stream media content to an Xbox 360, PS3, or other compatible device. Plus, included Cisco Connect software gets you set up in a few simple steps and offers powerful tools for managing your wireless network.


The Router lets you access the Internet via a wireless connection or through one of its four switched Gigabit Ethernet ports. With the built‑in Storage Link, you can easily add gigabytes of storage space onto your network using USB 2.0 hard drives, or plug in a USB flash disk to access your portable data files. The E3000’s built-in media server streams music, video and photos from an attached storage device to any UPnP‑compatible media adapter or player. A variety of security features help to protect your data and your privacy while you are online. Security features include Wi‑Fi Protected Access 2 (WPA2) security which provides encryption for data on your wireless network, a Stateful Packet Inspection (SPI) firewall to block unwanted access to your Router, and Network Address Translation (NAT) technology to protect and allow your entire network to access the Internet using a single Internet IP address.

In addition, you can connect computers or devices to this router by giving them local access (Computers and Devices option)or Guest Access (Guest Access option). Computers and Devices with local access will have access to the Internet and to other devices (shared computers andprinters, etc) on your local network, whereas guest Access allows you to provide guests visiting your home with Internet access only.
For more wireless bandwidth, the Router can create two simultaneous yet separate Wireless-N networks (dual-band technology), one using the 5 GHz band and one using the 2.4 GHz band. For example, use the Wireless-N 2.4 GHz network to surf, e-mail, and print while keeping the less crowded, Wireless-N 5 GHz network free for time‑sensitive traffic like music, gaming, and high‑definition video.

Setup and use of the Router is easy using Cisco Connect, the software that is installed when you run the included CD. Advanced configuration of the Router is available through the provided browser‑based utility.

Important Specifications:
Device type:Wireless router (with extended wireless coverage)
Wireless Network Standards:
- IEEE 802.11n
- IEEE 802.11g
- IEEE 802.11b
Wireless Data Transfer Rates:- Up to 300 Mbps
Ports/Buttons:- Internet: One 10/100 RJ-45 Port
- LAN: Four 10/100/1000 RJ-45 Switched Ports
- One USB port
- One Power Port
- One Reset Button
Security Features:- Wireless Security Wi-Fi Protected Access (WPA, WPA2), WEP
- Wireless MAC Filter
- Firewall, Internet Filters and Web Filters
- Internet Access Policy
Supported VPN Pass-through Features:- IPSec VPN Pass-through
- PPTP VPN Pass-through
- L2TP VPN Pass-through
Other Features:- Port Forwarding
- Port Triggering
- DMZ
- DDNS
- Quality of Service (QoS)
- Disk Storage (via USB port)

Disassembling a Computer

5 Tips for Disassembling a Computer System


Disassembling a computer can be a painful task. If you're planning to slot in a new hardware component or want to look inside your PC, disassembly cannot be avoided.
Here are few tips for making the task pretty easy:

1. Cut Off The Power

This is important. The first thing to do when disassembling a PC is to disconnect your computer from all power sources.

2. Open the Case Slowly

Next, you want to open the computer case slowly. Some PCs slide off the side - and you may need to remove some screws before the cover can come off. Others open in different ways. You need to check your specific computer case.

3. Learn What is Inside the Case

Once that computer case comes off, you need to familiarize yourself with the internals of your PC. If you want, you can take photos. Usually, the things to look out for are you video card, hard drives, sound card, CPU, memory modules.

4. Disconnecting Adapter Cards

If you need to remove adapter cards, e.g. a PCI based sound card, you will need to take note of the screw at the top of the bracket. Remove that screw first, then you'll be able to disconnect the card.

5. Disconnecting Disk Drives

The other point to note is regarding disk drives. Disk drives (hard disks and floppy disks) usually have screws at the side to secure them in the PC's drive bays. Make sure you unscrew those carefully and hang on to the drive while doing it.

Its important to bear the above points in mind when opening up your PC, it will avoid any potential problems that may happen.
 

Inkjet Printers

Top 5 Inkjet Multifunction Printers

Inkjet multifunction printers from Canon, Epson and HP are good additions to any office. A multifunction printer can do all sorts of jobs, from sending and receiving fax messages, making and receiving phone calls, to scanning and printing documents or pictures.
 
Here is the list of top 5 Inkjet Multifunction Printers

Canon Pixma MP500


This multifunction printer from Canon easily duplicates as a scanner and media card reader. The in-built media slot can read almost all digital camera memory card formats, and the PictBridge port allows you take prints directly from a compatible digital camera. It allows two-sided printing with its built-in duplexer that leaves the printed side to dry for a few seconds before it starts printing on the reverse.

Epson Stylus CX7800


Mainly aimed at photography market, Epson�s Stylus CX7800 comes with options to scan slides and negatives; the three media slots that can read almost all of the digital camera memory card formats and the USB 2.0 port allows speedy transfer of image data from your PC. It is also PictBridge compatible. It uses a four pigment-based ink, which is touted to resist fading in the long run.

HP OfficeJet 7410 All-in-One


Priced at a premium, the HP OfficeJet 7410 has everything a small or a big office would ask for. Fax (both color and B/W), copying, photo printing, document printing and scanning tasks are handled well. Wireless networking, a duplexer that saves paper by printing on both sides, wide scanning area, 2.5-inch color LCD panel and blue tooth compatibility add to its attraction.

HP OfficeJet 7210 All-in-One


An All-in-One office assistant, the HP OfficeJet 7210 is with packed features, catering to home or small office needs. Multi-page copying is made easier with a 50-page automatic document feeder (ADF). It reads digital camera memory cards and is PictBridge enabled to facilitate printing directly from your camera. It does, however, lack a color display unit.

HP PSC 1610 All-in-One


Though priced minimally at $130, HP PSC 1610 All-in-One offers every utility a small office needs � printer, copier and scanner. Though it is a bit slow, the prints are of high quality. You can expect standard printing and copying of office documents. It allows direct printing from a digital camera via PictBridge and the media card slots read all major digital camera memory card formats.

Top 5 Video Cards


XFX GeForce 7800 GTX


The XFX GeForce 7800 GTX video card comes with a PCI Express interface, 256MB DDR3 video memory and supports a maximum resolution of 2048 X 1536. Though its price is a bit steep, its one of the fastest video cards on the market right now.
 
Powercolor Radeon X800 GT


A leading manufacturer of video cards, Powercolor has come up with the Powercolor Radeon X800 GT card. It is PCI Express based, runs on 256MB of DDR3 memory and a maximum resolution of 2048 X 1536. Cheaper than many of the cards in this list, but still gives extremely good 3D performance. Great value for money.

BFG GeForce 7800 GTX


Another PCI Express graphics card, the BFG GeForce 7800 GTX runs on 256MB of DDR3 video memory and a maximum resolution of 2048 X 1536. BFG produces quality video cards and the GeForce 7800 GTX is no exception. Its price may scare off the casual user though.

ATI Radeon 9800 Pro

The ATI Radeon 9800 Pro is still one of the hottest selling high-end video cards in the market. The Radeon 9800 Pro graphics processor scores very high on most benchmark tests. With an AGP 8X interface, 128 MB of DDR video memory and a maximum screen resolution of 2048 x 1536, this card is highly recommended.

Connect 3D Radeon X850 XT Platinum

Built on the Radeon X850 XT graphics processor, the Connect 3D Radeon X850 XT Platinum is a PCI Express card that runs on 256MB of DDR3 memory and a maximum resolution of 2048 X 1536. Highly recommended for spectacular 3D performance, and gives the GeForce video cards a run for their money.