Showing posts with label computer. Show all posts

Computer Tips: Troubleshooting "No Sound"

Having a Computer that does not have a sound is kinda annoying, Right? I am sure some of you have experienced it quite some time in your life with computers. And yes, I know what you feel.

Here are some Computer Tips in Troubleshooting "No Sound":

1.) Check your speaker
  • If it is turned on or the cables if it is connected to the correct audio port of your tower, the audio port usually has a color green and could found at the back and front of your tower.


A. Side surround left and right / line in / retasking jack
B. Line out / retasking jack
C. Center channel and LFE (subwoofer) / retasking jack
D. Microphone in / retasking jack
E. Surround left and right / retasking jack
F. S/PDIF digital audio out


2.) Check if the you see the speaker icon on your task bar.
  • If it has a red circle on it it is possible that it is only muted, if yes, just double click on it and the master volume control window will appear and just click on the box beside the "mute all" to unchecked it.
  • If it has a red "x" on it or if you cannot see it, this means that your sound is disabled or has a problem with your sound driver.


3.) To Fix this you need to reinstall the driver. Here are the on How to step to reinstall the driver:

Step 1: Find the driver for your Sound or Audio Device.

  • If you have the driver go to step 2,

Where to find the driver?

  • You can find it on the Driver CD that came with your motherboard if you purchase it separately or if you purchase the whole computer it is on the Restore CD (for branded computer) or contact the Technical support of your OEM (Original Equipment Manufacturer) and ask them for the Sound Driver for the model of your computer (Recommended for Branded Computers).
  • If you do not have the Driver CD and/or you are using a clone computer (Non Branded Computer), you can check the brand and model or chipset of your motherboard and search for the driver in Google (recommended) or other browser and download it.
  • If you purchase your sound card separately it should come with the Driver CD if not go to the website of your sound card and look for the driver of the sound card model you have.

Step 2: Go to Device Manager:

  • To open Device Manager - Go to Start > Control Panel > Click on Systems > Under Hardware Tab click on Device Manager Button


Step 3: Look for Yellow Exclamation point or Question mark on your sound driver.

  • If you do not see any proceed to Step 5.
  • If it is working before then you can see it under [+] Sound, video and game controllers.
  • If your sound card is newly installed you need to check it under [+] Other Devices.

Step 4: Updating of the Driver

  1. Right click on the device that has a Yellow Exclamation point or Question mark then choose update driver.
  2. Choose No, not at this time on the Hardware Update Wizard then click Next
  3. Choose Install from a list or specific location
  4. Choose Search for the best driver in these locations and put a check on Include this Location in the search and browse where the driver is located (if it is the CD , browse to the specific location or drive it is located)
  5. Then Click on next then follow the steps on the window.
  6. If the driver is installed properly then you should have a sound now.
  7. 7. If not Go to step 5.

Step 5: Remove and reinstall the Sound Driver

  1. On the Device Manager
  2. Click on [+] Sound, video and game controllers
  3. Right click on your Sound Device (usually it is Realtek or sigmatel or check the specs of your motherboard) or the one with the yellow question mark or exclamation point.
  4. Choose Uninstall
  5. Then Close all windows and restart your computer
  6. Then repeat the from Step 2 onwards.

You should have sound right now. If not Check for Any errors and search for a possible fix on the internet or do a system restore to an earlier date.

Having a sound is one of the most essential feature of a computer. Specially if you love playing mp3, watching movies or a Gamer.

I do hope this post provides you with the answers or at least point you in the right direction where you can find answer with your sound problem. If you have any questions and suggestion please fee free to leave a comment and I would be glad to answer it for you.

The Boxee Box by D-Link

Ever think convenience where you could get all the great free entertainment from the Internet onto your TV where you can playback your personal collection of movies, TV shows, music, and photos on your living room without having to sacrifice your laptop? Where you could enjoy and share that movie, TV show, remote. All of this power and more is coming in a killer new box from D-Link, The Boxee Box by D-Link - DSM-380 . With the NVIDIA’s Tegra 2 chipset, the Boxee Box is capable of Full HD with an HDMI output.
Whether it’s coming from your local network or from the internet it will make sure local and streamed media it will still looks its best, the Tegra 2 also keeps the menus moving swiftly. It has a dual-sided RF remote control which has straightforward navigation keys on one side and a useful QWERTY thumb.
" Boxee is the best way to enjoy entertainment from the Internet or a computer on a TV. Their free, open source, downloadable software for Mac, Linux and Windows brings all your entertainment into one place - whether it's from the Internet or from your hard drive or home network. Plus, they overlay everything with a heaping helping of social by letting you share what you're playing with friends on Boxee, Twitter, and Facebook.
- as described by the D-Link Website

Specifications

  • Item (WxDxH): 120mm x 120mm x 120mm
  • 1 HDMI Connector
  • 1 Optical Digital Audio (S/PDIF) Connector
  • Composite Audio Connectors
  • Power Button
  • AC Power Connector
  • Ethernet Connector
  • 2 USB 2.0 Connectors
  • SD Card Slot
The Boxee Box by D-Link - DSM-380 is expected to hit the market by November of 2010... 

Video Card Upgrade Tips

A video card, also referred to as a graphics accelerator card, display adapter, graphics card, is a piece of hardware installed in a computer that is responsible for rendering or generating an output or image on the computer’s monitor or display screen.


Video Card Upgrade? Well this is probably the best way to enhance your systems graphics and picture. As a Computer savvy I could say that this on e of the important things you should consider specially if you are a Gamer. Specially, nowadays that most new games needs a load of video memory.

There are certain factors you will have to consider before deciding if you need a Video Card Upgrade. Here are some Video Card Upgrade Tips:

1.) What Video Card Do you have?

This is would probably the first question you have to ask if you are looking for a Video Card upgrade. Most computer motherboard nowadays comes with an integrated Video. One way to check it is by running the DirectX Diagnostic Tool, to open this: Click on Start > Click on Run > and type "dxdiag" > Under display Tab you can see it under "Device" Header.

You may also check it with your invoice if you have a separate video card installed. If you do not see any Video card in your invoice you probably have an integrated video card.

2.) What Video Card do you need?

This is what I think the second factor you should consider in upgrading your video card. We should know what video card you need. For Gamers, the best way to know what video card yo need is to check the system requirements of the game you are going Play or would like to play. This will give you the hint of what video card you need. For non gamers, I would recommend you to at least have a 64 MB Video Memory of any type of video card would good enough. One thing you would like to put in your mind. It is better to have a better video card than less one. At least you save time and money from upgrading again in the future.

3.) What Video Card does your system supports?

This would be the third factor but I think this is the most important factor you should consider in upgrading your Video card. It is useless to have the best video card and not being able to use it. The keyword here is "Compatibility". You should know what your system supports. The first thing to know is the interface of the Video card that your system supports. The best way to check it is by knowing what your motherboard supports.

First you should know if your system can support a PCI(Peripheral Component Interconnect), an AGP ( Accelerated Graphics Port) or a PCI-E (Peripheral Component Interconnect Express).
After knowing what is the interface your system supports.


You will also need to check the power supply you have and the video card's power supply requirements. Video Cards with a PCI and a AGP Interface usually requires a Power Supply upto 300 Watts but there are some High end AGP Video cards that requires 350 Watts to 400 Watts Power supply. But if you are looking for a PCI-E Video Card I would recommend you to have at least 400 Watts of Power supply, but some highend video cards require more than that depending on an video cards requirements. Another thing also for some Advance and Hardrcore gamers that used dual video card the Scalable Link Interface (SLI) for Nvidia and CrossFire for ATI, this technology uses 2 high end video cards to combine its performance in one output. This usually requires at least 700 Watts of Power supply and some may require more. This is recommended for advance users.

4.)Where do we go for Video Card Upgrades?

Video card Upgrades can be purchased in every computer store. I cannot tell which video card to use or buy. I can only say that in purchasing a new video card upgrade, aside from its technical aspects you will need also to consider the price. Spending $100 plus more or less is enough, or if you are here in the Philippines, there are also much cheaper video cards that ranges from 1000 to 3000 pesos depending on your needs. But if you are a high end gamer, spending woung range from $200 - $400 more or less or 4000 to 10,000 pesos more or for the latest and high end video cards. Not to mention you need to upgrade your power supply and the cooling system of your system since high end requires it. Plus before purchasing it, please make that you have checked the video cards specs and reviews online. I would also recommend you to contact your OEM Technical Support or Upgrade Support for recommendations.


Video Card Upgrades is one of the essential upgrades you will be doing for your computer. Although it does not affect much of the speed of your Computer compared to RAM Upgrades. It is also important because if we are using an integrated video it shares with our physical RAM, and by adding a separate video card it will free some resources and will results to an additional speed to your computer.

I hope this Video Card Upgrade Tips have provided you some information or atleast point you to the right direction. Thanks for reading....

Computer Maintenance Tips


With my more than 15 years in computers since High school. I already came across with not all kinds of computers but I believe I have seen and handled most of them. Let me impart to you this Computer Maintenance Tips.

The question here is "Do you want to add life on your computer?".

We may have different uses for our Computer, but as a Computer user we need to maintain it, to have a better and smooth experience not to mention if we are using it to do our work. This is where Computer Maintenance comes in.

Most Computer Users spend a fortune just to have the best computer and the top of the line peripherals. For me I consider that as an investment and I don't blame others for spending that much just to have it. Since I consider it as an investment, I have to protect and take care of my investment.

Here are some basic Computer Maintenance Tips I can share:

1.) Turn off your computer properly
One of the causes of permanent hard drive failure and defect is the the sudden power shutdown. So for your hard drives health, Never, I mean never turn off your computer by pushing the power button or by pulling the plug from the outlet. And in case it hangs, that is the only way to you push the reset button key or if the keyboard is still active just press Ctrl+Alt+Delete keys at the same time twice to restart or reboot your computer.
I would also also recommend using a UPS (Uninterrupted Power Supply), this will give you time to save and turn off your computer properly in case there is a power outage.
Turn off your computer before unplugging any peripherals unless it is "hot swap" enable. This will short or cause your computer to freeze.

2.) Scandisk and Defrag
Running Scandisk and Disk Defragmenter once a month is recommended. This will keep your hard drive healthy and for you monitor its health. Using some hard drive utilities would also be advisable.

3.) Update Antivirus
Install and regularly update your Anti-virus and Anti-Spyware program. This is one of the basic application or program that we must have in our computer specially if you are regularly using the Internet. We must have this application to have protection from viruses and spy wares on the net. We can use some Free Anti-virus and Anti-Spyware program or if you want a premium package your can get it with just a couple of bucks. Either of the two would be good as long as it updates and protects.

4.) Turn on your Firewall
Turning on your Firewall is also advisable specially when you are always surfing. By doing this it will protect your Computer just like Anti-virus and Anti-Spyware program did. Plus it will protect you from unwanted visitors.

5.) Backup
Always keep a backup of your files, data or pictures. This will give you a worry free life in case you computer crashes. Using a Flash Drive or a second hard drive would be recommended. Burning it to a CD /DVD using CD /DVD burner would also be advisable.

6.) Free Space
Do keep at least 100MB free hard disk space or I would recommend at least 500MB Free hard disk space on your computer. This will prevent your computer from choking or hanging when you are open or use an application. This usually happens when you are multi tasking, meaning opening a browser and playing some music or other application at the same time.

7.) Ventilation
Having an Air conditioned room for your computer is recommended, however if you do not have it, just keep or place it in a well ventilated room would be required. One of the worst enemy to your computer is heat. It causes the internal components and chips to wear out. It also lowers the performance of your system.
For most computers it needs a better cooling system. Installing some extra fan or other cooling system would also be advisable.

8.) Direct Sunlight
One of most basic health care instruction and I even read it once in a computer box. Never, put your computer where is a direct sunlight. It raises your computers temperature and may lead to overheating.

9.) Keep it clean
Always keep it clean. Remove the dust. Dust is like a blanket, which keeps the chips of your components nice and hot. The more dust, the hotter they get. The best way is to clean the outer part every day with a soft cloth and for the inside part of your tower a vacuum cleaner hose would be advisable.

Hope this Computer Maintenance Tips help you in maintaining your computer to run smoothly. Computer is one investment we do not want to go into waste. So let us take care of it. As they say "Prevention is Better than Cure".

Clean your PC to Prevent Overheating.

Many times in helping people fix their computer problems, they complain about their computer randomly shutting down without warning. There could be several causes as to what is the cause of the problem, but often I discover that they've never cleaned their computers.

"What? I'm supposed to clean the computer?" they ask.

"Yes, probably at least once every few months." I tell them.

Nowadays most computers have a safe-guard feature built in so if the internal components start getting too hot, then the computer will automatically shut itself off. If over time dust and dirt builds up on the fans and venting areas, it can prevent the natural air-flow that would normally help to cool a computer, and then the computer can start to overheat. So, it's important to try and keep your computer clean and cool.

Tips for Cleaning a Desktop Computer:

Turn off the computer and unplug it. Unplug all of the devices and set your computer someplace with lots of space around it for easy access (such as on a table top).

Slide-off the cover of the computer. This can be a different procedure according to what type of computer model you have, but typically there are a few screws located at the back of the computer that holds the case on that you will need to remove. Once you have the screws out, then the casing cover, or part thereof, should easily slide off.

Look inside the computer and you can probably see lots of dust and dirt built-up on the various components if it hasn't been cleaned in a while. Have good lighting so you can see what you're doing.

Use a can of compressed-air (which most computer shops sell), and give a good blow throughout the inside of your computer, especially the fan(s) and venting areas. Don't hold the compressed air for too long in any one spot, as the compressed air is very cold and it's possible if concentrating on one spot for too long, that it could damage something, so keep moving the spray-can in gentle constant motion while using it so as to not overly "freeze" one spot.

You can use a dry cloth to wipe away dust and dirt, as well as a cotton-swab for those hard to reach areas.

If you have a vacuum-cleaner, you could put on a soft-attachment onto the end of the hose, and using it gently, suck away the dust and dirt.

Just go slow, careful and gentle with the whole cleaning process, and everything should be okay.

Once you're done, slide the cover back on, put the screws back in, plug everything back in, turn the computer on and it should be running a lot cooler now.
----------------------------------------------------------

For Laptops:

Pretty much the same advice I gave for cleaning a desktop computer, except removing the cover can be very difficult for a laptop, or for some laptops the cover is really not meant to be removed, so in this case you would need to try to clean it without removing the cover. So in this case, use a can of compressed air, give a good blow into all of the various openings, and you can still use a vacuum-cleaner on the vent areas to help suck out the dust and dirt too.

Also, in using a laptop, avoid placing it on any soft surfaces, such as carpet or a bed, as this can block the vent areas and cause the computer to overheat as well. When the computer is not being using, I would recommend to turn it off.

Some computer-shops may also sell a type of "cooling platform" that are made for laptops, so that is something else to consider if you use a laptop a lot.
----------------------------------------------------------

Well, there you have it. Keep your computer clean and cool. It will help to avoid overheating problems and extend the life of your computer.
Cheers! :)

Fixing A Microsoft's Windows XP Slow Starting

Windows XP Boots Slowly why

Do you start your computer and then go out for lunch? Maybe...just maybe by the time you get back your computer will be fully booted.

If you want your computer to boot like the day you turned it on for the first time (or even better) just continue reading...

Computers with Windows XP startup slow because of 2 major causes

  1. Your Windows XP computer has too many programs set to start when the computer boots. This is the #1 reason for a Windows XP Slow Startup.
  2. Windows XP needs at least 512 MegaBytes of RAM to startup quickly.

Both of these reasons for a Windows XP slow startup can be fixed by you with having to hire someone to do it for ya.

Too Many Items In Your Startup

Having too many programs set to startup when Windows XP boots is the #1 reason for a slow Windows XP boot (and for your computer being slow after it boots).

Luckily you can fix this issue with a free little program already on your computer...it's called MSCONFIG.

You can load MSCONFIG by following these steps below:

  1. Click Start
  2. Click Run
  3. Type MSCONFIG and click OK
  4. MSCONFIG is now open
  5. Click the Startup tab

On the startup tab you can see every item that is set to startup when your computer boots (every item WITH a checkmark will try to load when your computer starts)!!!

Now it's time to speed this computer up. Uncheck any items that aren't critical to you. If you're not sure what to uncheck then just uncheck everything except your antivirus software.

Click Apply.

Click Ok.

Click Restart.

Related Topics
Pc Tech Support
Optimize your slow pc with pc optimization services
Partner With Technical Support To Have A Hassle Free Web Experience

How to start your computer in Safe Mode

Safe mode is a very important thing In windows operating system , because you would be able to solve Most of your computer problems through safe mode , in safe mode you can run programs that will fix your problem.

You have many options for accessing Safe Mode. The most common technique involves pressing the F5 key down as soon as you turn on the pc. Hold it there until you hear a beep, a startup menu (a list of the computer’s various startup options) appears on-screen, or Safe Mode loads. You can press the F5 key to access Safe Mode directly in all Windows versions. If you favor to access the Safe Mode via a startup menu, you need to press a different key. Users of Windows 98 should press the CTRL key. Windows Me/2000/XP users should press F8.

The method varies slightly if you have more than one OS installed on your PC. In that case, wait for the OS Choices Menu to appear. Select which version of Windows you want to access by highlighting it and pressing ENTER. Then begin pressing the appropriate key (either F5, F8, or CTRL).

You could also end up seeing the startup menu without doing anything. If your computer has trouble starting in Normal mode, for instance, it may reboot to the startup menu automatically. When this happens, the Safe Mode startup option is regularly highlighted as the default selection. This is Microsoft’s way 0f encouraging you to use Safe Mode to fix whatever startup problem you may have.

Related Search
Online computer technical Support
Computer Support – MSCONFIG Command
Easy Way To Get Computer Help
Computer Help and Support

Resolve Your Computer Problems With Online Technical Support

With the availability of thousands of online computer support services, you can easily improve the performance of your slow moving computer and bring it back to life in the convenience of your home. Wondering how?

Simple with the help of online computer support technicians who have the ability to resolve most technical problems related to computer and other technical products. As a customer, you are only needed to pay for the service you want. Online computer repair is increasingly coming up as a preferred choice of customers searching for efficient resources to get their computers fixed. Professionals can take up most of your technical problems through remote control via the Internet, as long as you have a high-speed Internet connection.

You can find online computer help specialists by carrying out a simple search on the Internet. Online resources give you a good idea about the computer support services available. An online computer repair technician can watch everything going on your system along with working on your issues.

With advancements in technology, you can even control the actions taken on your system at any point of time while your support session, just in case you think that there is any security violation. In some cases, instructions are directly given to customers over the phone, and the user has to simply follow these guidelines to fix his/her computer.

Most online computer troubleshooters disconnect the program until and unless you want the program for future use. The entire process of online computer repair is coming into limelight but it is always suggested that you get good references of remote repair company. This will help you to verify company's credentials and ensure security of your valuable data.

Online computer support proves to be of great help to troubleshoot computer issues like nasty computer problems and can help you with other annoying things such as virus removal, software installation, upgrading, disk cleaning, and PC optimization. The success rate is also pretty high when it comes fixing computer through online computer support.

Another advantage of online computer repair is that it allows you to save on money as well as your efforts in long run as you don't require you to haul your system to any local computer repair showroom and the technicians are working from their own location. In fact, they handle everything from a centralized console. So neither they nor you need to go anywhere to search for solutions of your computer errors.

Source:http://ezinearticles.com/?Resolve-Your-Computer-Problems-With-Online-Technical-Support&id=2150626

Resolve Your Computer Problems With Online Technical Support

With the availability of thousands of online computer support services, you can easily improve the performance of your slow moving computer and bring it back to life in the convenience of your home. Wondering how?

Simple with the help of online computer support technicians who have the ability to resolve most technical problems related to computer and other technical products. As a customer, you are only needed to pay for the service you want. Online computer repair is increasingly coming up as a preferred choice of customers searching for efficient resources to get their computers fixed. Professionals can take up most of your technical problems through remote control via the Internet, as long as you have a high-speed Internet connection.

You can find online computer help specialists by carrying out a simple search on the Internet. Online resources give you a good idea about the computer support services available. An online computer repair technician can watch everything going on your system along with working on your issues.

With advancements in technology, you can even control the actions taken on your system at any point of time while your support session, just in case you think that there is any security violation. In some cases, instructions are directly given to customers over the phone, and the user has to simply follow these guidelines to fix his/her computer.

Most online computer troubleshooters disconnect the program until and unless you want the program for future use. The entire process of online computer repair is coming into limelight but it is always suggested that you get good references of remote repair company. This will help you to verify company's credentials and ensure security of your valuable data.

Online computer support proves to be of great help to troubleshoot computer issues like nasty computer problems and can help you with other annoying things such as virus removal, software installation, upgrading, disk cleaning, and PC optimization. The success rate is also pretty high when it comes fixing computer through online computer support.

Another advantage of online computer repair is that it allows you to save on money as well as your efforts in long run as you don't require you to haul your system to any local computer repair showroom and the technicians are working from their own location. In fact, they handle everything from a centralized console. So neither they nor you need to go anywhere to search for solutions of your computer errors.

Source:http://ezinearticles.com/?Resolve-Your-Computer-Problems-With-Online-Technical-Support&id=2150626

Mac App Store will be open starting on january

Apple on Thursday (16/12) announced that the Mac App Store will be open starting Thursday, January 6 2011. "Mac App Store will make the install and update the Mac applications easier than ever."

Mac App Store will be available in 90 countries at launch and will feature free and paid applications for the category of Education, Games, Graphics & Design, Lifestyle, Productivity and Utilities.

"The App Store revolutionize mobile applications," said Steve Jobs, Apple's CEO. "We hope to do the same for PC applications with the Mac App Store with the purchase of PC applications make it easy and fun. We can not wait to start on January 6."

Mac App Store lets you search for a new application, look for a favorite, category search and read the customer ratings and reviews.

"Like the iPhone, iPod touch and the iPad, you can purchase, download and install applications in just one click and start using it immediately."

"Applications that are purchased to run on all of your personal Mac and updates delivered directly via a Mac App Store making it easy to make all your applications up to date."


Mac App Store are available for users of Mac OS X Snow Leopard as a free download through Software Update.
Source : http://id.berita.yahoo.com/

Microsoft version of Windows designed for tablet

Sow annual exhibition Consumer Electronics (CES) next month in the U.S. is expected to become a means of warfare which are now popular tablet. Microsoft was rumored to be a bombshell by announcing the latest version of Windows specifically designed for tablet devices.

The plan was revealed by the Bloomberg web site and the Wall Street Journal on Wednesday (12/22/2010) yesterday. The operating system also will support devices that work with ARM processor. Previously, Microsoft already has a version of Windows that works in artificial ARM processor that is Windows CE, but this software has been a long time age.

The latest generation of Windows CE in question is likely the version that is named Windows Embedded Compact 7. In June, Microsoft had revealed that the launch of the operating system intended for the set top box and slate (tablet), it will be done early 2011.

Microsoft has not been answered on this speculation. No confirmation whether, operating systems are prepared for yablet is an instance of Windows 7 or completely new operating system. To be sure, in July 2010, Microsoft has signed a license with ARM. In fact, Microsoft is allowed to design ARM-based chips such as Apple's A4 chip designed for the iPad.

Platform ARM chip is known for energy efficient making it ideal for handheld and mobile devices that depend on battery life. Vendor smartphones and tablets are now many are using it, including Apple.
Source : http://id.berita.yahoo.com/

NTLDR or NTDETECT.COM Not Found

NTLDR or NTDETECT.COM not found If you find an error that NTLDR is not found when booting. solution:
a. For the type of FAT partition
- Please you to boot from your Win98 floppy and copy the files NTLDR or NTDETECT.COM from i386 directory to the drive stem / root (root) C: \

b. To partition an NTFS type-Enter the Windows XP CD and boot from the CD.
-At options appear first R = Repair , pressthe R key
- Press the number that corresponds with the location of the Windows installation you want to repair.
- Usually # 1 - Enter the administrator password if necessary.
- Enter the following command, where X: is the address of the CD ROM drive.
- Write: COPY X: \ i386 \ NTLDR C \:
- Write: COPY X: \ i386 \ NTDETECT.COM C: \
- Remove your CD and type exit, or just coffee NTDETECT.COM and ntldr from the windows that are still good or your friends and copy to directory C: \ you (make you a slave hdd first).

If the Master Boot Record error then can be corrected with the application Win Image with your HDD records used to be a slave on a windows computer is still good, and then install winimage and in bar disk select the drive letter your windows broken HDD and choose Properties to edit Master boot record and select reset and if there is a warning not hesitate to select yes easily useful.
Reference : http://yogialghofiqhi.blogspot.com

NTOSKRNL not found and HAL.DLL Missing or Corrupt

NTOSKRNL not found
If, NTOSKRNL Damaged or Missing (Missing or Corrupt) If you find an error message as follows: "NTOSKRNL not found" the solution:


- Insert the Windows XP CD and boot from the CD.
- When the options appear first R = Repair, press the R key
- Press the number that corresponds with the location of the Windows installation you want to repair.
- Usually # 1 - Change to the CD Drive you are.
- Write: CD-Write i386: expand ntkrnlmp.ex_ C: \ Windows \ System32 \ ntoskrnl.exe
- If Windows XP is installed elsewhere, change according to location.
- Remove your CD and type exit-only copy ntoskrnl.exe from your friends computer system32 directory to your system32 directory with a record of your hdd on slave made it first on your friend's computer / windows that are still good and his windows same version of SP1 with SP1, SP2 with SP2 and not vice versa.

Hal.dll corrupt missing
HAL.DLL Damaged or Missing (Missing or Corrupt) If you get an error message regarding corrupt or missing hal.dll file, it is possible BOOT.INI file has incorrect configuration (misconfigured). The solution:
- Insert the Windows XP CD and boot from the CD.
- When the options appear first R = Repair, press the R key
- Press the number that corresponds with the location of the Windows installation you want to repair.
- Usually # 1 - Write: bootcfg / list Displays the contents / entries in the BOOT.INI file while in
i-Write: bootcfg / rebuild Improve the configuration of the BOOT.INI file-Remove your CD and type exit.
Reference : http://yogialghofiqhi.blogspot.com

How to fix black screen on startup on your mac book pro?

Long back I've written some thing about Mac I researched a lot on the most talked about problem of the Mac users and I found out that most of the Mac users are facing the problem of black screen at the time of start up.

Most of the time such a problem occurs when we leave our Mac book untouched for a longer duration of time. Its not a regular feature. What I found out, as per my research was, the main cause of such a problem to occur is of corrupted sleep image.

The procedure I followed to delete the corrupted sleep image is:

1)I started my mac in target disk mode.
2)Connected another working Mac via fire wire.
3)Upon starting the working Mac, started the effected Mac book pro too
4)While the effected mac is starting up hold on to the “T” key
5)You will find a external hard drive in the finder
6)Next step is to open the finder in the working mac book pro
7)You will see the effected mac book pro name in the finder
8)Then simultaneously press CMD+Shift+G
9)Type /volumes/name of effected computer/private/var/vm/
10)Delete the sleep image from there
11)Empty Trash.
12)Eject the effected mac
13)Remove the fire wire cable

If every thing goes as per the plan your mac book pro will work fine. But, the most important thing which I would like to mention is to back up your data as soon as the systems starts working fine. Another most important thing is to disable the sleep mode via preference pane, which I forgot to do and lost the data when I was trying to recover from the same problem again. I had to buy a third party mac data recovery software to recover the data.

How to Repair Windows XP Installation

Repair windows xp
How to Repair Windows XP Installation If you are damaged or corrupted when you do not have another operating system to boot, you can do a repair installation , which works as the settings (settings) is the solution:


- Make sure you have the key Windows XP valid.

- If you asked for an administrator password, you should choose the Repair option the second, not the first.

- Insert your Windows XP CD and do the boot from the CD.

- Then will come the second repair option R = Repair, press the R key This will start the repair.

- Press F8 to agree to further process the "I Agree at the Licensing Agreement - Press R when the directory where you installed Windows XP. Usually C: \ WINDOWS. Next will be checked drive C: and start copying files. And automatically restart if necessary. Let your CD in the drive.

- Next you will see a picture of "progress bar" that is part of the improvement, that looks like a normal XP installation normally, including "Collecting Information, Dynamic Update, Preparing Installation, Installing Windows, finalizing Installation" .- When asked, click Next- When asked to enter a key, enter key your valid Windows XP.

- Normally you want to remain in the same Domain or Workgroup computer will restart .- .- Then you will have the same screen as the activation of the system when a normal installation.

- Register if you want (usually not necessary).

- Done Now you can log in with your existing account.

Reference : http://yogialghofiqhi.blogspot.com/

Install Windows XP to Acer Aspire M1641

Finally finished install Windows XP on the Acer Aspire M1641, at the beginning I was confused as well, the first time I tried to install windows xp on acer aspire M1641 computer so confused because after I enter the cd install windows xp there would not load or detect jamming hard drive that happens is a blue screen, after I check it turned out to be sata hard drive, so it means I have to install SATA drivers.
there are several ways that we can do to , which I know  4 steps for install windows xp into acer aspire M1641.
blue screen
Install windows xp Blue screen 
To do the install aspire M1641.

Select one from 4 steps to install windows xp to acer aspire m1641 bellow.

1. Download Flash BIOS SOP to your computer, or place to USB drive.
 (Download Flash Bios Sop Here.) There are two option .
  • Flash BIOS SOP for DOS.
         go into dos and install open DFB file from your directory computer or usb drive in dos... wait until the  upgrade is completed then restart the computer, install windows xp will as usual and will not happen blue screen again  or hard drive is not the detect. here are step by step.
(1)Execute DFB.bat in Dos
(2)After finish flashing BIOS, system will auto-reboot
(3)When system is on post screen,button “F1” to go to BIOS Menu for loading default
(4)When go to BIOS menu,move to item “Load Optimized Defaults” ,button it ,
Dialog : Load Optimized Default(Ok/Cancel)? will pop up and choice “Ok”
(5)After finish step(4),button “F10” , Dialog :Save and Exit Setup (Ok/Cancel) ? will
pop up and choice “Ok”
(6)After finish step(5),system will reboot and flashing BIOS in DOS is finished

or it could be you clone its windows xp from another computer in the form of ata to sata. after we upgraded flash bios sop, then windows xp should work, after that we install its drivers according to the spec motherboards.

  •     Flash BIOS SOP for Vista.
       Please follow up the step flash biossop.pdf from your current download directory.

2. Using a floppy disk, copy and extract the files into the floppy SATA drivers.
You can use the internal USB Floppy Disk or Floppy disk. Please note if you use an internal floppy disk, you must open the seal ACER on your CPU casing. If the seal is open, then your warranty will be void (void). Then when install XP after booting from CD press F6 to install third party drivers. The computer will automatically load the SATA drivers. Once installed the SATA drivers, then follow the installation instructions of Windows XP.

3. ACER Aspire M1641 is available on the internal memory card reader.
Besides Using the floppy disk you can use Secure Digital Card (SD Card). Just like floppy disks, copy and extract the SATA driver files into the SD card. Then Insert the SD card into Internal memory card reader. Next steps are used together with the tips first.

4. The next step is to combine the master windows XP with the SATA drivers.

For this step we need the software nlite (Download nlite here). Before installing the nlite, first make sure your PC already has Microsoft net.framework. If you do not have microsoft net.framework, download HERE
Install microsoft net.framework first, only then nlite install it.

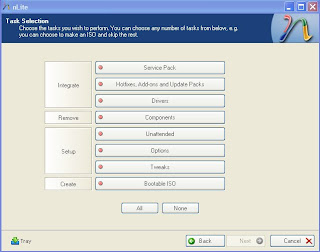
After the nlite installation is successful, open the program nlitenya, then click next, will appear the following picture:
nlite step 1

Browse for your windows XP master who would you combine with SATA drivers Acer M1641.Then click next, until the image appears as below:

nlite step 2


On the menu select the Driver integrate and to create the menu select the bootable ISO
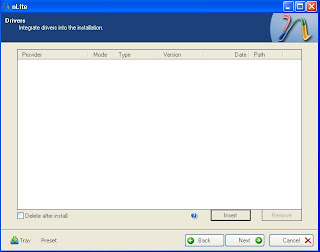
click next, and a new window will appear as below:

nlite step 3


select Insert>> single driver>> and select the SATA drivers you've downloaded
click OK and it will appear like this:
nlite step 4
Click next and wait for its processes.
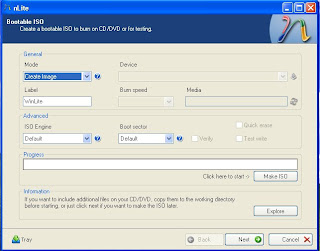
When you're done, click next again and it will appear the following picture:
Click on the make an ISO and select the ISO file it will you save on your hard drive.
then click next.
nlite finally step
Wait until the process is complete. If you've completed a Master Windows XP means you already have in it the SATA drivers Acer M1641, now an ISO file should you burn to a CD, can use nero or other burning tools.

After burning is complete, your XP CD master can be used to install the Acer M1641. without clicking F6 or F2, will perform a normal install.

DOWNLOAD LIST :
1. Flash Bios Sop Download here.
2. Nlite Download here.
3. microsoft.net Framework Download here.

11 uses for an old PC

I found this artcle from webestigate, i feel this article so interest for my this blog, so i get this and post. I hope www.webestigate.com not angry :).

11 uses for an old pc.

You can do plenty of things with an old PC besides sending it to the recycling heap. Let’s take a look at a few ways you might put that old system to work.
 

1. Convert It Into a NAS or Home Server

If you’re running a home network and have multiple users – you, your spouse, your kids – reuse as network-attached storage or even as an actual server may be just the ticket for an old system.
You can turn your old PC into a network-attached storage device with FreeNAS or Mikrotic server. However, it’s not just a matter of plugging an old PC into a network connection and starting it up. Most desktop systems aren’t configured to be effective servers or storage systems. For one thing, they probably use too much power. You’ll want to set BIOS power management to run cooling fans in quiet mode, if that option exists. You’ll also need to set up the operating system so that it doesn’t shut down at inconvenient times, yet run in a low power state when it’s not being actively used.
Bear in mind that you’ll probably want to run your server “headless” (that is, without a monitor), and sans keyboard and mouse as well. While you’ll need a display and input devices for the initial setup, make sure the system will work properly without them. Having a scheduled reboot hang because the system halted during startup (it couldn’t find a keyboard, perhaps) is annoying, to say the least.


Also, the operating system is likely not well suited for storage applications, particularly for multiple users. While Windows XP, Vista, or Windows 7 can function well as a storage repository for a couple of users, you’ll want to take the time to create user accounts for each person who might need access. In some cases, you may want to set storage quotas.
You could also use Windows Home Server, but it’ll cost over $100.A better solution would be to install a proper network operating system. One choice is Windows Home Server. However, that will cost you somewhat north of $100, and WHS may prefer newer hardware. An alternative is FreeNAS.
FreeNAS is open-source software designed to turn a PC into a network-attached storage device. It’s based on FreeBSD, a UNIX variant. If you’re uncertain whether you want to commit to an unfamiliar OS, FreeNAS can be downloaded as a LiveCD version. This is an ISO file which, when burned to a CD, will boot off an optical drive and run completely from memory. You can keep your old OS on the hard drive until you determine if FreeNAS is suited to your needs.

2. Donate It to a Local School

If your PC isn’t too archaic, consider donating it to a local school or daycare center. Worst case, it could go to the high school computer lab (most schools have one) and be used as a test bed, to take apart and reassemble. Alternatively, the school district computer services group might use it for parts, though it’s been my experience that many school district IT groups tend to shy away from used gear, given the unknown pedigree or wear of older hardware.
If you donate it to a daycare or child development center, consider buying some low-cost educational software packages and preinstalling them before handing the system over. Also, as with selling a system, you’ll want to remove all software that you’ve reinstalled on your new PC. And make sure to include all license information for the software you’re preinstalling on the old system.

3. Turn It Into an Experimental Box

You’ve heard about this Linux thing, and maybe you’d like to give it a whirl. But the thought of trying to create a dual-boot system on your primary PC leaves you a little green around the gills. Now you can experiment to your heart’s content on your old box.
Check out Ubuntu, the sexy Linux distro that geeks love to, well, love. The neat thing about Linux is all the built-in support for older hardware, so installation is usually easy. In fact, installing Ubuntu is sometimes simpler than installing Windows. And there’s a wealth of free software for Linux just waiting to be tried out.

If you think you’ve got the tech savvy and a bent for tinkering, you might try creating a Hackintosh – a PC that can run MacOS X. It can be done, but it does take a fair amount of effort. The main hackintosh site is a good place to start, but expect a long and somewhat bumpy trip. Oh, and you’ll have to pony up a few bucks for a legal copy of MacOS X.
In addition, a number of true UNIX-based operating systems are available, ranging from FreeBSD or PC-BSD (based on the Berkeley UNIX version) to OpenSolaris, based on the Sun Microsystems version of UNIX.

4. Give It to a Relative

I do this all the time. My brother-in-law has modest computing needs. So I’ll often just hand over one of my two-year old PCs, though I’ll usually drop in a midrange or entry-level graphics card.
I don’t generally recommend doing this with your kids, though–at least, not if your kids are like mine. They often need as much or more PC horsepower than I use on a regular basis (outside of gaming and photography, anyway). My older daughter is a dedicated photographer, and makes heavy use of Photoshop, while my younger daughter has become a pretty hard-core gamer (she recently asked for a copy of Borderlands for her birthday).
Giving a system to family members can be fraught with peril, though. That’s because you are now the go-to person for tech support. So you’ve been warned: Give a PC to a friend or relative, and you’re now on call.
One thing you’ll definitely want to do is completely erase the hard drive and reinstall the OS from scratch. If it’s an off-the-shelf system from a major manufacturer, restoring it to its original condition from the restore partition or restore disc accomplishes the same thing.

5. Dedicate It to Distributed Computing

Want to do a little good for humanity? How about dedicating your old PC to one of the various public distributed computing projects?

The best known is probably Folding@Home. Folding@Home uses computing resources from all over the world to help study protein folding, an essential element to understanding how many diseases operate. If your old PC has a fairly new graphics card, that hardware can often pitch in as well, and offer up even more computing resources. Other distributed computing ventures include:

6. Use It as a Dedicated Game Server

Do you have a favorite multiplayer game? If so, check and see if it’s a game where you can host a server on a local computer – you might consider making your old system a dedicated game server. Most multiplayer games capable of playing online often support dedicated servers. I ran a Civilization 4 “pitboss” server for a few months.

The neat thing about many of these dedicated game servers is how little system horsepower they actually need. I ran a Freelancer server on an old Pentium 4 laptop system, at times supporting eight simultaneous users, with no performance issues.

7. Use It for Old-School Gaming

Related to the idea of using an older system as a dedicated game server, consider repurposing that box for old school gaming. You can go as nuts as you want. For example, install Windows 98, so you can run those older Windows 95 and DOS games, if you have a bunch around. Note that this isn’t as necessary as it used to be. Online services like Steam and Impulse are offering older games that have been rewritten to work under newer operating systems, and DOSBox lets you emulate a legacy DOS environment to get your classic gaming fix.
Perhaps the most complete site for older PC games is Good Old Games. GoG, as it’s often called, offers a large number of older titles, all of which work fine under newer operating systems. So if you’ve always wanted to go back and play Planescape: Torment, now is your chance.

If you want to go really old school, install MAME (multiple arcade machine emulator) software. That will allow you to play arcade games and games written for older game consoles, provided you have access to the ROMs and other related files to run the games. MAME can become a gigantic time sink (albeit a very fun one), so you’ve been warned!

8. Make It a Secondary Computing Server

If you’re a content creator using a title like 3dsmax, Adobe After Effects or Sony Vegas, having another PC to help with distributed rendering chores can greatly speed up final renders for complex projects.
Each application handles distributed rendering a little differently, so you’ll need to consult your documentation. But typically, you’ll install a lightweight application on the secondary rendering system, which will take data and commands from the primary system and then return results when done. The main application on your production system, or a separate manger app, manages the rendering across multiple networked systems.

9. Set It Up as a Light-Duty ‘Living Room’ PC

We have a small PC in our living room that’s often used for quick Web surfing and to check e-mail. Occasionally, our kids will come down and do homework on the communal PC when they get tired of being cooped up in their rooms. This can work particularly well if you have networked storage somewhere in the house, so people can get to their files whether they’re on a personal system or a communal one.
If you do have this type of communal PC, your first inclination might be to create separate accounts for each person. I’ve found this isn’t really necessary. Since it’s communal, no one really keeps private information on it.
The flip side is that you’ll want security software that’s as bullet-proof as possible. Since you have multiple users on one system, eventually someone, sometime, will hit a Web site that may attempt to download a Trojan horse or other malware.

10. Salvage It!

If you have a do-it-yourself bent and build your own systems, you may reduce the cost of your new system by salvaging parts from the old one. Good candidates for salvage include the case (if it’s not a proprietary, prebuilt system), the optical drive, the power supply, and, sometimes, the memory modules.
Depending on how much you actually reuse, the distinction between new system and one that’s simply been upgraded is a hazy one. If you replace the motherboard, CPU, memory, and primary hard drive, but keep the case, power supply, optical drive, and graphics card, is that a new system, or one that’s been upgraded?
That will still leave you with a few old parts. Which brings us to our final point.

11. Sell It

Somewhere on eBay, someone is looking for a computer. They may not be able to afford a new PC, or are looking for a second PC for the family. Your old PC, at the right price, may be just what they need. Assuming it all goes smoothly, everyone wins: You unload your old hardware, which finds a good home with a new user who can appreciate it.
However, it’s not as simple as selling it at a garage sale. For one thing, scammers cruise both Craigslist and eBay, looking to convince unwary buyers to take deposits that mysteriously vanish when you try to cash them. Always be suspicious of anyone who wants to use Western Union and has an overseas address.
My general rule of thumb is to stick to selling locally (if it’s Craigslist) and only in the United States, if its eBay (since I live in the U.S.). Also, using an escrow site like Paypal (required for eBay anyway), gives you a sense of security, though clever scammers still manage to take advantage of Paypal.
As we’ve seen, an old computer can have many uses, particularly if it’s still in good working condition. And not all uses for a PC require quad-core systems with high-end graphics. So if that old system is sitting in a closet somewhere, dig it out and put it to use. Who knows? It might be your PC that identifies the signal that’s the first sign of intelligent life outside our planet.

Wireless Used for American Farm

Wireless is now a necessity used for American Farm, that's true?
Wireless is a term used to describe telecommunications in which electromagnetic waves (rather than some form of wire) carry the signal over part or all of the lines of communication. Some monitoring devices, such as intrusion alarms, using acoustic waves at frequencies above human hearing range, is also sometimes classified as wireless.

Wireless transmitter was first aired on radio telegraphy early 20th-century use (morse code). Later, as modulation allows to send voice and music via wireless, the media was then called "radio." With the advent of television, fax, data communication, and effective use of a larger portion of the spectrum, the term "wireless" has been resurrected.

Wireless Internet hot spots, or WiFi, not just for coffee shops and airport terminals again, U.S. researchers said the technology has a place in the American farm. Researchers at Texas A & M University, said wireless technology is increasingly used in agriculture to help produce better crops, generate more income for farmers and provide a superior product in stores for consumers, said the university release.

Texas rice farmers will benefit from the technology, scientists say.

"We are working on systems that use wireless sensing in rice production," said Lee Tarpley, Texas AgriLife Research plant physiology.

"We want to continue to monitor the field conditions such as temperature and soil moisture, and using sensors allow us to do that. We can put them in the field and collect data from their entry on our computers," said Tarpley.

As a wireless sensing network commercially available, Tarpley said they would help farmers make crop management decisions.

"We can not do it using a wired network which is more typical sensing because of the cost of running wires to the field would be too expensive," he said.
Source : http://id.berita.yahoo.com/
cisco linksys wireless-g

Cisco-Linksys WRT54G2 Wireless-G Broadband Router.
See detail here
wireless n usb adapterMedialink - Wireless N USB Adapter - 802.11n - 150Mbps - 2.4ghz - Windows 2000 / XP / Vista 64-Bit /128-Bit Windows 7 Compatible.
See detail here
wireless network adapterXbox 360 Wireless Network Adapter A/B/G & N Networks.
See detail here


Asus Bamboo Newest Version

[Asus Bamboo Newest Version] Asus Bamboo Latest Version
asus bamboo


REPUBLIKA.CO.ID, JAKARTA - ASUS launched its new Bamboo Series notebook, U43Jc Bamboo, to increasingly assert its commitment to caring for the environment (green values).

Advanced products from Bamboo series first launched in 2008 is equipped with a dark brown exterior bamboo that are not processed by excessive to maintain a natural appearance, character, and flexibility.

Selection of bamboo is also supported research that identifies it as a quick resource that is updated, and utilization of almost no impact on the environment.

Bamboo also has a flexural strength Setra with iron, making it appropriate in lieu of plastic. Packaging products are also environmentally friendly, made of 100 percent pulp and fabric "non woven" natural that can be recycled.

"This time we show a more eco-friendly notebook. We use that can be recylce ingredients," said Juliana Chen, Business Development Manager of ASUS Indonesia.

Laptop-sized 14-inch screen is equipped with 2 megapixel camera. Weighs 2.1 kg with 8 cell battery lasting up to 10.5 hours. This product uses a USB 3.0 environment-friendly because it can recharge gear faster than USB 2.0 and requires less power.

ASUS Bamboo using the Altec Lansing speakers with SRS Premium Surround Sound.

The product is available in the country this month and sold at approximately 1209 dollars.

In addition to launching the Bamboo, the ASUS two introduce two other notebooks, the ASUS NX90JQ and N43JF.

NX90JQ is the world's first notebook equipped with "dual touchpad," which placed flanking the keyboard "chiclet". This product is also the world's first notebook that has the speakers flanking the 18.4-inch LED backlit display full HD 1080p (1920x1080).

This product is equipped with ASUS SonicMaster technology, an innovative hardware and software development results in collaboration with Bang & ICEpower.

Meanwhile, ASUS N43Jf is a multimedia notebook. This product also features technology SonicMaster. Magic Video technology Equipped with 72 frames in 1080p HD resolution.

Both notebooks also use the USB 3.0 to ten times the speed of USB 2.0.

ASUS provides leading after-sales service, with two-year global warranty for notebooks.
Here The Product :
1. ASUS U43JC-X1 14-Inch Bamboo Laptop (10 Hours of Battery Life)
15/11/2010 - Price: $999.00 See detail here, 

2.ASUS U43JC-A1 14-Inch Bamboo Laptop  15/11/2010 -  Price:$1,049.99  See detail here

Google Introducing Google Buzz

 Monaco: The company famous search engine in cyberspace, Google, introducing a new product called Google Buzz on Tuesday last. Users of this system can easily share information, messages, photos, etc. to friends and relatives in Gmail (Google's site mailbox). Steps are taken to compete with two giants of social networking sites Facebook and Twitter [read: Google Recommend Google Buzz].
On the other hand, Google has denied that the launch of Google's social networking Buzz intended to rival Facebook, which has dominated the field. This is reinforced by a statement from a Google executive who said they were not competing to beat any social network.

"We see a business opportunity in the field of social networking. But the reason we developed Google Buzz merely to take the opportunity and do not intend to compete with anybody," said Google's Product Development Chief Hugo Barra, as quoted by Zeenews, Thursday (11 / 11).

Known previously, Google has also been issued a social network Orkut is popular in Brazil. Unfortunately, a failure to tap markets in other countries. Surce : http://id.berita.yahoo.com/